
 |
by
Ken
Yee


Level: Intermediate
Works with: Lotus Domino Toolkit for WebSphere Studio
Updated: 06/02/2003
Inside this article:
Creating a Web project in WebSphere Studio
Creating administration pages
Session variable security
Container-managed security
Deployment to a J2EE server
Related links:
Sample code from the Sandbox
Integrating Amazon Web Services with your Notes databases
Integrating Amazon Web Services with JavaServer Pages
Lotus Domino Toolkit for WebSphere Studio Beta
Amazon Web Services SDK download
Domino/JBoss SSO Web page
Get the PDF:
 (894 KB) (894 KB)

|
 |
If you've been following along with this article series, remember that in our first LDD Today article, "Integrating Amazon Web Services with your Notes databases," we described how to integrate Amazon Web Services with a Domino application to query the Amazon.com search engine. In Part 2, we told you how to build the same application with JavaServer Pages and a few other J2EE technologies. In Part 3 of this article series, we use the Lotus Domino Toolkit for WebSphere Studio to create a Web application using the Domino database that we created in Part 1 of this series. Applications created using the Lotus Domino Toolkit for WebSphere Studio run on any J2EE subset server that supports JavaServer Pages (JSPs) and servlets, including WebSphere Express and Apache Tomcat.
The Lotus Domino Toolkit for WebSphere Studio includes the Domino custom JSP tags for access to various Domino objects; these tags integrate with WebSphere Studio. (The toolkit does not work with Eclipse, even though WebSphere Studio is based on the Eclipse framework, because the toolkit uses some WebSphere Studio features.) The integration with WebSphere Studio allows you to open a Domino database and drag and drop Domino design elements into JSPs in WebSphere Studio; the integration automatically generates the correct JSP custom tags, so you don't have to worry about getting the syntax correct. In this article, we show how this integration lets you create a Web application that displays the Amazon.com books from the database we loaded via Amazon Web Services and that lets you categorize documents as an administrator.
You can download code samples for this article from the Sandbox.
Application structure
As you discovered in Part 2 of this article series, "Integrating Amazon Web Services with JavaServer Pages," you have to program many of the "niceties" that Domino handles for you when Domino serves a database on the Web, including view paging, logins, and document editing. You separate viewing from editing by dividing your Web site into sections that are visible to all users and by creating a separate section that only administrators can access so they can edit/delete documents (in our case, links to books on Amazon.com). Note that, because the data is in a Domino database, you can save a significant chunk of development time by doing the editing in a Lotus Notes client. However, this article shows how the administrator's section can be built using the Domino custom JSP tags for completeness.
If you follow this article, you will also create an application using two security techniques that keep the application portable: session variables and container-managed security (a.k.a., declarative security). The session variable technique is the most portable because it requires very little from the J2EE server and, in fact, is used in other Web development environments from Active Server Pages (ASPs) to Cold Fusion to PHP. When a user completes a login form, the user's authentication information is looked up and the user name and roles are stored in the user's Web session on the server; if this session information does not exist, the user is not logged in. One benefit of this technique when used with Domino is that you can look up a user's roles in the Notes/Domino database the user is trying to access, instead of tying it to the J2EE Web application. The negative of this technique is that a piece of code to check for a valid login must be included at the top of all "secure" pages; if this is not done, any user can access that page.
Container-managed security, as implied by the name, is managed by the J2EE server on which your application is run. In your Web application's web.xml file, you declare which roles are available for your application, which URLs are secure, and which roles are required for the secured URLs. Management of users and roles is handled in the J2EE server's administration tools. Because Notes/Domino databases are secured by Domino security, even when a role is assigned to a user in the J2EE server, the user who can edit a Notes/Domino document must have valid access rights to the database, so you have an extra layer of security when using Domino custom JSP tags.
The JSPs needed for our Web application include:
| JSP | Description |
| login.jsp | Login page for session variable security |
| doLogin.jsp | Page that processes the actual login and returns the user to index.jsp if successful or to login.jsp if unsuccessful |
| logout.jsp | Logout page used to flush all session variables related to login |
| index.jsp | Read-only view displaying all books in Added state for non-administrative users |
| showBook.jsp | View book page |
| checkLogin.jsp | Included in all pages for session variable security; used in container-managed security to load login information into the same session variables as session variable security |
| admin/index.jsp | Administrator view of books which allows deletion of books and displaying books in each state |
| admin/editBook.jsp | Edit book page for administrators only |
Creating a Web project in WebSphere Studio
This section assumes that you already installed the Lotus Domino Toolkit for WebSphere Studio. You can download the Beta version of the Lotus Domino Toolkit for WebSphere Studio from LDD.
Note: As of this writing, the Beta of the Lotus Domino Toolkit for WebSphere Studio includes Domino custom JSP tags that do not fully work (specifically, the form/field tags) on J2EE servers besides WebSphere. It's expected that this is a bug in the Beta instead of a hardcoded dependency on WebSphere given that Lotus is promoting use of the Domino custom JSP tags on all J2EE servers.
After installing the toolkit, open WebSphere Studio and create a new Web project. Make sure you select the Include Domino Custom Tags Library option in the Web Project features window. When you create the project, the Domino Toolkit automatically configures your project with the tag library (TLD) files for the Domino custom tags and adds the necessary Domino custom JSP tag JAR files to your project's classpath.
Creating a JSP
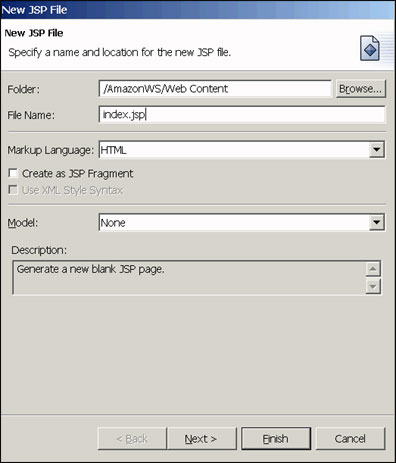
Now you are ready to create your first JavaServer Page. Create a new JSP file by choosing File - New. The New JSP File dialog box opens. Check the location to make sure it's the correct one:
Click Next and select the Domino JSP custom tag libraries from the Select a Tag Library dialog box.
Note: You have to enter the prefix before you can select the checkbox; the prefix field is located after the checkbox, which is a bit confusing. After doing this, click Next or Finish and use defaults for the rest of the page options. WebSphere Studio generates a starter page that includes tags for initializing the page, a style sheet reference, and tag library includes.
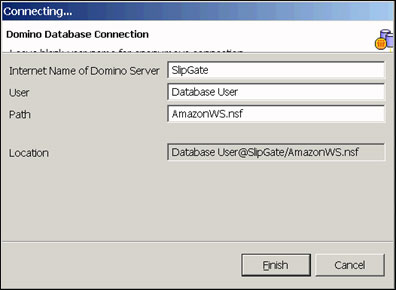
Now you can add a Domino view. First open the Domino database browser pane by choosing Window - Show View - Other and selecting Domino. Click the new database menu item and enter the Domino server name (the DIIOP task must be running on this Domino server), the user name to log in as, and the AmazonWS.nsf database you created in Part 1 of this article series.
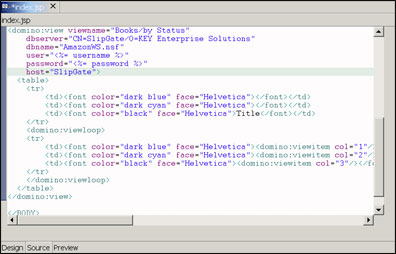
Position the cursor before the </BODY> tag, then open the Domino database browser for the AmazonWS.nsf database. Find the Books\by Status view. Right-click the view and choose "Add form/view to Web Page" from the menu. WebSphere Studio inserts the appropriate JSP tags to display the Domino view in your JSP. You can also drag and drop the view onto the JSP, but be aware that the view is inserted wherever your cursor is, not where you drop the view. This is what the result looks like:
You can now look at the results of this. Don't use the Preview tab in the JSP editor however. This only shows you what the static HTML looks like and is fairly useless when you have live custom JSP tags on the page. Instead, look in the project file hierarchy pane on the left, then right-click the JSP file and select Run On Server. Choose the WebSphere Test Environment (this requires an extra 145 MB of memory, so you should have at least 768 MB on your system for development or it will be slow). After you do this, you are rewarded with your first usage of the Domino JSP custom tag library:
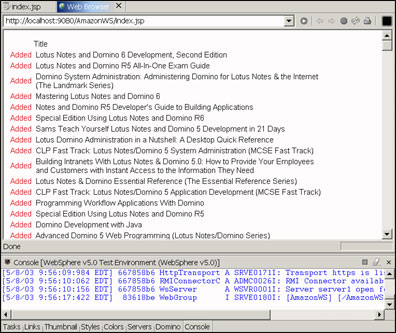
Although this shows everything in the view, the code generated by the WebSphere Studio Domino custom JSP tag integration has a few limitations. You have to add category handling (replacements for Notes twisties) and view paging.
Paging a View
First, let's add paging support to the view. You can do this by adding the lines in boldface to the index.jsp file:
<domino:page id="pagelist" rows="10">
<domino:viewloop>
<tr>
<td><font color="dark blue" face="Helvetica"><domino:viewitem col="1"/></font></td>
<td><font color="dark cyan" face="Helvetica"><domino:viewitem col="2"/></font></td>
<td><font color="black" face="Helvetica"><domino:viewitem col="3"/></font></td>
</tr>
</domino:viewloop>
<domino:pageprev/> Page <%=pagelist.getPage()%> of <%=pagelist.getPageCount()%>
<domino:pagenext/><br>
</domino:page>
The first tag adds paging support to the view that's displayed. The <domino:pageprev/> tag automatically adds a Previous link if you're not on the first page. The <domino:pagenext/> tag automatically adds a Next link if there are additional pages. These links disappear when you expect them to on the first and last pages! Unfortunately, as of this writing, the same can't be said about the <domino:pagefirst/> and <domino:pagelast/> tags. You can hide these links by adding this bit of code after the <domino:pagenext/> tag:
<% if (pagelist.getPage() != 1) { %>
<% } if (pagelist.getPage() != pagelist.getPageCount()) { %>
<% } %>
As you can see, you can mix Java in the same page with the Domino custom JSP tags, though it's generally not recommended because it makes the JSPs harder to maintain and less readable. We can replace the Java if statements using the Domutil tag library to avoid problems with matching Java curly braces, but it requires a few more lines:
<domutil:if>
<domutil:condition>
<%=pagelist.getPage() != 1%>
</domutil:condition>
<domino:pagefirst/>
</domutil:if>
<domutil:if>
<domutil:condition>
<%=pagelist.getPage() != pagelist.getPageCount()%>
</domutil:condition>
<domino:pagelast/>
</domutil:if>
Adding search to the view
One great reason to use Domino back-end databases to store the information for your Web site is the full-text search facility that is part of Lotus Notes/Domino. Adding the ability to search the view is easy. After the <BODY> tag of the index.jsp page, add this snippet of Java code:
<%
String searchstring = request.getParameter("search");
if (searchstring == "") { // domino:view tag blows up if you feed it a blank search string
}
String searchdefault = searchstring;
if (searchdefault == null) {
}
%>
This code creates two variables used later in the page for enabling search. The <domino:view> tag has a ftsearch parameter. The view is search-enabled by adding this parameter to the <domino:view> tag as shown in boldface:
host="SlipGate"
ftsearch="<%=searchstring%>">
Finally, after the </domino:view> tag, add this small search form:
<domino:preserve name="search"/>
<form method="get" action="index.jsp">Search: <input
name="search" value="<%= searchdefault %>"></form>
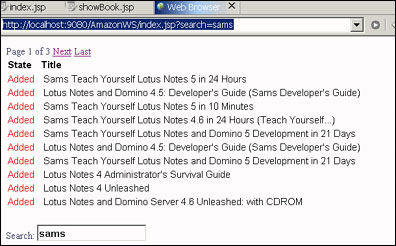
Note the use of the <domino:preserve> flag. The Domino custom JSP tags hide some of the implementation of paging from you by invoking URLs with hidden parameters to do the paging. By using the <domino:preserve> tag, you tell the Domino custom JSP tags to keep your parameters when it generates its URLs for view paging. In our example, if a user is searching for Sams and clicks the next page, you want the results of the next page to be the next set of search results for Sams instead of the next page in the view without any search criteria. Here's what our Web page now looks like with the search form in place:
Linking documents to the view
Now that you have a view that anonymous users can use, you need to add links to each view entry so that users can look at the details of each book. This is easily done using the <domino:formlink> tag. All you have to do is surround the appropriate column of each view entry with the tab and link to a JSP that you designed to display the document:
<domino:formlink href="showBook.jsp">
<domino:viewitem col="3"/>
<domino:formlink></font></td>
After you do this, you can display the view page in the browser, and it looks like this:
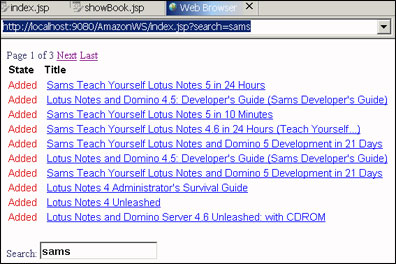
Under the covers, the URL it generates is similar to showBook.jsp?unid=<docunid> in which <docunid> is the unique document ID that we've come to know and love as part of Notes.
Displaying document details
Follow the earlier procedure for generating the index.jsp file to create showBook.jsp. After you create showBook.jsp, you can open the same Domino database browser in WebSphere Studio and drag and drop the Book form from the Notes database to the JSP. The Domino Toolkit automatically generates code to display all the fields in the form, so it looks like this:
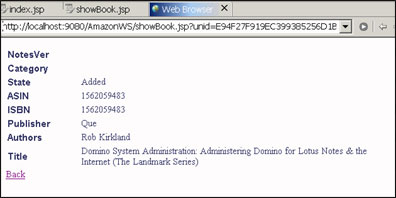
The default for the <domino:form> tag is to display the document in read mode instead of edit mode. You should also add a link to let the user go back to the view; that can be done by adding this line before the </BODY> tag:
<a href="index.jsp" onClick="javascript:history.go(-1)">Back</a>
Now you can run the index.jsp file on the test server and click one of the links in the view. The book document displays in your browser like this:
Creating administration pages
Now that you have your basic view and document pages done, you can concentrate on the administration pages which can be based on your previous work. Create an admin subfolder in the Web Content directory of your project. Copy the index.jsp and showBook.jsp files into the new subdirectory, then rename showBook.jsp to editBook.jsp.
Adding delete capability to the view
Adding the ability to delete documents is simple because of the Domino custom JSP tags. First, allow the tags to generate selection checkboxes for each view entry. This is done simply by adding the enableselect parameter to the <domino:view> tag in index.jsp:
ftsearch="<%=searchstring%>"
enableselect="true">
You also have to add the <domino:selectentry> tag where you want the checkbox displayed. We put it just before the title:
<domino:selectentry/><domino:viewitem col="2"/>
Now you have to add the actual code to handle the deleting of the documents. Before the <domino:view> tag, add this action code (it has to appear before the view in which you use the action):
<domino:ifserverevent event="OnAction" for="DeleteDocuments">
<domino:selectedloop viewname="Books/by Status"
dbserver="CN=SlipGate/O=KEY Enterprise Solutions"
dbname="AmazonWS.nsf"
user="username"
password="password"
host="SlipGate">
<% document.remove(true); %>
</domino:selectedloop>
</domino:ifserverevent>
The <domino:selectedloop> parameters should match the parameters you use in the <domino:view> tag. Finally, you need to add a link that invokes this delete action. You can do this by adding the following line of code after the </TABLE> tag:
<domino:action name="DeleteDocuments" text="Delete Selected Documents"/>
After you do this, you see a Web page that looks like this:
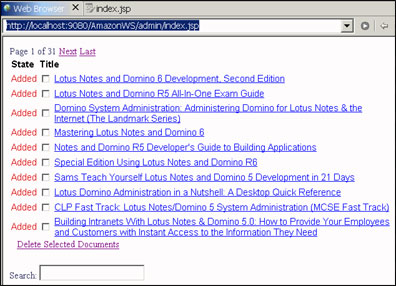
You can select documents to delete them. You can use a similar technique to recategorize documents.
Editing documents
Administrators need to be able to edit the Category and Notes Version fields in our book documents. To do this, you have to modify the <domino:form> tag in editBook.jsp to include the editmode parameter:
schema="Book"
editmode="edit">
Also, modify the <domino:formlink> tag in admin/index.jsp to open the editBook.jsp page:
<domino:formlink href="editBook.jsp">
When you click a link on the admin/index.jsp page, you see a form that looks like this:
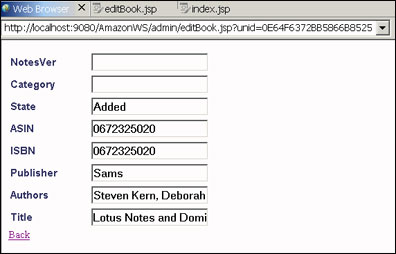
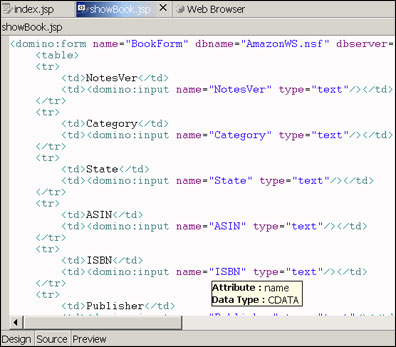
You may notice a few things with this form if you've seen the equivalent served up by Domino: The NotesVer and Category fields are not automatically displayed with the selections available from the Notes form; you need to change the lengths of some fields; and you may want to make a majority of the fields read-only. Let's concentrate on the read-only fields first. The only fields that should be editable are NotesVer, Category, and State. The rest should be read-only. Change the <domino:input> tags in the editBook.jsp to <domino:item> for the read-only fields. Remember to remove the type="text" attribute that the Lotus Domino Toolkit for WebSphere Studio puts in automatically for the <domino:input> tags because that attribute is not available for the <domino:item> tag.
Next, you have to modify the NotesVer, Category, and State fields so that they're no longer simple text input fields, but checkboxes and radio buttons. Unfortunately, they don't read the possible values from the Domino form. Here's what the NotesVer field changed to a checkbox looks like (the original <domino:input> tag is commented out):
<!--domino:input name="NotesVer" type="text" /-->
<domino:checkbox name="NotesVer" value="3" multivalue="true"/>3
<domino:checkbox name="NotesVer" value="4" multivalue="true"/>4
<domino:checkbox name="NotesVer" value="4.5" multivalue="true"/>4.5
<domino:checkbox name="NotesVer" value="4.6" multivalue="true"/>4.6
<domino:checkbox name="NotesVer" value="5" multivalue="true"/>5
<domino:checkbox name="NotesVer" value="6" multivalue="true"/>6
And here's the code needed to modify the State field using radio buttons:
<!--domino:input name="State" type="text" /-->
<domino:radio name="State" value="New" />New
<domino:radio name="State" value="Added" />Added
<domino:radio name="State" value="Not Relevant" />Not Relevant
<domino:radio name="State" value="No Longer Published" />No Longer Published
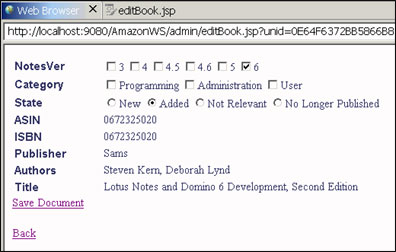
Lastly, you need to add a method for saving the document and for returning to the previous view. This is done using the <domino:saveclosedoc> tag. Add this line of code after the </TABLE> tag:
<domino:saveclosedoc validhref="index.jsp" text="Save Document"/>
If you preview this, you have a Web page that looks like this:
Session variable security
For session variable authentication, you put the following variables in your Web session when a user is authenticated:
| Variable | Description |
| l_user | User's login name or *webuser if you use container-managed security |
| l_pw | Password user used to log in |
| l_admin | Value 1 if user has administrator role |
| l_fullname | User's full name (what the user entered to log in) |
First, you have to create a checkLogin.jsp file which checks if a user is logged in. The following is a JSP fragment that is included (via checkLogin.jsp) in all pages in the admin directory that requires the user to be logged in:
<%
// this JSP file needs to be imported by all JSP files so they can
// get the username/password properly
String username = (String) session.getAttribute("l_user");
String password = (String) session.getAttribute("l_pw");
String isAdmin = (String) session.getAttribute("l_admin");
String fullname = (String) session.getAttribute("l_fullname");
if ((username == null) &&
(request.getRemoteUser() != null) &&
(request.getRemoteUser().compareToIgnoreCase("Anonymous") != 0)) {
// this handles the case of using container-managed security and only works
// if your J2EE container supports Domino Multi-User Session Authentication;
// we have to save the admin role state and stick it in the session variables
// and the username is set to *webuser so the Domino JSP Custom tags know to use
// the Domino Single Sign On mode of logging in
fullname = request.getRemoteUser();
session.setAttribute("l_user", "*webuser");
session.setAttribute("l_fullname", fullname);
if (request.isUserInRole("Admin")) {
session.setAttribute("l_admin", "1");
} else {
session.setAttribute("l_admin", "0");
}
}
if (username == null) {
// if username is blank, we have to send the user back to the login page
// this path is not taken if you use container managed login because no
// pages are loaded until you're logged in successfully
response.sendRedirect("../login.jsp?ar=1");
}
%>
There is also some extra code for the container-managed security case, so you can share some of the other code which we'll discuss later. The rest of the code loads the user name/password into variables which you can reference in JSPs later. If the user name is not available in the session, you will know that the user has not been logged in and return them to the login.jsp page with an ar parameter indicating that authentication is required.
In your admin/editBook.jsp and admin/index.jsp pages, you can insert this line at the top:
<%@include file="../checkLogin.jsp"%>
which loads the JSP fragment to check that a user is logged in. If you use coding patterns, this is called the Guard Pattern to indicate that each page that is secure has a check at the start of it.
In these pages, you have to modify the Domino custom JSP tags to use the variables instead of hardcoding user names and passwords like so:
user="<%=username%>"
password="<%=password%>"
Here's the code for the doLogin.jsp page which uses a mixture of Java and Domino custom JSP tags:
<% try {
String username = request.getParameter("username");
String password = request.getParameter("password");
%>
<domino:db host="SlipGate"
dbname="AmazonWS.nsf"
dbserver="CN=SlipGate/O=KEY Enterprise Solutions"
user="<%=username%>"
password="<%=password%>">
<%
// Store the username into session context
session.setAttribute("l_fullname", request.getParameter("username"));
session.setAttribute("l_user", request.getParameter("username"));
session.setAttribute("l_pw", request.getParameter("password"));
session.setAttribute("l_admin", "0");
%>
<domino:ifdbrole name="Admin">
<% session.setAttribute("l_admin", "1"); %>
</domino:ifdbrole>
</domino:db>
<%
response.sendRedirect("index.jsp");
} catch (Exception e) {
// flush current login info
session.setAttribute("l_user", null);
session.setAttribute("l_pw", null);
session.setAttribute("l_admin", null);
// redirect to login page
response.sendRedirect("login.jsp?lf=1");
}
%>
Note that it retrieves the user's role information from the Notes database's ACL. This eases management of the application, so you don't have to define a separate user/role mapping on the J2EE server. It returns to the login page with an lf parameter to indicate a Login Failure; it opens the main view if it is successful.
The doLogin.jsp page is called by login.jsp which is fairly simple, even with the conditional display of error messages at the top of it:
<form method="POST" action="doLogin.jsp">
<domutil:if>
<domutil:condition>
<%= request.getParameter("lf") != null%>
</domutil:condition>
<center><b>Login Failure!</b></center>
<p>
</domutil:if>
<domutil:if>
<domutil:condition>
<%= request.getParameter("ar") != null%>
</domutil:condition>
<center><b>Authorization Required. Please Log In.</b></center>
<p>
</domutil:if>
<TABLE border="0">
<TBODY>
<TR>
<TD>Username:</TD>
<TD><input type="text" name="username"></TD>
</TR>
<TR>
<TD>Password:</TD>
<TD><input type="password" name="password"></TD>
</TR>
</TBODY>
</TABLE>
<input type="submit" value="Log In">
</form>
Lastly, you have the logout.jsp page. It's a simple matter of purging the Web session to do the actual logout:
<%
// this just purges any log information and goes to the index page
session.invalidate();
response.sendRedirect("index.jsp");
%>
After this is all done, add code to the top-level index.jsp (not the index.jsp located in the admin subdirectory), so users can login, logout, and access the administration pages. You do this with another bit of Java code:
<%
if (session.getAttribute("l_user") != null) {
response.getWriter().println("You're logged in as " + session.getAttribute("l_user"));
String hasAdmin = (String) session.getAttribute("l_admin");
if ((hasAdmin != null) &&
(hasAdmin.compareTo("1") == 0)) {
response.getWriter().println("<BR>You have the Admin role");
}
response.getWriter().println("<BR><a href=\"logout.jsp\">Log Out</a>");
} else {
response.getWriter().println("<a href=\"login.jsp\">Log In</a>");
}
response.getWriter().println("<BR><a href=\"admin/index.jsp\">Admin Page</a>");
%>
Container-managed security
If you have a J2EE server that can support Multiserver Single Sign-On with Lotus Domino, such as JBoss (with a third party add-on: Domino/JBoss SSO) or IBM WebSphere Enterprise (the lower versions of WebSphere do not support Domino SSO), you can take advantage of container-managed security for your application. The container uses Domino (running LDAP) to log the user on, so user information is maintained in your standard Domino Directory; roles can be managed by the J2EE server or be in the Domino Directory depending on the J2EE server's implementation.
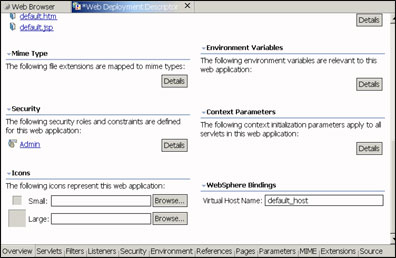
You have to make several modifications to your web.xml file to protect the /admin directory of our Web application so that it can only be accessed by users with the Admin role. Luckily, WebSphere Studio presents you with a nice Web deployment descriptor editor, so you don't have to worry about getting spelling and order correct in the web.xml changes. Edit WEB-INF/web.xml in WebSphere Studio by double-clicking on it to bring up the Web Deployment Descriptor Editor. You start in the Overview tab. Click the Security Details button or click the Security tab at the bottom of the window:
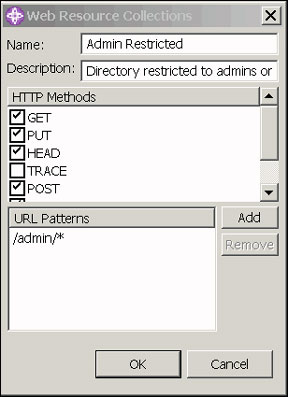
After clicking the Security tab, click the Security Roles tab (this other tab is under the Security heading on the page). Once there, you can add a role named Admin. Next, click the Security Constraints tab. Add a URL restriction (for GET, PUT, HEAD, POST, DELETE HTTP methods) to specify that /admin/* URLs should only be editable by users with the Admin role:
That's really all there is to it. The benefit to using this type of security is that everything in that /admin directory is now protected. You won't hear a story about how someone found an unprotected URL in the /admin directory and deleted everything in your database.
You should also add the following code to the checkLogin.jsp file for container-managed security:
if ((username == null) &&
(request.getRemoteUser() != null) &&
(request.getRemoteUser().compareToIgnoreCase("Anonymous") != 0)) {
// this handles the case of using container-managed security and only works
// if your J2EE container supports Domino Multi-User Session Authentication;
// we have to save the admin role state and stick it in the session variables
// and the username is set to *webuser so the Domino custom JSP tags know to use
// the Domino Single Sign On mode of logging in
fullname = request.getRemoteUser();
session.setAttribute("l_user", "*webuser");
session.setAttribute("l_fullname", fullname);
if (request.isUserInRole("Admin")) {
session.setAttribute("l_admin", "1");
} else {
session.setAttribute("l_admin", "0");
}
}
When you have container-managed security, you can use the standard servlet methods of getRemoteUser() and isUserInRole() to get the user's name and to check if the user is in a role, respectively. Unfortunately, this is only valid in the restricted /admin directory. When the user returns to the top level directory, these methods may or may not work depending on the J2EE container's implementation of the servlet API. Because this code is executed at the top of all JSPs in the /admin directory, you can tuck this information into the session, so you can get to it in the nonrestricted JSPs.
If you want to test container-managed security in the Websphere Test Environment in Websphere Studio, you must run the LDAP service on Domino because WebSphere uses LDAP for logins. In the Server Configuration, double-click WebSphere v5.0 Test Environment to open the configuration. Then, in the WebSphere Server Configuration, select the Enable the administration console option. Next, start the WebSphere server. You can then open the Websphere Admin Console by logging on to http://localhost:9090/admin/ and enabling Global Security and configuring LDAP:
Deployment to a J2EE server
Before you can deploy the AmazonWS.jar file to your J2EE server, you have to set a few things up to get the Domino custom JSP tags to work. First, copy the NSCO.jar file to your J2EE server (this assumes you're using DIIOP to access Domino). It should be placed in a directory that is available to all Web applications; in WebSphere, this is /appserver/lib/ext. If you want to specify the Domino server that hosts all of the databases in one place instead of specifying the server in each Web page, you can add the following context-param to your web.xml file:
<context-param id="ContextParam_host">
<param-name>lotus.domino.default.host</param-name>
<param-value>DominoServerName</param-value>
</context-param>
Summary
The benefits of using the Lotus Domino Toolkit for WebSphere Studio include Web application performance, development efficiency, and increased security. Application performance is increased over a pure Domino application because the Web application front-end can be separated from the Domino server which can then be used solely for serving Notes databases.
Web applications can be developed more quickly by doing the administrative editing of documents using the Notes client rather than spending time to create a section of your Web application just for administration. The Domino custom JSP tags (but not the WebSphere Studio integration) provide automatic view paging and simplified support for view document selection/processing. They also provide access to Domino's vastly superior full-text indexing instead of devoting a lot more work to relational databases' full-text indexing.
If you want added security for your Web application, Notes databases' document-level read/write control is much better than what is provided by relational databases. As a secondary level of security, Notes database ACLs can be used if you access the Notes databases as real users instead of as an anonymous user as you usually do in Web applications that use a relational database back-end.
The Domino custom JSP tags provide a good option for companies with a Notes/Domino infrastructure that want to provide access to Notes/Domino data using a J2EE application server. IBM/Lotus have mentioned many times that their Domino/WebSphere integration will include integrating these tags more tightly with WebSphere Studio. The Lotus Domino Toolkit for WebSphere Studio is just the first step down this path.
ABOUT THE AUTHOR
Ken Yee has been a consultant and Lotus Business Partner since the inception of the program. He has done software development since 1989 and is always looking for interesting J2EE/Domino integration projects. His company, KEY Enterprise Solutions, has done Notes, Domino, IIS/ASP, Java, ActiveX/COM, and C++ development and administration projects for Lotus, Inso/Stellent, Logica, eVelocity, World Bank, and Analysis Group. KEY Enterprise Solutions maintains the Notes/Domino FAQ (the first Notes FAQ on the net) as a service to the Notes community and the Java Servlet FAQ for the Java community. |
|