 |

by
Michael
Patrick


Level: Advanced
Works with: Designer 5.0
Updated: 08/01/2000

Inside this article:
Simulating tabbed tables
Multiple embedded views on a page
Just the beginning

Related links:
DHMTL Samples database
Linking style sheets sidebar
Mark Judd: JavaScript integration
Creating Web sites for Domino using HTML authoring tools

Get the PDF:
 (169 KB) (169 KB)


|  |
Imagine that your customer has asked you to design a Web page in which certain elements must be selectively hidden or revealed based on actions taken by the user. "No problem," you say. Then the customer pulls out a stick and shoves it between the spokes of your bike: "Do it without page refreshes. I find them annoying." You have two options: You can don your most authoritative voice and announce "You obviously have no idea what you're talking about!" (not recommended, by the way) or you can brandish your Dynamic HTML (DHTML) sword and slay that dragon (the page, not your customer).
Chances are, if you've done some Web development, you already know a little DHTML. That's because DHTML isn't new at all; it's really HTML, JavaScript, Cascading Style Sheets, and the browser's Document Object Model (DOM) working in conjunction with one another to achieve dynamic presentation of content.
As you can imagine, DHTML is a huge topic that can't be covered in one article. To introduce you to DHTML's possibilities, this article examines some Domino limitations and how you can use DHTML to work around them. The first is a technique for simulating a tabbed table on a form so that users can switch between the tabs without hitting the server (which also demonstrates one way to tackle the hide-when problem introduced in the first paragraph). The second is a way around the Domino restriction that allows only a single embedded view to exist on any given form.
A word of caution: DHTML is not applicable in all situations, particularly where the target browser base cannot be identified. Because DHTML is based on a number of independent specifications, it is very much at the mercy of the browser manufacturers and how they choose to implement those specifications. As a general statement, the 4.x releases of both Netscape's Navigator and Microsoft's Internet Explorer (IE) support these specifications at a basic level. Internet Explorer 5 is better still, and the soon-to-be-released Navigator 6 promises the tightest adherence to standards yet.
The examples in this article work with Microsoft Internet Explorer 4.x and Netscape Navigator 4.x. A sample database containing these examples, DHTML.nsf, is posted in the Iris Sandbox so that you can download and examine it. This article assumes basic familiarity with HTML, JavaScript, and Cascading Style Sheets.
Simulating tabbed tables
One of the great features of the R5 Notes client is its support for nice-looking, flexible tabbed tables. They can even be effortlessly nested within one another.
While Domino will serve up tabbed tables to a Web browser, there's a problem: the clicking of any given tab results in a page refresh, which means a server hit. Unfortunately, that can add up to a lot of clicking and waiting, not to mention the potential for losing data between the refreshed pages and the impact on server performance.
DHTML provides a way around this problem. There's quite a bit of coordination among various form elements involved, but once the basic technique is understood, it's a snap.
Note: While the following example shows the editing of a document, tabbed tables are just as applicable in situations where you are simply displaying read-only data to users. This is important to note, because while Netscape Navigator 4.x recognizes FORM tags that span DIV tags under basic conditions, the following example makes use of some advanced techniques that Navigator 4.x does not fully render. As a result, this tabbed table example works perfectly well in Navigator 4.x when reading a document, but not when editing its content.
First, let's take a look at what we're ultimately striving toward. When the Tabbed Table form is previewed in IE, it looks like this:
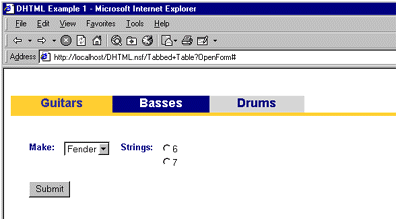
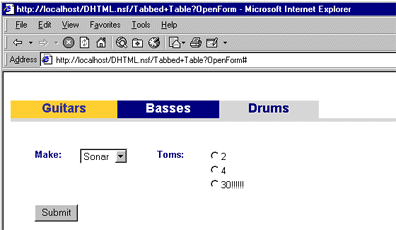
Guitars, Basses, and Drums are links that represent the three tabs, and the current tab (Guitars, in this case) is denoted by the color of the line running underneath the tabs. Each tab contains its own fields, all of which are part of the document and are "saved" when the document is submitted. When you click on another tab, for example, the Drums tab, the Guitars fields are hidden and the Drums fields are revealed:
The Tabbed Table form's Cascading Style Sheet and JavaScript
Before examining how the tabs are physically constructed, let's take a look behind the scenes at the various pieces that make the tabs actually work. The first item of interest is the form's Cascading Style Sheet.
You can think of Cascading Style Sheets (CSS) as allowing the separation of content from the presentation of that content. Style sheets provide a single place that lets you define how content should look and behave as opposed to interspersing that information throughout the content as you used to do before CSS came along.
For the sake of simplicity for this article, I've embedded the style sheets in the examples and the sample database directly into the forms. This is fine when a given style sheet only needs to modify a single form/document, but what about instances where a single style sheet would be applicable for multiple forms/pages? For greater flexibility, style sheets can also be linked. This means you place a reference to the style sheet on each form it needs to modify, and the style sheet itself is maintained in a separate file. For more information, see the Linking style sheets sidebar.
The following code represents the style sheet embedded in the HTML Head Content object of the Tabbed Table form:
"<STYLE type=\"text/css\">" +
"A.tabs { text-decoration: none};" +
"#tab1{position:absolute;top:40;left:10};" +
"#tab2{position:absolute;top:40;left:10; visibility:hidden};" +
"#tab3{position:absolute;top:40;left:10; visibility:hidden};" +
"</STYLE>"
First, the style sheet's content is surrounded by STYLE tags. Each line within the tags represents a "style rule" intended to modify some element of the resulting HTML document. The first style rule specifies that the links on each of the tabs are not to be underlined. This is by no means required, but it's instructive to include here. What the line says is that some links (hence the "A" reference relating to <A></A> link tags) will be specifically labeled as belonging to the class "tabs" and we'll set the text-decoration attribute of this class equal to "none." You'll see this in use a little later.
The three rules starting with "#tab" control the positioning and visibility of the tabs themselves. There's one for each tab, and if we added or took away tabs, these lines would have to change accordingly. The first attribute is "position," which for this example is set to "absolute" so that we can control exactly where each of the tabs will be placed on the screen. You'll notice that each rule contains the same values: 40 pixels from the top of the browser window and 10 pixels from the left margin. This causes the tables containing the tabs to overlap, which is exactly what we want. If these had different values, the tabbed table would appear to jump all over the screen -- which you might think is cool, but your customers probably will not!
The only other attribute to discuss is "visibility," and since elements on a form/page are visible by default, we've left it off the first rule, which relates to the first tab. The second and third tabs, however, are both marked as initially hidden.
The actual code that makes the tabbed table work is contained in the form's JS Header:
var currtab = "tab1";
function showtab( tabnum ) {
tabname = "tab" + tabnum
if ( tabname != currtab ) {
if (window.document.layers) {
handle="window.document.layers";
stylevar="";
}else{
handle="document.all";
stylevar=".style";
}
eval(handle+'["'+currtab+'"]'+stylevar+'.visibility = "hidden"');
eval(handle+'["'+tabname+'"]'+stylevar+'.visibility = "visible"');
currtab = tabname;
}
}
First, the variable "currtab" is set to "tab1" by default. This will keep track of which tab is currently visible. Next is the "showtab" function, which will be called every time you click on one of the tabs. It accepts one argument, the number of the tab that was clicked. If any tab other than the one currently visible has been clicked, the next thing we must do is determine which browser is being used.
Since Netscape Navigator includes a layers object type in its Document Object Model (DOM) and since IE does not, we use the line:
if (window.document.layers)
It performs a very simple test to determine whether or not the layers object is supported in the current browser. If it is, you're using Netscape, so we'll set the variable called "handle" equal to "window.document.layers." If you're using IE, we need to set two variables, "handle" and "stylevar," to "document.all" and ".style," respectively.
Why the difference between browsers? Essentially, the Netscape and Microsoft DOMs are fairly divergent, and when it comes to addressing elements on a page, this is especially true. Regardless of the browser in use, we're setting the visibility property of the old tab to "hidden" and the newly selected tab to "visible," and the same code is used to achieve that in both browsers. Finally, we reassign "currtab" to the newly selected tab.
The Tabbed Table form
To see how the tabs are created, you can look at the form in Designer:
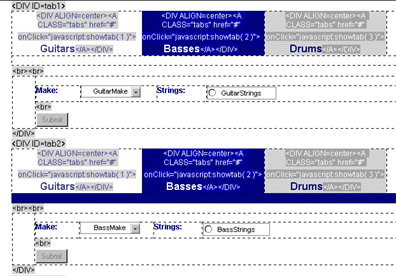
The first thing to notice is that the tabs are really just a succession of tables, with a separate table for each tab. While only two are shown in the graphic above, there is a third table under the second. The fields belonging to each tab are placed in a table as well. In the example above, there are Make and Strings fields for both the Guitars and Basses tabs, each containing values unique to its corresponding tab.
Let's look at everything that constitutes a single tab. First, there are two tables (for the tabs and the fields) surrounded by a Division -- for example, "<DIV ID=tab1></DIV>" -- that is marked as passthru HTML. The DIV element is simply a way to group multiple elements together logically, allowing us to refer to them collectively. Before we can do that, however, we need to name the DIV. In the case of the first table shown, the Guitars tab, "<DIV>" has an additional attribute, ID, which identifies this Division by the name "tab1." If you refer back to this form's style sheet (remember, it's located in the form's HTML Head Content object), you'll notice that we've got a rule for "tab1." As a result, that rule is applied to the "tab1" Division, and so everything contained by the Division is positioned absolutely.
Each tab is a cell in the table. The content of these cells looks like this:
<DIV ALIGN=center><A CLASS="tabs" HREF="#" onClick="javascript:showtab( 1 )">Guitars</A></DIV>
This is marked as passthru HTML. Breaking it down, the cell content is also wrapped in a DIV tag, mainly for the purpose of centering the tab content via the ALIGN attribute of the DIV element, which is set to "center." The links within each cell/tab are of particular interest. Notice that link tags -- "<A>" -- contain the attribute "CLASS="tabs"." If you refer once again back to the form's style sheet, you'll see that this matches the rule that specified that links of this class not be underlined. Not surprisingly, the links on this form not belonging to the "tabs" class (provided there are any) will be unaffected.
Also, we're calling a JavaScript function as part of the link, although it's a good practice to avoid such calls directly in an HREF. Links, however, require an HREF; since in this case, HREF shouldn't be doing anything, it's being terminated by the "#." Instead, the form's "showtab" JavaScript function is called by the link's onClick event, passing the numerical value of its tab.
There remains one last detail worth pointing out with regard to this example. If you compare the screen of the Tabbed Table form in the browser with the screen of it in Designer, you'll see that the first cell/tab and the merged cell running underneath the tabs is a dark yellow. And how were the cell heights specified? The answer is that the R5 Designer gives you many more options for taking control of tables created in the IDE than were previously available. Look at the last tab of the Table Properties dialog box:
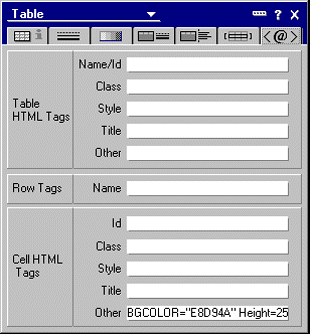
This shows the code controlling the first tab, Guitars. In the Other field under the Cell HTML Tags section, we've provided a specific hex value for the cell's background color. (In this case, it's the hex value for a deep yellow.) This is handy for supplying predefined color values. We've also set the cell height to 25. The merged cell underneath the tabs also has the same color value defined and it's height is set to 5. The short of it is, in R5, tables can take on whatever look you choose.
That's it! Visually, the Tabbed Table form is quite busy, but it's also fairly simple once you realize that much of it is redundant. (You can use the code in the sample database, DHTML.nsf, to see how this works in your browser.)
There are two more points to make before leaving this example:
- The tabbed tables didn't have to be constructed from HTML tables; we could have created multiple graphics to represent the tabs and switched between them. This example opted for HTML tables because they are simple to create and they load much more quickly than multiple graphics would.
- What about nested tabbed tables? For those interested in extending this tabbed table example, the sample database includes the Nested Tabbed Tables form, whose modifications are fairly obvious once you understand the basic technique. The Nested Tabbed Tables form only works in IE.
Multiple embedded views on a page
Contrary to what Notes/Domino professionals have come to expect, there are instances where the Web browser has an advantage over the Notes client. One of these is the ability to present multiple views on a page without resorting to multiple view applets. Try that in the Notes client! The following screen illustrates this in action:
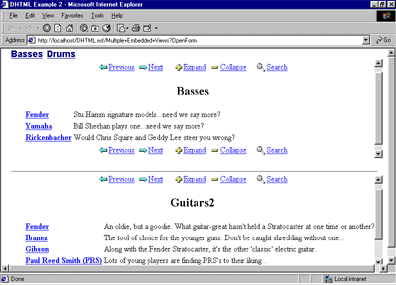
In this example, everything above the horizontal rule represents the Basses view, and everything below it is supplied by the Guitars2 view. Two views are not necessarily the limit; you could include more if you wanted. Also, notice the Basses and Drums links above the upper view. In IE, these links actually switch the upper view without reloading the page. For instance, if the Basses view is visible, clicking on the Drums link will switch the upper view to the Drums view. To view the Basses view again, you'd simply click on the Basses link. (Because the switchable links don't work in Netscape Navigator, they are hidden when viewed through that browser. We'll see how they are hidden a little later.)
How was all this accomplished? Let's look at the Multiple Embedded Views form in Designer:
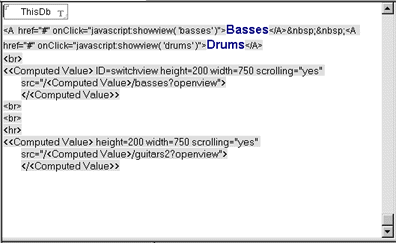
At the top of the form, we've included the field "ThisDb," which is editable but hidden via its HTML Attributes, which are set to "Type=\"Hidden\"." This allows the field to be hidden in the browser but still available for referencing by the page's code, which will be important for the JS Header of the form. "ThisDb" has the standard formula used to calculate the database path:
@ReplaceSubstring (@Subset (@DbName; -1); "\\" : " "; "/" : "+")
Skipping over the Drums and Basses links for a moment, the following block, which is marked as passthru HTML, is responsible for the inclusion of the form's upper view:
<<Computed Value> ID=switchview height=200 width=750 scrolling="yes" src="/<Computed Value>/basses?openview">
</<Computed Value>>
Similarly, the same code is repeated below the horizontal rule (<hr>) for the Guitars2 view.
The real work is being done by the first and last lines of computed text, which, with one exception, look like this for both lines:
@If(@BrowserInfo( "BrowserType" ) ="Notes"; "IFRAME";
@BrowserInfo( "BrowserType") = "Microsoft"; "IFRAME frameborder=0";
@BrowserInfo( "BrowserType") = "Netscape"; "ILAYER";
"")
The only difference between the first and last lines of computed text is that the last line omits the frameborder=0 parameter because it is generating a closing tag and attributes aren't associated with closing tags.
What's really going on here? This code introduces the IFRAME and the ILAYER. It creates a "window" or "frame" within a page depending on the browser type. The window or frame can be loaded with content independent of the page on which it resides. As I mentioned earlier, there can be more than one per page, which makes for some interesting possibilities.
IFRAME is part of the HTML 4 specification and is supported by IE, hence its use when @BrowserInfo("BrowserType") determines that Notes or IE is the browser. ILAYER is a Netscape-only tag that works much like IFRAME, except scrolling is not supported as it is with IFRAME. Scrolling allows the IFRAME to be sized to whatever best fits the overall page design. A scroll bar independent of the browser window allows for scrolling within that IFRAME. Since ILAYER does not support this scrolling, make sure that ILAYER is sized big enough to accommodate all the content you wish to display.
We've also given IFRAME or ILAYER a name with ID=switchview, although it's really only relevant to IE, as you'll see in a moment. Lastly, we've provided additional attributes to the opening tag -- height, width, scrolling, and SRC. SRC controls where our content is coming from. In the code above, the SRC attribute's computed text equates to the form's ThisDb field, which helps us build a relative URL to our Basses view since that view was chosen as the default upper view when the form is first opened. (Although the example uses the generic Domino-generated view format, all the views could have been presented via a $$ViewTemplate form.)
So, without any other code, we've now placed two views on a single form/page. As if that weren't enough, let's conclude by discussing how to switch the IFRAME content on the fly. (Remember, this only works reliably in IE and so these controls are hidden in Netscape Navigator, but everything up to this point works in Netscape Navigator.)
Back to the passthru HTML Drums and Basses links near the top of the form. First, remember that these links don't work in Netscape Navigator, so this entire piece of passthru HTML has been given a Hide-When formula, which uses the @BrowserInfo function that we've already seen in action:
@BrowserInfo( "BrowserType") = "Netscape"
So, when true, the passthru HTML Drums and Basses links do not appear in Netscape Navigator. Here is the passthru HTML for the links:
<A HREF="#" onClick="javascript:showview( 'basses' )">Basses</A>
<A HREF="#" onClick="javascript:showview( 'drums' )">Drums</A>
The onClick event of both links calls the JavaScript function "showview" with the name of the view to switch to. Here is the form's JS Header:
function showview( view ) {
target = "/" + document.forms[0].ThisDb.value + "/" + view + "?openview";
document.all.switchview.src = target;
}
The first line of this function makes use once again of the ThisDb form field to build a relative URL to the view we ultimately want to display. The actual opening of the view is accomplished by the function's last line, which sets the SRC attribute of our IFRAME (remember, we called that IFRAME "switchview") to the relative URL we just constructed on the line above. Viola! Switchable views!
The ability to include multiple views on a given page is a powerful option for Domino developers and can lead to some creative solutions. As was alluded to above, you're not limited to Domino's default view presentation. In fact, views can be displayed through any of the means by which they normally would. The sample database includes a Multiple Embedded Views 2 form in which the bottom view is set to "Treat view contents as HTML," thus demonstrating the flexibility of this technique.
Just the beginning
Hopefully, these examples have demonstrated some of the flexibility that you can incorporate into Domino-based Web solutions, and that what you've seen here will serve as a foundation from which you can launch your own explorations of DHTML's potential.
You've seen that the DHTML path has a few challenges, mainly due to the varying levels of support across different browsers; so don't expect cross-browser DHTML development to be frustration-free. But Web browsers will continue to evolve, as will the specifications that comprise DHTML. The best way to thwart many of the potential roadblocks is to educate yourself while diving in.
One of the best references available is Danny Goodman's Dynamic HTML: The Definitive Reference (ISBN 1-56592-494-0) from O'Reilly & Associates, Inc. Additionally, most HTML 4 references also cover DHTML to a certain extent. WebMonkey and CNET's Builder.com are both excellent online sources for tutorials and examples. The HTML and CSS specifications are maintained by the World Wide Web Consortium (W3C), while information on the competing DOMs and implementation of ECMAScript (from which JavaScript and JScript are derived) can be found from Netscape and Microsoft.
Although you need to continue educating yourself about DHTML, there's no question that it is a powerful tool (or set of tools, actually) to have at your disposal when developing applications. Using DHTML, you can deliver solutions that both perform faster and are more intuitive to users. After all, the Notes client delivered on these promises long ago; with DHTML, the Web can now deliver on them as well.
ABOUT THE AUTHOR
Michael Patrick is a Senior Consultant with Knowledge Resource Group in Indianapolis, Indiana. He would like to credit Henry Newberry of Synergistics for planting the seeds from which this article sprouted.
|