 |

Implementing and Maintaining Domino Web Servers

Back to main menu
Introduction

This Learner-Directed offering provides information about implementing and maintaining Domino Web servers as a supplement to the Implementing a Domino Infrastructure R5 and Maintaining a Domino Server Infrastructure R5 courses.
Most of the information contained in this offering assumes knowledge of the Domino Administrator interface and Domino server and workstation implementation tasks in the R5 System Administration courses mentioned above.
Table of Contents

Facts About the Domino Web Server
Starting the Domino Web Server
Domino Web Server Settings
Controlling Access to the Web Server
Enabling Session Authentication
Internet Security Protocols
Becoming a Certificate Authority
Setting Up SSL on a Server
Setting Up SSL Server Authentication
Setting Up SSL Client Authentication and S/MIME
Web Monitoring Tools
Reconfiguring Web Servers
Maintaining Usable URLs on the Web Site
Creating Multiple Web Sites
Creating a Web Realm
Scenarios for Web Server Configurations
Facts About the Domino Web Server

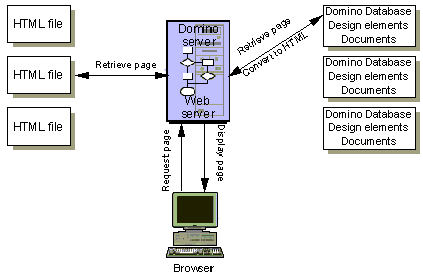
What does the Domino Web server do?
Domino provides an integrated Domino Web application server. As a Web application server, the Domino Web server allows browser clients to participate (read and contribute information) in applications built in Domino databases and HTML pages as shown below.
Microsoft IIS can be the HTTP stack
In Domino R5, Microsoft Internet Information Server (IIS) can serve as the HTTP stack, enabling the Domino server to be run as an IIS server extension.
IIS routes all URL requests that include the .NSF extension to the Domino Web server to process.
To use Microsoft IIS for the HTTP stack, the Domino server requires:
Windows NT Server 4.0 with Service Pack 3
Microsoft Internet Information Server 4.0
Note: For more information about using Microsoft IIS as the HTTP stack, refer to the Domino 5 Administration Help database and the Microsoft IIS documentation.
Back to Table of Contents
Starting the Domino Web Server

Enabling HTTP during server setup
Enable HTTP on any server during either the Quick and Easy or the Advanced Configuration server setup. If HTTP is selected during server setup, Domino adds the HTTP task to the NOTES.INI file.
Procedure: Automatically start the HTTP task at server startup
Follow these steps to automatically start the HTTP server task when the server starts, if HTTP was not enabled during server setup.

Step |
Action |
1 |
Open the NOTES.INI file in a text editor. The NOTES.INI file is located, by default, in the Domino program directory. |
2 |
Search for the line beginning with ServerTasks. |
3 |
Add HTTP to the ServerTasks line. For example, the ServerTasks line may contain the following:
ServerTasks=HTTP,Replica,Router,Stats,AMgr,Adminp,Sched,... |
4 |
Save the NOTES.INI file, and close the text editor. |
5 |
Restart the server for the changes to take effect.
Result: The HTTP task will start automatically when the server restarts. |
Procedure: Start and stop the HTTP task manually
Follow these steps to verify that the HTTP server task is currently running on the Domino server.
Procedure: Access the Domino Web server from a browser
The Domino Web server supports many URL commands. For a complete list of URL commands, refer to the Domino 5 Administration Help database. Follow these steps to access the Domino Web server from a browser.
Step |
Action |
1 |
Open the browser client. |
2 |
Enter the following for the URL:
http://servername
where servername is the Domino Web server’s host name (either the server’s common name, such as PTHub or host name such PTHub.world.com)
Result: The Web server displays either the Default home page, Home URL: /homepage.nsf?Open (default), or a list of databases on the server, depending on Web server settings. |
Back to Table of Contents
Domino Web Server Settings

Internet port settings
The HTTP task uses the TCP/IP port for communication. Use the default port settings, or edit the Server document to modify these settings. The following table describes some of the fields found under the Ports tab > Internet ports tab in the Server document:
Field | Description |
| TCP/IP port number | Specify the port number on which the Domino server should listen for HTTP requests. The default port is 80. |
| TCP/IP port status | Specify the status of the TCP/IP port. The TCP/IP port and/or the SSL port must be enabled for the Web server to operate. Disable this port and enable the SSL port to allow only SSL transactions. |
Customize Web server settings
The default Web server settings may be sufficient for initial deployment. The following table describes the Web server settings to consider customizing.
For Web clients to access the Web server this way | Set these fields |
| Allow Web users to use the Domino Web server name in the URL to access the server. |
Host name: Blank (Default)
Bind host name: Disabled (Default)
Note: Domino will use the host name specified in the TCP/IP stack. |
| Allow Web users to access the site by entering an alias, such as www.world.com. |
Host name: DNS name
Bind host name: Enabled |
| Have the Web server look up the DNS host name for clients. |
DNS lookup: Enabled (Default is Disabled.) |
| Use a Domino database element for the home page. |
Default home page: default.htm (Default)
Home URL: URL for database element
(Default: /Homepage.nsf?Open) |
| Use an HTML file for the home page. |
Default home page: HTML file name
Home URL: Blank |
| Allow Web users to enter a URL to see a list of databases on the server. |
Allow HTTP clients to browse databases: Yes
( Default is No.) |
Scenarios for Web server settings
Consider the following scenarios for deciding on Web server settings.
Question: Which two scenarios from the previous table are most likely to be used by a company using Domino Web servers?
Answer: Web clients would most likely access the server using one of the following scenarios:
Scenario | Rationale |
| Allow Web users to access the site by entering an alias, such as www.world.com. | Web clients only need to know the Web site address, not the specific Domino Web server name. |
| Use a Domino database element for the home page. | Facilitates easily and quickly changing the design or information on the page as Domino converts database elements at the time the page is requested. |
Question: When would you want Web users to enter the server name as the URL?
Answer: On a company intranet or for testing purposes.
Question: When would you use an HTML page for the home page?
Answer: For initial deployment, if you already have an existing HTML page.
Question: When would you want to allow Web clients to browse the databases on the server?
Answer: For testing purposes, or for a server that does not have a home page.
Procedure: Change default Web server settings
The Domino Web server has default settings that do not require modification for the Web server to function. However, administrators can customize how Web clients access the Domino Web server. Follow these steps to edit the Server document to change the default Web server settings.
Caution: If Microsoft IIS is the HTTP stack, do not use the Web server settings in the Server document. Configure Web server settings using Microsoft IIS tools.
Procedure: Use the new Web server settings
After changing the default Web server settings, follow these steps to restart the HTTP task to use the new settings.
Back to Table of Contents
Controlling Access to the Web Server

Domino security review
Answer the following questions to review Domino security.
Question: Can a Notes user access the Domino server without authenticating (i.e. anonymously)?
Answer: Yes, if the server allows anonymous access from Notes clients.
Question: What is the primary security mechanism for Notes users?
Answer: The Notes user ID with user name and password.
Question: How does the Domino server authenticate with a user?
Answer: The server checks for a certificate in common with the user.
Note: The three questions above also apply to the Domino Web server. The Domino Web server can:
- Allow access to anonymous users.
- Authenticate using name and password challenge.
- Authenticate using Internet (X.509) certificates and SSL.
Domino security and Web users
The username and password is the key to controlling security on a Domino Web server. There are two types of users for security consideration:
Registered users: Users who are listed in the Domino Directory or a trusted directory with:
- A valid user name and password
- A valid X.509 certificate
Nonregistered users: Users who either do not have an X.509 certificate or Internet password, or are not listed in the Domino Directory or a trusted directory.
Registered users
Web users must be listed in the Domino Directory or a trusted directory to access restricted resources on the Web server. Administrators can:
Manually create the Person documents in the Domino Directory.
Set up Directory Assistance to authenticate via a trusted directory. Refer to the Domino 5 Administration Help database for more information about setting up authentication via a trusted directory.
Use a registration application to allow users to register themselves. Domino/Notes ships with a database template for a Site Registration application. This application is used to register visitors to the Web site. For more information, refer to the Domino 5 Administration Help and Domino 5 Designer Help databases.
Nonregistered users
A nonregistered user is assigned the Anonymous user name when accessing the Domino Web server.
By default, the Domino Web server allows anonymous access.
If the administrator prevents anonymous access, all Web clients will be required to provide a name and password to access the server.
Web authentication choices
Domino’s basic Web authentication options determine the server’s response when a Web user requests access to the server, or to a restricted resource — a file or database element with access control in place. The Web authentication fields are found in the Server document, Ports tab > Internet ports tab.
If you want Web users to authenticate this way | Set the Anonymous field to... | Set the Name & Password field to... |
| All Web users can reach the server anonymously without authenticating. Web users will be prompted for name and password when they attempt to access a restricted resource on the server (default). | Yes | Yes |
| All Web users must authenticate via a name and password when they first access the server. | No | Yes |
| All Web users can reach the server anonymously without authenticating. Web users will not be allowed to access any restricted resources on the server. | Yes | No |
| No access to the server from a browser unless SSL is enabled, and the Web user can present a valid Internet certificate. | No | No |
Note: The fields in the above table also apply if Microsoft IIS is the HTTP stack; however, the fields do not apply to SSL authentication, which is covered later in this offering.
Procedure: Set basic Web authentication options
Follow these steps to allow or restrict name and password authentication and anonymous access to the server.
Tip: Coordinate with application developers
To ensure Internet clients have the appropriate access to Web applications, work with application developers to determine the Web authentication requirements.
Back to Table of Contents
Enabling Session Authentication

What is session authentication?
Session authentication is a security mechanism in which the Domino Web server sets up a session ID for a user when the user authenticates with the Web server using a name and password.
Each time the user requests a page during this session, the server authenticates the session ID. HTTP session authentication helps prevent a name and password from being stolen by not using the name and password with each URL request.
Session IDs
The session ID is:
- Valid only on the server in which the user authenticated.
- Valid for the entire session.
- No longer valid when the user closes the browser.
Procedure: Enable HTTP session authentication
Follow these steps to edit the Server document to enable HTTP session authentication.
Back to Table of Contents
Internet Security Protocols

Secure Web sites
A secure Web site may allow browser users to access some pages without authentication, but may require credentials, such as a user name and password or a trusted certificate, to get to other pages.
A client requests a secure channel to the site by specifying https in the URL.
By specifying http, the client is requesting a non-secure channel.
Domino also provides the ability to force use of SSL, even if the client specifies http.
What is SSL?
Secure Sockets Layer (SSL) is a security protocol that provides communications privacy and authentication over the Internet. When SSL is enabled for any Internet protocols on the Domino server, the data is encrypted as it passes between clients and the server.
Supported Internet protocols
Domino supports enabling SSL over the following Internet protocols:
- HTTP
- LDAP
- NNTP
- POP3
- IMAP
- SMTP
- IIOP
Benefits of SSL transactions
There are three primary commercial reasons for enabling SSL:
- Data encryption provides confidentiality.
- Servers and clients were authenticated using certificates with digital signatures.
- Digital signatures provide data integrity.
What is S/MIME?
Secure Multipurpose Internet Mail Extensions (S/MIME) is an Internet standard for providing privacy, data integrity, and authentication of mail using the MIME format. Since S/MIME can be integrated into any e-mail software package, secure messages can be exchanged between users of different e-mail packages. S/MIME:
- Offers a consistent way to send and receive secure MIME data.
- Allows Notes R5 clients to sign and encrypt Internet mail.
- Uses X.509 certificates.
Internet certificate format
Domino uses the X.509 format for SSL and S/MIME certificates, which is the most universally recognized certificate format. Using this format allows servers to recognize certificates presented by Domino and other applications.
Sources for Internet certificates
Internet (X.509) certificates can be generated from a variety of sources, including:
- Commercial certifying authorities, such as Verisign or CyberTrust
- An internal Domino certifying authority
Note: The Domino server running Internet protocols accepts both internally and externally created Internet certificates.
Signing/encrypting a message review
Answer the following questions to review Domino security using signatures and encryption.
Question: What message storage formats does Domino use?
Answer: Domino can store messages in either Notes Rich Text or MIME format.
Question: What certificate would be used to sign or encrypt a Notes Rich Text format message?
Answer: A Domino internal certificate stored in the Notes user ID, such as /PT/World.
Question: What certificate would be used to sign or encrypt a MIME message?
Answer: An Internet (X.509) certificate stored in the Notes user ID.
Back to Table of Contents
Becoming a Certificate Authority

Certificate Authority
The Certificate Authority (CA) is an authorized entity that generates Internet X.509 certificates used for SSL and S/MIME. Specifically, the CA:
- Owns the CA certificate, used to sign server and client certificates.
- Provides trusted root certificates, which allows clients and servers with certificates signed by the same CA to trust each other.

Domino vs. external CA
Domino R5 includes a CA application that can create Internet X.509 certificates for servers and clients (Notes client or Web browser).
A company may decide to set up an internal CA. Using a Domino CA:
Avoids the expense that a third-party CA charges to issue and renew client and server certificates.
Uses available tools that are already familiar to the Domino system administrators.
Checklist: Set up a Certificate Authority server
Complete these tasks to set up a Certificate Authority server.
Note: The steps to set up a CA server are the same regardless of the Internet protocol(s) being used.
Task 1: Create the Certificate Authority application
Follow these steps to create a CA application.
Back to the Set Up a Certificate Authority Checklist
Task 2: Create a CA key file and CA certificate
Follow these steps to create the CA key file and CA certificate that will be used to certify other servers and clients.
Back to the Set Up a Certificate Authority Checklist
Task 3: Configure the CA application Profile
The Certificate Authority Profile includes CA key file and server information for signing certificate requests. Follow these steps to configure the CA Profile.
Back to the Set Up a Certificate Authority Checklist
Task 4: Create a server key file and certificate for the CA server
The CA application creates the key file, then adds a signed server certificate and the CA certificate to it as a trusted root. Follow these steps to create the key file and certificate.
Step |
Action |
1 |
From Domino Administrator Files tab, open the Certificate Authority Application. |
2 |
Click Create Server Key Ring & Certificate. |
3 |
Enter an appropriate Key Ring File name, such as PTHUBKEY.KYR. |
4 |
Enter and confirm a secure password. |
5 |
Enter the CA Certificate Label field, such as WorldCA. |
6 |
In the Common Name field, enter the server’s host name specified in the Server document in the Domino Directory, such as PTHub.world.com. |
7 |
Enter the Organization name, such as World. |
8 |
Enter the appropriate the state or province, such as Lisbon. |
9 |
Enter the correct country code, such as PT. |
10 |
Click Create Server Key Ring. |
11 |
Enter the CA key file’s password, and click OK. |
12 |
Notes displays a confirmation of the information just entered. Read the information to make sure that it is correct, then click OK. |
13 |
Copy the key file from the Notes\data directory on the workstation to the Domino\data directory on the server. |
Back to the Set Up a Certificate Authority Checklist
Task 5: Configure the SSL port on the CA server
Follow these steps to turn on SSL port access for the HTTP protocol on the CA server.
Back to Table of Contents
Setting Up SSL on a Server

Certificates required
Each SSL-certified server in the organization requires two certificates issued by the CA. The certificates allow the server to communicate with clients and other servers within the organization. These certificates are:
- The CA certificate
- The server’s individual certificate
Checklist: Set up a server to use SSL
Complete these tasks to set up a Domino server to use SSL.
Note: Tasks 1 through 7 in the above procedure are the same regardless of the Internet protocol(s) being used.
Forward to Set up server authentication on an SSL server checklist or Set up S/MIME and SSL for client authentication
The Server Certificate Administration database
The Server Certificate Administration database lets administrators:
- Create a server key file.
- Request server certificates from either a Domino or third-party CA.
- Add a CA certificate as a trusted root.
- Manage server certificates in a key file.
- Create a self-certified certificate for testing purposes.
Note: Access the Server Certificate Administration database using a Notes client or Domino Administrator client. The application creates files locally which must be moved to the Domino server or a network file server.
Task 1: Set up the Server Certificate Administration database
Domino creates the Server Certificate Administration database automatically at server startup. If the database does not exist, follow these steps to set up the Server Certificate Administration database.
Tip: Protect the Server Certificate Administration database
Prevent non-authorized access to this database by:
- Setting the default Notes and Web access to No access.
- De-selecting the Show in 'Open Database' dialog and the List in Database Catalog database properties.
Back to the Set up a server to use SSL checklist
Task 2: Create the server key file
The key file resides on the server and stores the CA certificate and signed server certificates for the server. Follow these steps to create the server key file.
Note: The default path for the key file is the Notes\data directory.
Back to the Set up a server to use SSL checklist
Task 3: Request a server certificate for the CA server
The server must hold a signed certificate from the CA. Follow these steps to request a certificate from the CA server.
Step |
Action |
1 |
From Domino Administrator Files tab, open the Server Certificate Administration database. |
2 |
Select Create Certificate Request. |
3 |
Enter the Key file name, including the path to the file. |
4 |
In the Log Certificate Request field, select Yes to log information to the Server Certificate Administration database. |
5 |
In the Method field, choose Paste into form on CA’s site. |
6 |
Click Create Certificate Request. |
7 |
Enter the password for the server key file, and click OK. |
8 |
Select the certificate (including the Begin Certificate and End Certificate lines). Press Ctrl-C to copy the certificate to the clipboard, then click OK. |
9 |
From a browser, access the Certificate Authority Application on the CA server. |
10 |
Select Request Server Certificate. |
11 |
Enter your name, e-mail address, phone number, and any comments for the CA. |
12 |
Press Ctrl-V to paste the certificate into the text box, then click Submit Certificate Request. |
Back to the Set up a server to use SSL checklist
Task 4: Add the CA’s certificate as a trusted root to the server key file
The key file must contain the CA’s certificate as a trusted root. Follow these steps to add the CA certificate as a trusted root to the server's key file.
Back to the Set up a server to use SSL checklist
Task 5: Sign the server certificate request
The CA approves the certificate request by signing the server certificate, then notifies the server administrator where and how to pick up the signed certificate. Follow these steps to sign the server certificate.
Back to the Set up a server to use SSL checklist
Task 6: Merge the signed server certificate into the server key file
After the CA approves the request, follow these steps to merge the signed certificate into the server key file.
Back to the Set up a server to use SSL checklist
Task 7: Move the server key file to the server
Use the operating system to move the server key file (KEYFILE.KYR) and the associated stash file (KEYFILE.STH) from the local Notes\data directory to either of the following locations:
- The Domino\data directory structure on the server
- A network file server to which the Domino server has access
Back to the Set up a server to use SSL checklist
Task 8: Configure the SSL port for an Internet protocol
The process of setting up SSL security is independent of the protocol. However, enabling the port that SSL will use to send and receive secure transactions is protocol-dependent. Note: If Microsoft IIS is the HTTP stack, the settings on the Internet Ports tab do not apply. Set up the HTTP protocol using Microsoft IIS tools.
Follow these steps to configure the SSL port for an Internet protocol.
Note: The SSL authentication options are discussed later.
Back to Table of Contents
Setting Up SSL Server Authentication

Authentication options
Domino supports the following types of secured Internet authentication:
- Server-only authentication using SSL
- Server and client authentication using SSL
- Signed or encrypted message authentication using S/MIME
What is server authentication?
Using SSL with server authentication, the server encrypts transactions and validates data. Server authentication allows the client to verify the identity of the server. When using only server authentication, all clients access the server anonymously or using basic name and password authentication.
Checklist: Set up server authentication on an SSL server
Complete these tasks to set up the SSL server and clients to use only server authentication.
Forward to Set up S/MIME and SSL for client authentication
Task 3: Add the CA certificate as a trusted root on the browser
In order to access the SSL-enabled server from a browser, the browser must hold the server’s CA certificate as a trusted root. Follow these steps to set up a browser client for server authentication.
Back to Set up server authentication on an SSL server checklist or Forward to Set up S/MIME and SSL for client authentication
Trusted root certificates for Notes clients
In order to access the SSL-enabled server from a Notes client, the Notes client must hold a trusted root certificate from the CA. The process for obtaining a trusted root certificate for Notes clients is different than for browser clients, as outlined in the following procedures.
Task 4a: Add the Internet Certifier to the Domino Directory
Before the Notes client can obtain a cross-certificate for the Internet server, the Internet certificate used by the CA server must be listed in the Domino Directory. Follow these steps to add the Internet Certifier to the Domino Directory.
Back to Set up server authentication on an SSL server checklist or Forward to Set up S/MIME and SSL for client authentication
Task 4b: Create a cross-certificate for the Notes user and the Internet certifier
Internet cross-certification allows Notes clients and servers to authenticate when the client and server are not certified by the same certifier. For example, a Notes user has a Domino certificate, /PT/World, but no Internet certificate, and the Web server is certified by an X.509 certificate, WorldCA.
Domino stores an Internet cross-certificate document in the user’s Personal Address Book. The cross-certificate includes Domino certificate information for the user and for the Internet CA certificate. After an administrator adds the Internet certificate to the Domino Directory, the Notes user follows these steps to create the Internet cross-certificate.
Back to Set up server authentication on an SSL server checklist or Forward to Set up S/MIME and SSL for client authentication
Task 4c: Test access to an SSL-enabled server
After setting up the Notes client for SSL authentication, follow these steps to test access to the SSL-enabled server from a Notes client.
Back to Table of Contents
Setting Up SSL Client Authentication and S/MIME

Internet authentication
An Internet client can access the Domino server with one of three levels of security. These levels, in descending order of security (most secure to least secure), are:
- With a client certificate
- With a user name and password
- With no authentication (that is, anonymous)
Client certificates
A company can also set up client certificates, which is the most secure method and eliminates the need for user names and passwords for Internet authentication. Clients can obtain a client certificate using either of the following methods:
- Issued by a Domino CA
- Obtained from a commercial CA, such as Verisign or CyberTrust
Client certificates can be used to:
- Authenticate with an Internet server using SSL.
- Send signed and encrypted mail (S/MIME) messages over the Internet.
Note: The process for setting up browser and Notes clients is the same for SSL client authentication as for S/MIME.
Client authentication
Using SSL with server/client authentication, the server and client communicate by encrypting transactions and validating data. Server/client authentication allows the client and server to verify the identity of each other.
In order for the Domino server to authenticate an Internet client, the person must be listed in the Domino Directory or a trusted directory, and the directory entry must contain a copy of the client certificate.
Checklist: Set up S/MIME and SSL client authentication
Complete these tasks to set up S/MIME and SSL client authentication.
Client authentication options on the server
The following figure shows the Server document SSL authentication options:

The administrator can turn on different combinations of authentication. Domino will test for the highest level of security first. The following table describes some of the possible combinations for SSL Web authentication.
For the Domino server to test for these conditions... | Set Client Certificate field | Set the Name & Password field | Set Anonymous field |
|
Do not test for Client certificate.
The user is asked to provide name and password.
If no valid name and password, the user can access the server as Anonymous. | No | Yes | Yes |
|
Test for Client certificate. If found, the user gains access.
If no Client certificate is found, the user is asked to provide name and password.
I f no valid name and password is provided, the user cannot access the server. | Yes | Yes | No |
|
Test for Client certificate. If found, the user gains access.
If no Client certificate is found, the user is not allowed access to the server. | Yes | No | No |
Back to Set up server authentication on an SSL server checklist or Back to Set up S/MIME and SSL for client authentication checklist
Task 2: Enable SSL client authentication on the server
After choosing the appropriate client authentication options, follow these steps to enable SSL client authentication on the server.
Note: On the CA server, the client certificate field should always be set to No in order to allow Web clients to access the server to request a client certificate.
Back to Set up S/MIME and SSL client authentication checklist
Task 3a: Create a Domino Directory entry for the Web user
The Web user must be listed in the Domino Directory or a trusted directory. Follow these steps to create a directory entry for a new Web.
Back to Set up S/MIME and SSL client authentication checklist
Task 3b: Request a client certificate
The user follows these steps to request a client certificate.
Back to Set up S/MIME and SSL client authentication checklist
Task 3c: Merge the CA certificate as a trusted root
Refer to the detailed procedure Add the CA certificate as a trusted root on the browser.
Back to Set up S/MIME and SSL client authentication checklist
Task 3d: Approve the client certificate request
Acting as the CA, follow these steps to sign your client certificate.
Note: The steps outlined above require the Administration process and do not occur immediately. The server performs these steps based on scheduled intervals.
Back to Set up S/MIME and SSL client authentication checklist
Task 3e: Merge the client certificate in the browser
The CA notifies the user that the request was approved, and provides the user with the pick up ID. The user must merge the signed certificate from the browser. Follow these steps to merge the client certificate and test access.
Back to Set up S/MIME and SSL client authentication checklist
Uses for Internet Certificates in the Notes ID file
A Notes ID can store an Internet (X.509) Certificate from an internal or external CA. Notes clients can use Internet Certificates to:
- Access an Internet Server using SSL.
- Send signed or encrypted mail messages over the Internet.
Note: The process for setting up a Notes client for SSL client authentication and for setting up a Notes client for S/MIME is the same.
Additional tasks for SSL client authentication setup
Setting up SSL client authentication for a Notes client includes all the tasks to set up a Notes client for SSL server authentication, plus an additional task that adds the Internet certificate to the user’s Notes ID and Person document in the Domino Directory.
We covered the first two tasks associated with setting up a Notes client for SSL client authentication and S/MIME earlier. Refer to Tasks 4a and 4b of Set up server authentication on an SSL server. The next section includes the procedure to complete Task 4c.
Back to Set up S/MIME and SSL client authentication checklist
Task 4c: Add the Internet Certificate to the user’s Person document and Notes ID
Notes users can use SSL and S/MIME with an Internet (X.509) certificate. Follow these steps to add the Internet Certificate to a Notes ID.
Back to Table of Contents
Web Monitoring Tools

Tools for monitoring Web servers
Administrators maintain Web access by monitoring the tasks and access from the Internet. The following table list the Domino tools used to monitor Web activity.
Monitor | Details |
| Log files | Logs record Web access and activity. The Default Log database is Domino Web Server Log (DOMLOG.NSF). |
| Server tab > Status tab | Displays HTTP task. |
| Server tab > Monitoring tab | If selected, displays HTTP on all servers. |
| Server tab > Statistics tab | Specific information on Web access and activity. |
Procedure: Enable the Web Log file
Follow these steps to enable logging to the Domino Web Server Log database (DOMLOG.NSF).
Monitoring Web Access
Most companies provide public information on its Web site, but wants to protect company confidential information from casual users. When a Notes client or Domino server attempts to communicate with a Domino server for replication or other transactions, the interaction is validated. It is then authenticated before any transaction can be made between the two sites. Information on valid and invalid attempts can be logged and used to review security. Monitoring Web access to the servers and data on a regular basis allows for verification of secure information.
Procedure: Access statistics
Statistics of Web transactions are available by viewing the HTTP statistics. Follow these steps to view the statistics and a consolidated report.
Back to Table of Contents
Reconfiguring Web Servers

Domino Web server Configuration documents
When changes occur in Web requirements and file locations, use Web server configurations to:
- Remap file directories.
- Remap/redirect URLs.
- Set up virtual servers.
- Protect files on the Web server.
Use Web server Configuration documents to control Web access and display.
Web Server Configuration menu options
Create Web server Configuration documents by selecting the Configuration tab > Server section >All Server Documents view > Web button. The following table describes the function of each of the choices on the Web menu.
Note: Each option creates a document that contains the information as described.
Menu Option Provides | Function |
| Create Virtual Server | Two options: Virtual Server and Virtual Host
Virtual Server:
- Permits hosting multiple Web sites on the same Domino Web server.
- Establishes a new Web site on a multi-site server.
- Creates a Virtual Server document in the Domino Directory.
- Settings specified in the Virtual Server document override corresponding settings in the Server document.
- Requires an additional IP address.
Virtual Host: Creates aliases for a Web site, so that people can enter two or more different URLs and still access a given page. |
| Create URL Mapping/Redirection | Mapping/redirection points one URL to another URL or directory. Remapping directories allows databases to be stored in multiple locations. These files can be moved to new locations without breaking URL links or changing Server and Virtual Server documents. |
| Create File protection | Creates a File Protection document which controls the access that Web browser clients have to the files. |
| Create Realm | Defines the realm display when a Web user is denied access to the URL or Web site. A realm is typically a URL path that the server sends to indicate the location, or path, for which the user has been authenticated. |
Back to Table of Contents
Maintaining Usable URLs on the Web Site

Maintaining links
When a company adds drives to support its Web site, administrators sometimes move files. To minimize disruption for users and allow them to use the same URL to access the files in the new locations, update Web configurations to reflect the new structure.
Redirecting vs. remapping
Redirecting a URL displays the page in the new location and displays the new URL in the location box for the user. Remapping a URL displays the page in the new location and hides the new URL from the user.
Note: Redirecting and remapping can be done for servers that host a single site and for virtual servers that host multiple sites.
Remapping URLs
Web administrators often move files to different directories to reorganize the Web file structure. Reorganize under the following circumstances:
- Changing system configurations
- Restricting Web file access through directory controls
- Taking a Web server off-line for monthly maintenance. During this time, another server with database replicas acts as the Web server
Moving files can break URL links and cause users to receive error messages. Remapping URLs helps administrators to control what users see when they request a particular URL. Example situations for remapping include:
- Adding drives
- Changing the top-level directory for Web files
- Moving CGI scripts to an execute-only directory
- Moving files, such as static HTML text, to a read-only directory
- Making the Web directory appear as a sub-directory in the site’s root directory
Scenario: Remapping URLs
Worldwide had a third-party Web server. They are now using a Domino server as their Web server. They need to move the files from the old Web server to the Domino server. After they move the files, a user attempts to access the new Domino server with the following URL:
http://www.world.com/pages/home.html
The following diagram shows a sample change in file structure:

Question: What will happen when the user attempts to access the server using the same URL?
Answer: The user will receive an error message that the server cannot find the requested page because the PAGES directory no longer contains the HOME.HTML file.
Question: What would you do to allow the user to continue to use the same URL, and access the page in the new directory structure?
Answer: Create a URL Mapping/Redirection document of type URL --> URL for the Domino Web server to map the /pages URL to the /Domino/html URL.
Question: What would happen if the HOME.HTML page contains links to a graphic using the code: ""?
Answer: The user will see a broken icon image in place of the graphics that used to stored in the IMAGES directory.
How would you fix the problem so that the graphic displays correctly?
Answer: Create a URL Mapping/Redirection document of type URL --> Directory for the Domino Web server to map /images URL requests to the D:\Lotus\Domino\Data\Domino\Icons directory.
Redirecting a URL
Redirecting the URL displays Web pages from the new location and shows the user the new location. The Domino Web server will automatically redirect the user to another server. Use URL redirection under the following circumstances:
Consolidating Web servers
Moving files from a third-party Web server to a Domino Web server
Procedure: Remap or redirect a URL
Follow these steps to remap or redirect a URL.
Step |
Action |
1 |
Select the Configuration tab > Server section > All Server Documents view. |
2 |
Click the Web button, then choose Create URL Mapping/Redirection. |
3 |
In the What do you want to set up field, select one of the following types:
URL --> Directory
URL --> URL
URL --> Redirection URL |
4 |
Select the Site Information tab, and enter the server's IP address. |
5 |
Select the Mapping tab, and complete the following fields:
Incoming URL string, for example, /images or /pages
For the URL --> Directory type, enter the Target server directory, for example, D:\Lotus\Domino\Data\Domino\Icons
For the URL --> URL type, enter the Replacement URL string, for example, /html
For the URL --> Redirection URL type, enter the Redirection URL string, for example, www.earth.com/homepage.nsf |
6 |
(Optional for URL --> Directory type) Select the Access tab, and select one of the following access levels:
Read
Execute |
7 |
Click Save and Close. |
8 |
Restart the HTTP server task. See Use the new Web server settings. |
Back to Table of Contents
Scenarios for Web Server Configurations

For the following scenarios, choose a method for updating the Web server. Make selections from the following list and then explain your choice:
URL --> URL
URL --> Directory
URL --> Redirection URL
Virtual Server
Possible solution to scenarios
The following possible methods can be used to update the Web server.
Situation | Method | Reason |
| Worldwide Corporation purchased a company that has a Web site. Worldwide’s Management wants this information to be part of the corporate Web site, but allow the subsidiary to retain its identity. | URL --> URL Directory | The company retains their original URL and Web site. |
| Worldwide Corporation’s Development team uses code that calls all executable scripts from /scripts. They do not want to recode the applications. | URL --> URL Directory
Access: Execute | All calls are redirected to /scripts and execute correctly. |
| The server in London is down. No replacement is expected for at least 2 days. The U.S. server must handle all Web traffic. | URL --> URL | The server name change is not visible to Web users. |
| The server in Brazil is being decommissioned and rebuilt for another server role. | URL --> Redirection URL | The server change is visible to Web users. |
| Web service response from Lisbon is slow. There is no money to purchase an additional server at this time. | Virtual server on another system | System may not have sufficient resources for an additional server. |
Back to Table of Contents
Creating Multiple Web Sites

Hosting multiple sites using virtual servers
The virtual server allows multiple HTTP tasks to run on a single Domino server. Virtual servers:
- Allow a single Domino server to act as many Web servers.
- Are configured by site. Each site can be configured in Domino with its own IP address, Home URL, default Home page, and HTML, CGI, and icons directories.
- Use the same Domino data directory structure for all virtual servers on the same physical machine.
- Use Domino Web server configurations to configure virtual servers.
Alternatives to virtual servers
One alternative to virtual servers is the use of partitioned servers. Partitioned servers share system resources. Domino supports up to six partitioned servers on a single computer. Each partition can run its own Web server. For more information on partitioned servers, see the Domino 5 Administration Help database.
Procedure: Create multiple Web sites on one Domino server
Follow these steps to create a new Web site on a multi-site server.
Back to Table of Contents
Creating a Web Realm

What is a Web realm?
A Web realm permits configuring Domino Web sites so that Domino authenticates and asks users for their names and passwords only once when they access different locations. The browser uses the string of text (realm) to determine which credentials (user name and password) to send with the URL for subsequent requests. The realm credentials are cached so that users are not prompted again for the same credentials.
For example, if users access www.world.com with their user names and passwords, then access www.world.com/catalog, they are not prompted for their passwords twice because /catalog is part of the world.com realm.
Worldwide Corporation has a number of customers that require access to both the Product Catalog and the Purchasing areas. The Web realm will allow customers single-entry access.
Procedure: Create a Web realm
Follow these steps to create a realm for a virtual server.
Back to Table of Contents
Protecting Files on the Web Site

Access control for the file system
Domino R5 allows the administrator to control access to any file stored in the file system on the server. For example, users can be prompted for name and password when selecting to:
View an HTML file.
Download a file.
Similar to the database ACL, which controls access to the Domino Web-enabled applications, administrators can set the following access for files:
To allow users to... | Set this access level... |
| Open files and start programs in the directory. | Allow GET and HEAD methods. |
| Send data to a CGI program, fill out forms and submit them to the server. | Allow POST and GET and HEAD methods. |
Procedure: Set access control at the file system level
Administrators can set access control for a specified drive, directory, or file. Follow these steps to set access control for the file system.
Step |
Action |
1 |
Select the Configuration tab > Server section > All Server Documents view. |
2 |
Select the Web Server document, and click Edit Server. |
3 |
Click the Web button > Create File Protection. |
4 |
On the Basics tab, enter the drive, directory, or specific file name to protect in the Path field. |
5 |
On the Access Control tab, click Set/Modify Access Control List, then:
a. Select the -Default- entry to change the default access to the resource, and click Next.
b. Click the down-arrow next to the Name field to select the people, servers, and groups from a directory.
c. Select an access level, and click Next.
d. When finished, click OK. |
6 |
Click Save and Close. |
Back to Table of Contents |