 |

Specialized System Administration Tasks 4.6

Back to Main Menu
The Specialized System Administration Tasks Learning Bytes are targeted at system administrators who are working with 4.6. Administrators working with 4.6 must have successfully completed the Domino Messaging Administration course. This Learning Byte covers the tasks involved in implementing additional Domino 4.6 Server features, including:
Replicating Databases Using Server Passthru -- Server Passthru allows you to use an intermediary server as a stepping stone to reach a server to which you do not have direct access. Administration of Server Passthru includes:
What is Server Passthru?
Setting Up Passthru for Replication
Load Balancing Server Activity Using Clusters -- A cluster is a group of up to six Domino servers that provide a high bandwidth network connection and a common cluster name specified in the server document. Cluster servers share or load balance server activity. Cluster administration includes:
Configuring a Cluster
Adding a Server to a Cluster
Removing a Server from a Cluster
Setting Up Failover
Setting Up Load Balancing
Replicating Databases within a Cluster
Managing Databases within a Cluster
Maximizing System Resources Using Partitioned Servers -- Server partitioning allows a single machine to host multiple servers. For example, one physical server can be "divided" or partitioned to host two separate Web sites or multiple Domino applications within a company. Administration of partitioned servers includes:
Planning for Partitioned Servers
Installing a New Partitioned Server
Managing Partitioned Servers
Tracking Notes Activity Using the Billing System -- Billing allows you to track, compile, and analyze system usage. Administration of Billing includes:
Using the Billing System
Setting Up Billing
Integrating User Management in Notes and Windows NT -- When you register or delete a Notes user, you can also update the Windows NT User Manager. Additionally, you can use User Manager menu options to specify that additions, deletions, and name changes be made to the Notes Public Address Book. Administrators can perform the following tasks using either the Notes or Windows NT interface:
Making User Management Easier
Adding and Deleting Users
Logging Notes Events to the Windows NT Event Viewer
Synchronizing Windows NT and Domino Users
Viewing Domino Statistics through the Windows NT Performance Monitor

What is Server Passthru?

Server Passthru is the process of using an intermediary server as a stepping stone from one server to a destination server to which the original server does not have direct access.
You will remember that in order to replicate databases on servers that run different protocols, you must first replicate the database to an intermediary server that shares both protocols. We can't replicate databases stored on servers running different protocols by a direct connection.
We could use Server Passthru to accomplish this replication. Server Passthru allows a server to use an intermediary server in order to replicate with servers elsewhere on the LAN, if they do not share a common protocol.
Back to Table of Contents
Setting Up Passthru for Replication

Procedure: Setting up Replication using Passthru
To set up replication using Passthru, follow these steps:
1. Create a Passthru connection document that specifies the name of the Passthru server and schedules replication between the two servers.
2. Create any other Passthru Connection documents necessary to route to the destination server.
3. Edit the server documents of each server in order to allow Passthru access.
Typical scenario for using Server Passthru
Users of Server A and users of Server D work with a replicated "Load Status Tracking" (TRACK.NSF) application. Other servers in the domain do not replicate this database. To synchronize the database, Server A needs to initiate replication with Server D. The following diagram shows the servers involved and the network protocols they are running:
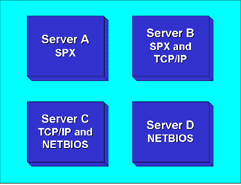
Servers A can use Server B as a Passthru server to get to Server C. Server C can in turn make a connection to Server D.
This scenario would require that you create Connection documents and edit the Server documents in the Public Address Book.
Creating a Passthru Server Connection document
When Notes attempts to make the connection from Server A to Server D based on the replication schedule specified in a connection document, it will use this same connection document to determine the route. First you must set up the connection from Server A to Server D using Server C as the Passthru server. This connection document also includes the enabled scheduled replication information.
The following figure shows this document:
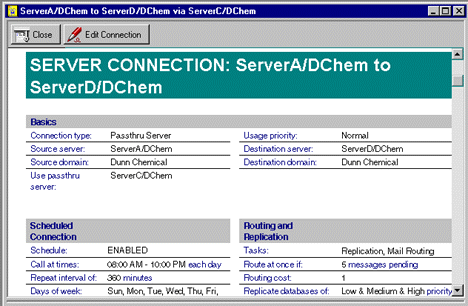
Public Address Book; Server - Connections; Add Connection; Connection Type: Passthru ServerNotes will look for another Passthru Connection document to determine the route to Server C, therefore you need a second Passthru Server Connection document from Server A to Server C using Server B as the Passthru server. This connection document does not need to include scheduled replication information. The following figure shows this Passthru Connection document. Note that the Schedule is disabled.
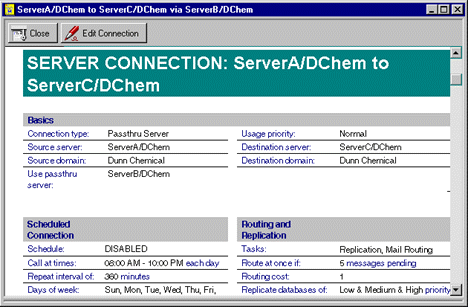
Public Address Book; Server - Connections; Add Connection; Connection Type: Passthru ServerEditing the Server documents
Finally, in order to use a server as a Passthru Server, you must specify this use in the Server documents for each server. The four relevant fields are in the Passthru Use section. These fields are described in the Controlling Passthru Access to Servers lesson in the System Administration 4.5 Learning Byte.
The table describes how the fields would be set up for the scenario described in this document:
Back to Table of Contents
Configuring a Cluster

Clusters are a feature included with Lotus Domino Advanced Services. A cluster is a group of up to six Domino servers that provide a high bandwidth network connection and a common cluster name specified in the server document. Clusters share or load balance server activity. When the specified threshold for a server is reached, the user is redirected to a more available server in the cluster.
Servers in a cluster work together as a unit to meet capacity and availability goals that exceed the capacity of a single machine. Clusters are designed to provide the level of service needed by large organizations; high availability is achieved by using database replicas. If a server is down, databases are still available on other servers in the cluster. The user is shifted to another replica in the cluster when opening the database.
Each server in a cluster must be on the same Local Area Network, use the same set of network protocols, and be in the same domain.
Cluster Administration
You administer a cluster by:
Adding a server to a cluster
Moving a server to a different cluster
Removing a server from a cluster
Setting up failover
Setting up load balancing
Replicating databases within a cluster
Managing databases within a cluster
Back to Table of Contents
Adding a Server to a Cluster

Procedure: Adding a server to a cluster
To add a server to an existing or new cluster, follow these steps:
Note: You must have at least Author access with the ServerModifier role in the Public Address Book and at least Author access in the Administration Requests database to perform this procedure.
1. Open the Public Address Book and navigate to Server - Servers.
2. Select the server(s) you want to add to a cluster.
3. Click Add to Cluster.
4. If you are creating a new cluster, select Create New Cluster, then type the new cluster name.
5. If you are adding a server to an existing cluster, select a cluster name from the list. You can add the server to the cluster immediately or use the Administration Process. If you add the server immediately, the current Public Address Book is updated to include your change.
What happens next
1. The Administration Process modifies the server document on the designated Administration Server for the Public Address Book and fills in the server name and the Replica ID of the Cluster Database Directory used in this cluster.
2. When the server document changes get replicated to the new cluster server, the tasks described in the table are started on the server.
3. The Cluster Database Directory Manager creates the Cluster Database Directory (CLDBDIR.NSF) and populates it with information for the databases on this server.
4. The Cluster Replicator replicates the Cluster Database Directory and Public Address Book with the most available server in the cluster.
5. The Cluster Manager enables the SHOW CLUSTER server console command. This command displays a list of cluster members and their status. An example of the SHOW CLUSTER command is shown below:
> show cluster
Cluster name: Cluster1, Server name: Server1/DChem
Server cluster probe timeout: 1 minute(s)
Server cluster probe count: 31
Server availability threshold: 0
Server availability index: 100 (state: AVAILABLE)
Cluster members (3)...
server: Server1/DChem, availability index: 100
server: Hub/DChem, availability index: 100
server: Server2/DChem, availability: UNREACHABLE
The following is an example of what you might see at the server console when a server is added to a cluster:
03/13/97 10:51:14 AM Cluster Administration Process started
03/13/97 10:53:18 AM Adding server to cluster Cluster1
03/13/97 10:53:21 AM Cluster Database Directory started
03/13/97 10:53:22 AM Cluster Replicator started
03/13/97 10:53:27 AM Created database Cluster Database Directory: cldbdir.nsf
03/13/97 10:53:38 AM Finished initialization of Cluster Database Directory
03/13/97 10:54:00 AM Cluster Administration Process shutdown
For detailed information on how the Administration Process adds a server to a cluster, see "About Adding a server to a cluster" in the Administration Help database.
Moving a server to a different cluster
The procedure for moving a server to a different cluster is essentially the same as adding a server to a cluster. After you specify the new cluster name, the Administration Process updates the server document with the new Cluster name and Cluster Replica ID. Next the Cluster Administration Process deletes the old Cluster Database Directory and creates a replica of the new directory, populating it with information for the databases on this server.
Back to Table of Contents
Removing a Server from a Cluster

Procedure: Removing a server from a cluster
To remove a server from a cluster, follow these steps:
Note: You must have at least Author access with the ServerModifier role in the Public Address Book and at least Author access in the Administration Requests database to perform this procedure.
1. Open the Public Address Book and navigate to Server - Clusters.
2. Select the server(s) you want to remove.
3. Click Remove from Cluster.
4. Click Yes to confirm the action.
For detailed information on how the Administration Process adds a server to a cluster, see "About Removing a server from a cluster" in the Administration Help database.
What happens next
1. The Administration Process removes the Cluster name and Cluster Replica ID from the server document in the designated Administration Server for the Public Address Book.
2. After the Public Address Book replicates to the server that is being removed from the cluster, the Cluster Administration Process is started and performs the following tasks:
- Deletes the Cluster Database Directory on the server.
- Removes any documents referring to the removed cluster server's databases from the Cluster Database Directory on the most available cluster server.
- Replicates the Cluster Database Directory with the other servers in the cluster.
- Shuts down the Cluster Replicator and Cluster Database Directory Manager server tasks.
- Removes the CLREPL and CLDBDIR task names from the ServerTasks line in the NOTES.INI file.
Back to Table of Contents
Setting Up Failover

Failover occurs automatically when a database is unavailable on one server and the Cluster Manager is able to redirect the Open Database request to another server in the cluster that stores a replica.
Failover usually occurs when a user tries to open a database that is either marked out of service or pending delete, or is on a server that is unavailable. For a complete list of circumstances under which failover occurs, see "About Failover" and its related topics in the Administration Help database.
Procedure: Setting up failover
Use one of the following methods to determine how failover occurs:
By Replica ID - Create a replica of the database on a server that is a member of the same cluster.
By path name - Create a second replica of the database on the same cluster server in a different directory. When more than one replica exists on the same server, the failover request is directed to a replica with the same path name as the original.
Procedure: Enable failover for mail files
When a user's home server is unavailable, you can enable mail routing to a replica of the user's mail file that is stored on another server within the cluster. To enable failover for mail files, use one of the following methods:
Edit the NOTES.INI file, and add the parameter MailClusterFailover=1.
Create or edit a Server Configuration document and set the parameter MailClusterFailover=1.
User failover is automatically enabled with CLUSTER.NCF on the client.
Note: This NOTES.INI file setting must be configured on every server in the domain through which mail routes, not just cluster servers.
Back to Table of Contents
Setting Up Load Balancing

To get the best performance from the servers that are members of a cluster, you should carefully monitor database usage, then set the load balancing parameters accordingly. The table describes the NOTES.INI file parameters related to load balancing on cluster servers.
You can set these NOTES.INI file parameters using either of the following methods:
Edit the NOTES.INI file and add the appropriate parameter.
Create or edit a Server Configuration document and specify a value for the appropriate parameter.
After the cluster is configured and has been used for a period of time, you may want to analyze cluster performance. For more information on Cluster Analysis, see "Setting up a Cluster Analysis" and its related topics in the Administration Help database.
Back to Table of Contents
Replicating Databases within a Cluster

The Cluster Replicator server task (CLREPL) keeps the databases that are stored on cluster servers synchronized. You do not need to schedule replication between servers in a cluster. When a change occurs in a database, the Cluster Replicator pushes the change to replicas on other servers in the cluster. It uses the Cluster Database Directory (CLDBDIR.NSF) to determine which other servers in the cluster store replicas of the changed database.
To replicate a cluster server with a server that is not a member of the cluster, schedule replication using a connection document in the usual way for the Replicator (REPLICA) to exchange data.
Forcing replication of databases within a cluster
To force replication from the server console, type one of the following commands:
REPLICATE <clustername>
REPLICATE <clustername> <local filename>
REPLICATE <clustername> <local directory>
Procedure: Disabling cluster replication for a database
To disable cluster replication for a particular database, follow these steps:
1. Open the Cluster Database Directory (CLDBDIR.NSF) and navigate to Databases by Server.
2. Open the database document for which you want disable replication.
3. Choose Actions - Edit Document.
4. Select Disabled in the Cluster Replication field.
5. Save and close the document.
Procedure: Enabling multiple cluster replicators
To enable multiple cluster replicators (CLREPL), use one of the following methods:
Add two or more CLREPL tasks to the ServerTasks setting in the NOTES.INI file. This will load multiple Cluster Replicators on subsequent server startups.
Use the LOAD CLREPL server console command. This will load another Cluster Replicator for this server session, but not for subsequent server startups.
Back to Table of Contents
Managing Databases within a Cluster

Cluster Database Directory
The Cluster Database Directory (CLDBDIR.NSF) is a database that resides on each server in a cluster and contains information about all the databases within a cluster. Each server in the cluster stores a replica of the Cluster Database Directory. The Cluster Replicator keeps replicas of this database in tight synchronization. The following figure is an example of a document in the Cluster Database Directory.

Cluster Database Directory documentMoving a database from a cluster server
Use the Database Tools dialog box to move a database from one cluster server to another. The destination server does not have to be a member of a cluster. The Administration process creates a replica on the destination server, then marks the database for deletion on the source server. The following figure shows the Move a database tool:
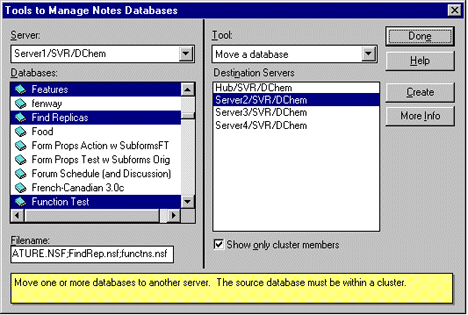
File - Tools - Server Administration; Database Tools; Move a databaseTo use this feature, you must ensure the following access:
Administrator must have Manager Access to the source database.
Administrator must have Create replica databases and Create new databases access on the destination server.
At least one server in the domain that stores a replica of the database must have Create replica databases access on the destination server. The destination server must have at least Reader access to this replica.
For more information on the details of how the Administration Process moves a database, see "Details: Moving databases from a cluster server" in the Administration Help database.
Cluster management
Use the Database Tools dialog box to perform additional cluster management. The following figure shows the Cluster Management Tool:
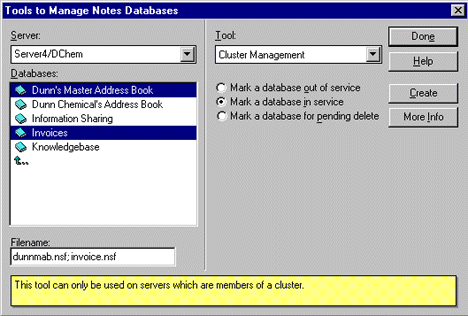
File - Tools - Server Administration; Database Tools; Cluster Management
The table describes the options available with this tool.
When you select one of these options, the availability of the database in the Cluster Database Directory gets updated.
For more information about clusters see "About Notes server clusters" and its related topics in the Administration Help database.
Back to Table of Contents
Planning for Partitioned Servers

Server Partitioning
Server Partitions is a feature included with Lotus Domino Advanced Services. It is available when you install a server on a Windows NT or UNIX computer. Use partitioned servers to set up multiple Domino servers on the same computer. The partitioned servers share the system resources. Partitioned servers on the same computer can belong to different Domino domains. Use partitioned servers to set up:
Multiple Domino Web Application Servers on the same computer.
Multiple Domino servers in different domains.
Each partitioned server can also be a member of a cluster if you require high availability of Notes databases.
Carefully plan your naming scheme. Any administrator should be able to immediately distinguish one partitioned server from another. Avoid changing a server name after you install.
Procedure: Planning for partitioned servers
Consider the following questions when planning to use partitioned servers.
1. How do partitioned servers fit into your current Domino environment?
2. How many partitioned servers should you install?
3. What network protocols should you use for the servers?
4. If you choose the TCP/IP network protocol, should you use unique IP addresses for each server or should they share the same network interface card and IP address?
5. What should you name each partitioned server?
6. How do you determine the data directory name for each partitioned server's data files?
For more information on these considerations, see "Planning a partitioned server configuration" and its related topics in the Administration Help database.
Note: In order to use server partitions, you must obtain a Lotus Domino Advanced Services license.
Back to Table of Contents
Installing a New Partitioned Server

This document provides an overview of the process of installing an additional partitioned server, including the tasks necessary to install and the order in which they should be performed. Complete details are available in the Administration Help database and the Lotus Domino Install Guide for Servers.
Partitioned servers use different Notes data directories and NOTES.INI files. When you install partitioned servers, install a separate data directory for each server.
The first time you install a partitioned server, name both the program directory, which by default is NOTES, and the data directory. During subsequent installs, name the data directory only.
Procedure: Installing an additional partitioned server
To install a second and subsequent Domino partitioned servers on a Windows NT computer, follow these steps:
1. Install and set up the first partitioned server. Be sure to select the Advanced Services tab to install Advanced Services and Advanced Services data.
2. Run the Lotus Domino 4.6 Powered by Notes Installation Program.
3. At the Install Options screen, select "Customize features - Manual install" to install the additional Domino partitioned server and click OK.
4. Enter the drive and directory where you want this server's Domino data files to reside and click Next. We recommend that you use the name of the new partitioned server to name its data directory.
Note: When installing additional Domino partitioned servers, the program directory field does not appear because all Domino partitioned servers share the same program files.
5. By default, both the Domino and Advanced Services tabs have the appropriate features selected for an additional Domino partitioned server install. Do not select or deselect any of the features. You must install the default features selected.
Note: You do not need to select the "Advanced Services" option for an additional partitioned server install.
6. Continue with the installation as usual.
7. Click Done when installation is complete.
8. Repeat this procedure for each additional Domino partitioned server you want to install.
After you install your Domino partitioned servers, set up the servers in the usual way. If you are installing the first server in an organization or domain, see "Setting up Domino on the first server" in the Domino Install Guide for Servers. For information on setting up additional servers, see "Setting up Notes on an additional server" in the Administration Help database.
For more information about setting up the a partitioned server using the TCP/IP protocol, see "Ways to configure partitioned servers for TCP/IP" in the Administration Help database.
Back to Table of Contents
Managing Partitioned Servers

Notes client software
Each partitioned server has its own Notes client which shares its system resources and Notes data directory. The Setup program automatically assigns a unique partition number to each partitioned server. Partition numbers guarantee separate system resources for each partitioned server.
Perform administration tasks on a partitioned server in the same way you would perform administration tasks for any Domino server.
Failures and shutdowns
One partitioned server shutdown or failure does not affect other partitioned servers that run on the same computer. If one server shuts down, the others continue to run. If a partitioned server encounters a fatal error, an automatic cleanup procedure allows the server to restart without restarting the computer. For this to occur, each partitioned server's NOTES.INI file must contain the KillProcess=1 setting.
For more information on partitioned servers, see the Lotus Domino Install Guide for Servers.
For troubleshooting information, see "Why are partitioned server problems occurring?" in the Administration Help database.
For information on removing a partitioned server, see "About removing partitioned servers" in the Administration Help database.
Back to Table of Contents
Using the Billing System

Billing is a feature included with Lotus Domino Advanced Services. A Domino server that has the Billing server task enabled becomes a "billing server". It tracks whatever billing activities you specify.
The next lesson describes an overview of how to set up a Domino billing server.
Complete details are available in the Administration Help database.
Back to Table of Contents
Setting Up Billing

Procedure: Setting up billing
To set up billing, follow these steps:
1. Specify the type of Domino/Notes activities you want tracked by including the appropriate activities in the BillingClass parameter in the NOTES.INI file. The Billing classes are outlined in the table. For more information on Billing classes, see "About Notes Billing classes" and its related topics in the Administration Help database.
2. Enable the Billing server task by adding Billing to the ServerTasks line of the NOTES.INI file. The Billing server task collects the billing information. For more information on the Billing server task, see "About the Notes billing server task" and its related topics in the Administration Help database.
3. Configure the Billing parameters. The table describes the NOTES.INI file parameters you can set to configure Billing. For more information on these NOTES.INI file settings, see "About NOTES.INI settings for Billing" and its related topics in the Administration Help database.
For more information on the Billing database, see "Viewing the Billing database" and its related topics in the Administration Help database.
Back to Table of Contents
Making User Management Easier

Notes and Windows NT Integration
When you register or delete a Notes user, you can also update the Windows NT User Manager. Additionally, you can use User Manager menu options to specify that additions, deletions, and name changes be made to the Notes Public Address Book. Administrators can perform the following tasks using either the Notes or Windows NT interface:
Add and delete users
Log Notes Events to the Windows NT Event Viewers
If Domino 4.6 is being used with Windows NT 4.0, a few additional integration features are available:
Notes User Manager Extension (NUME) - Synchronizes NT and Domino accounts
View Domino statistics through the Windows NT Performance Monitor
To use these features, you must have a properly certified Notes ID, appropriate access to make any changes to the Public Address Book, and be a member of the local Administrator Group or Account Operator Group in Windows NT.
Back to Table of Contents
Adding and Deleting Users

Adding Users
During user registration, administrators can add an NT user account and specify the NT Group Name as shown in the following figure:
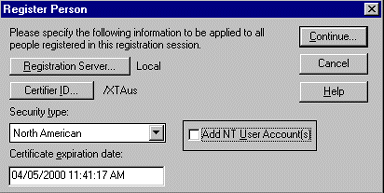
File - Tools - Server Administration; People; Register PersonAdditionally, administrators can specify an NT user name as shown in the following figure:
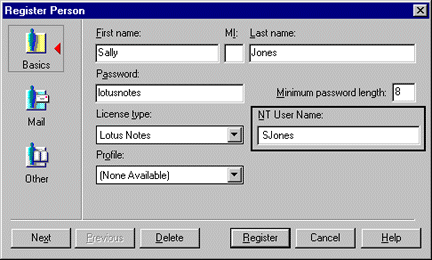
File - Tools - Server Administration; People; Register Person; Continue
For more information on registering Notes users from within Windows NT, see "Ways to register Notes users with Windows NT User Manager" in the Administration Help database.
Enable Single Password Logon
The NT account password will be set to the first 14 characters of the Notes password supplied during user registration. Note that changing a Notes password does not affect the Windows NT password.
This option is only available on clients running a minimum of Notes Release 4.5 for Windows NT.
Deleting Users
In the Public Address Book, administrators can use the Delete Person action button to delete the selected person's NT user account. When the Administrator deletes a person on a server that is running Windows NT, the administrator will be asked whether to delete the person's Windows NT network account. This prompt appears regardless of whether or not a Windows NT account for the user exists in User Manager.
The Administration Process must be set up in order to use this action button. Note that deleting the person document does not delete the NT user account; you must use the Delete Person action button.
For more information on deleting Notes users, see "About how the Administration Process deletes a user name" in the Administration Help database.
Back to Table of Contents
Logging Notes Events to the Windows NT Events Viewer

Procedure: Log Notes Events to the NT Event Viewer
To log Notes Events to the Windows NT Event viewer, follow these steps:
1. Open the Statistics and Events database (EVENTS4.NSF).
2. Choose Create - Monitors - Event Monitor.
3. Select Event Notification Enabled in the Enabled/Disabled field.
4. Select Server in the Event type field.
5. Select Log to NT Event Viewer in the Notification method field.
6. Enter the server name(s) to monitor or * for all servers.
7. Select an Event severity.
8. Save and close the document.
Events are logged to the Application View of the NT Event Viewer by level of severity according to the table.
Back to Table of Contents
Synchronizing Windows NT and Domino User Accounts

How to Synchronize Windows NT and Domino User Accounts
Notes User Manager Extension (NUME) synchronizes Windows NT and Domino user accounts.
Enabling synchronization
Use the following procedure to enable NUME synchronization:
1. During server installation, using the custom installation process, install and enable NUME.
2. Open Windows NT User Manager .
3. Choose Notes Synchronization Options.
4. Enable User Synching.
5. Enable "Set common password on user synching" if you wish to synchronize passwords
Synchronizing users through NUME
Use the following steps to synchronize users through NUME:
1. Open Windows NT User Manager
2. Open the Username Window
3. Select the users to synchronize with Domino
4. Choose > Notes > Synch Selected NT Users with Notes
5. If password synching is enabled, you will have to enter and confirm the password for each user being synchronized
Back to Table of Contents
Using the NT Performance Monitor to View Domino Statistics

Integrating the NT Performance Monitor and Domino Statistics
You can install Domino server statistics as a counter within the Windows NT Performance Monitor. The Performance Monitor lists all numerical Domino server statistics, including statistics generated by add-in programs. You can choose specific statistics to appear in a report or chart for analysis.
For complete information on using the Performance Monitor, see Volume 4, Optimizing Windows NT, of the Windows NT Resource Kit, or the Windows NT Device Development Kit.
Installing Domino statistics as a Performance Monitor counter
If you installed the Domino server by using the standard server install option, complete the following steps:
1. Run the Install program again and select "Customize features - Manual Install."
2. Make sure that the install paths are the same as for the original server install.
3. Deselect all install options except for "Notes Performance Monitor."
4. After the Install program completes, restart the server.
5. Type the following command from the program directory on the server:
notesreg.bat directory where directory is the full path to the program directory.
For example, type the following: notesreg.bat C:\notes
Viewing Domino statistics using the Performance Monitor
Follow these steps to view Domino statistics using the Performance Monitor:
1. Start the Performance Monitor by clicking the Performance Monitor icon or by typing the following command at the system prompt:
start perfmon
2. Choose Edit - Add To Chart or Edit - Add to Report.
3. In the Object box, select Lotus Domino.
4. In the Instances box, select a Domino statistic you want to include in a chart or report, then click Add. Repeat for each statistic you want to add.
Removing the Domino statistic counter from the Performance Monitor
To remove the Domino statistic counter from the Performance Monitor, type the following command at the NT command prompt:
unlodctr notestat
Back to Table of Contents
|