
Securing the Domino Environment

Back to Main Menu
Introduction
Security Layer Review
Network and Domino Firewalls
Isolating a Domino Server to Create a Quasi Firewall
Certificates: The Basis for Domino Security
Notes ID Component Review
Protecting a Domino Server
Accessing a Server through Successful Authentication
Fortifying Server Security Using Server Restrictions
Bypassing Authentication: Allowing Anonymous Access
Enhancing Server Security by Comparing Public Keys
Server Security Scenarios
Protecting a Notes Workstation
Password Basics
Automatic Password Protections
Protecting the ID with Password Checking
Enabling Multiple Passwords
Execution Control Lists (ECLs)
Scenario: Lost Password Problem
Introduction

This Learning Byte provides additional information about specific security topics covered in the Domino Messaging Administration (Release 4.6) and Domino Applications Administration (Release 4.6) courses, with the exception of HTTP and Secured Socket Layer (SSL).
Most of the information contained in this Learning Byte assumes knowledge of the security-related topics covered in the aforementioned System Administration (Release 4.6) courses; however, this Learning Byte provides a review of key security concepts.
Securing databases, documents and fields is the job of the database developer and is therefore beyond the scope of this Learning Byte. For additional information, refer to the Learning Byte entitled Securing Your Application. The Application Development curriculum also covers these topics in detail.
Back to Table of Contents
Security Layer Review

There are several layers at which you can protect your computer environment. These include:
Network: Use network firewalls to protect the network from direct access from other networks and dial-in access via modems.
Domino servers: Protect Domino servers physically by locking them in a room with limited access. Protect servers logically by preventing access to and from specific people, groups, and servers.
Notes workstations: Use passwords and Execution Control Lists (ECLs) to protect Notes workstations.
Databases: Protect databases on the servers with Access Control Lists (ACLs). Use roles and ACL refinements along with ACLs to specify who can perform what kind of action on which documents. To further hide and protect databases, use directory and database link access, the Open Database dialog box, and database encryption.
Documents and fields: Document and field-level security is the job of the database developer.
The following diagram shows the process the user must go through to gain access to data.

Back to Table of Contents
Network and Domino Firewalls

On the Web, the term firewall is used to describe the server which protects your network from the rest of the world. Network protection is managed by limiting access based on IP addresses.
Since Domino sits above the transport layer, it cannot limit which IP addresses have access to a domain. If a Domino administrator carefully implements security, it is possible to limit which named entities access the Domino server. This, in effect, allows administrators to set up an equivalent firewall system using Notes and Domino security.
Isolating a Domino Server to Create a Quasi Firewall
To best protect the Domino domain, isolate a server which will communicate with the outside world from the domain. To do this, either:
Certify the server under a different organization certifier ID.
Place the server in a different domain.
For example:
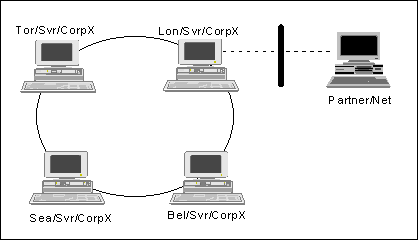
In addition, physically isolate the server from other servers.
If this "external" or "public" server is in the same domain as your other Domino servers, you must protect the Name and Address Book. To do this, replicate only the necessary documents to the external server's Name and Address Book. For example, replicate only Server documents, select groups, and one Connection document.
Note: If the server is in a different domain, this is not an issue since the Name and Address Book is unique by definition.
Back to Table of Contents
Certificates: The Basis for Domino Security

Certificates and certifier IDs are the basis for security in Domino. The organization's certifier ID is created during first server setup. Subsequent certifier IDs in the same organization are created by either the organization's certifier ID or by another certifier ID in the organization's ancestral chain of certifiers.

Domino uses the certificates created from the certifier IDs to identify entities (users or servers). To do this, the certificate uses an electronic signature from the certifier to associate a user or server's name with a public key.
Therefore, a certificate from /Xtreme issued to Inga Smith/Xtreme means that according to /Xtreme, Inga Smith/Xtreme has a public key stored in the certificate.
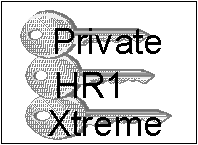
Keys in Inga Smith's ID file
Note: Entities with no common ancestral heritage are not barred from communicating with each other. One way to facilitate access between entities is cross certification. Cross certification is a two-way process. Organizations must cross certify with each other. Certifier IDs, servers, and users can all issue cross certificates.
Back to Table of Contents
Notes ID Component Review

The Notes ID identifies users and servers. It contains information necessary to allow access to data in a domain. Both servers and users have their own unique IDs. Each user/server ID contains:
Name and license information
Public key
Private key
Certificates
Encryption key(s) (optional)
Password (This information is used to encrypt the private key and encryption keys. The password itself is not stored anywhere.)
Note: The password is used to protect and encrypt the ID file. The other components are used to identify the owner of the ID in order to determine access to resources.
Back to Table of Contents
Protecting a Domino Server

When an entity (either a user or a server) tries to access a Domino server, the server first verifies whether or not that entity is entitled to access the server. The entity may be able to access the server if either:
It can authenticate with the server.
The server is configured to allow anonymous access.
Accessing a Server through Successful Authentication
Authentication is the verification process Domino uses to ascertain a user's or server's identity. It is based on certificates. Authentication is successful if users and/or servers share a common certificate. If users or servers each share an authority (the certifier), they trust each other's identity. Authentication is successful if any of the following are true:
Hierarchical IDs have a common ancestor.
Flat IDs have a certificate in common.
Hierarchical to Flat IDs have a certificate in common.
Hierarchical IDs without a common ancestor have a cross certificate available.
How keys identify users and servers during authentication
Each Notes ID contains public and private keys. A key is a set of numbers that provides access to information and/or data. Domino uses the RSA cryptosystem technology. RSA keys come in pairs: a public and a private key. Public and private keys are used as follows:
Private key: Available to one owner (person, server, or certifier). Contained in the owner's ID file.
Public key: Available to everyone. Stored in the owner's ID file and recorded in the Public Address Book.
The authentication process
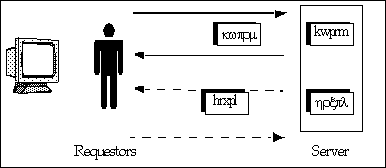
The entity or requester wanting access to a server generates a random number. This is sent to the server along with the requester's name, public key, and certificates.
The recipient server creates a message using the random number from the requester, signs it, and sends it back.
The requester verifies that the signature is correct and that the random number contained in the signed message matches the original random number.
This sequence is then repeated in the opposite direction so that the requester can verify that the server is authentic.
The Domino server uses the public and private keys to verify that all entities (users and servers) are who they say they are. In this verification process, public and private key pairs are used to decrypt one another.
Scenarios to test your understanding of authentication
In each of the following four scenarios, determine which entities can authenticate. The solutions follow.
Scenario 1

Scenario 2

Scenario 3

Scenario 4

Authentication scenario solutions
Answer to Scenario 1: Hierarchical to flat IDs have a certificate in common.

Answer to Scenario 2: Flat IDs have a certificate in common.

Answer to Scenario 3: Hierarchical IDs have an ancestor in common.

Answer to Scenario 4: Hierarchical IDs, with no common ancestor, have cross certified.

Back to Table of Contents
Fortifying Server Security using Server Restrictions
Server documents in the Public Address Book contain restrictions used to control access to a server. Server access includes the following:
Only allow server access to users in this Address Book
Yes limits access to only those users listed in the Public Address Book.
No allows access from users and servers in other domains.
Access server
If this field is left blank, there is no access restriction.
If the group LocalDomainServers is in this field, only servers in the local domain can access the server.
Not access server
This field is for explicit restrictions, such as terminations.
This field takes precedence over the Access server field.
Allow anonymous Notes connections
Yes indicates that users and servers can anonymously access the server without authenticating.
No indicates that users and servers must hold a certificate in common capable of authenticating with the server to gain access.
What happens when access levels conflict or coincide?
If a name appears in both the Access server and Not access server fields, the entry in the Not access server field takes precedence over names entered in the Access server field.
If a server is configured to allow anonymous access and an entity is listed in the access server field, the entity (server or user) is allowed to access the server as the named user or server. Since that entity's identity is known to the server, it is attributed with any additional access or restrictions based on the server or user name.
Back to Table of Contents
Bypassing Authentication: Allow Anonymous access
It is possible to access a server without authenticating. Allowing anonymous access to the server is a convenient way for administrators to allow access to users and servers without requiring ancestral certificates or cross certificates.
To designate a server as anonymous, check Yes in the Allow Anonymous Notes connections field in the Security section of the Server document.

If you allow Anonymous access to a server, you can still maintain server access control as follows:
Use the Server Access Control List (ACL).
Place servers within the network firewall.
Limit or restrict passthru access to the server.
Note: Remember that the scope of this discussion is protecting the server. Once the server is secure, it is the database manager's responsibility to set each database ACL appropriately to control access to databases.
Back to Table of Contents
Enhancing Server Security by comparing public keys
To prevent unauthorized use of an ID, administrators can configure servers so that clients can authenticate with the server only if the public keys on the client IDs match the public keys stored in the Public Address Book.
Comparing public keys enhances the security inherent in the authentication process. For example:
If a user loses an ID, the administrator can restore an archived ID and generate a new public key for the ID while retaining the same name and private key. If unauthorized users attempt to use the original ID, they will not be able to access the server because the new public key for the ID will no longer match the public key on the original user ID.
Users who are not listed in the Public Address Book will not be able to access the server. This secures the server against users from another organization and users who have left the company.
Note: There is no performance penalty when comparing public keys. Authentication does not take any longer when performing the comparison.
Additional considerations when using public key comparisons
Flat IDs: The Administration Process copies each server's public key to the Address Book. However, you must manually copy the public key from any flat ID to the relevant documents in the Public Address Book because the Administration Process does not address flat IDs.
Cascading Address Books: Include public keys in the primary Public Address Book. The server will not look in any additional Address Books specified in the NOTES.INI file.
To enable public key comparison, follow these steps:
Open the Public Address Book. Go to Server > Servers.
Select the server on which you want to enable public key comparison. Click Edit Server.
Expand the Security section.
Select Yes for "Compare Notes public keys against those stored in Address Book."
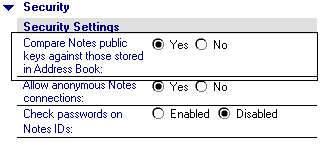
Save and close the Server document.
Stop and restart the server for the changes to take effect.
Back to Table of Contents
Server Security Scenarios
In each of the following scenarios, the administrator must perform a series of tasks in order to allow the appropriate access. Read the scenario and identify the decisions the administrator must make and the actions to take. The answers follow the second scenario.
Scenario 1: Connecting Two Domains for Mail Routing
There are two Domino domains: London and Paris. Each domain wants to connect to the other for mail routing purposes only. The servers are set up as follows:
London's server (Mail01/SVR/London) has been designated as the company's external server.
Paris' server (PreSales/SVR/Paris) has been designated as the external server for Paris.
From a security perspective, what should the administrator consider and do to connect these two domains for mail routing?
Scenario 2: Connecting Two Domains for Database Access
A consultant, Charlie Doucette/Brunswick/Canada, needs to communicate with the Domain Asia. Asia has many servers, all of which are identified in their own organizational unit, SVR.
The relationship between the companies, Canada and Asia, is such that Charlie should be allowed to assist in the development of any database. How should security be set up? Are there any database security issues you can spot?
Scenario Solutions
Answer to Scenario 1: Connecting Two Domains for Mail Routing
To connect the Domains London and Paris for mail routing only, the administrators at each site should:
Cross certify London and Paris at the Server ID level.
Since there is no evidence that their hierarchical names have any ancestors in common, London and Paris should cross certify. Cross certification facilitates mail routing by eliminating the need for users to address mail with explicit addresses.
The administrator should consider future communications, such as whether or not another server in Domain London will communicate with Domain Paris, and what the certification model for that domain is. The best practice is to issue a cross certificate on the Server ID level to provide the highest protection on the server.
Modify the Server Access lists on each server's Connection document to ensure that the servers can access each other.
Ensure the default Access Control List (ACL) on MAIL.BOX is Depositor. This allows the router for both servers to place mail in the file.
Add each server's name to the group designated for other domains to connect, such as OtherDomainServers.
Answer to Scenario 2: Connecting Two Domains for Database Access
Security between the Canadian and Asian corporations would best be configured as follows:
The most secure option is to cross certify Charlie and the OU for the servers in Asia. This requires Charlie to work from a workstation, however, because his own ID would be the only one allowed to communicate with the servers in Asia.
Note: If replication between servers is necessary, Charlie's server would have to be cross certified with the servers in Asia.
Update the Server Access lists in the Asian corporation to allow Charlie or the server to update databases.
Tip: Consider adding new databases authorization.
Database ACLs for the databases affected by Charlie must be updated to allow Charlie to make changes. The database administrator may decide to provide such access by means of a group.
If there are background agents in use, each agent would be signed with an ID, which is allowed to make the necessary changes in the database.
Back to Table of Contents
Protecting a Notes Workstation

Password Basics
A password is an alphanumeric string of up to 63 characters. It is used to permit or deny access to a server, server-based database, or ID file.
When users enter a password, Notes decrypts the user's private key using the typed password as a key. If users enter the wrong password, the checksum fails, and the decrypted result is random junk.
When users change passwords, they must first provide the old password which is used to decrypt the encrypted information contained in the ID. The new password is then used to re-encrypt it.
If users lose or forget the passwords, there is no way to recover them or to set new passwords, since the passwords are not stored anywhere.
Password tips for users
Clear Passwords As a general practice, users and administrators should clear their user information by pressing F5 each time they leave their workstation. This clears the ID password information from memory. The next person who attempts to access the Notes desktop will be required to enter the password to gain access with the current ID.
Lock the ID In File > Tools > User Preferences, click Basics. Fill in the "Lock ID after" section to lock the ID file after a specified number of minutes of inactivity. This provides additional security if a user forgets to clear the password.
Back to Table of Contents
Automatic Password Protections
Passwords have a built-in time-delay mechanism to deter password-guessing programs. When a user types the correct password stored in the ID, Domino permits almost immediate access. However, if a user enters the wrong password, Domino delays the time it takes to be able to proceed. Each time the user enters the wrong password, the time delay increases substantially.
Domino's anti-spoofing mechanism makes it difficult to steal a user's password by writing a password-capturing program that resembles the password prompt dialog box. This mechanism creates a unique icon, which resembles a hieroglyphics pattern when a password is typed.
Back to Table of Contents
Protecting the ID with Password Checking
Domino provides administrators with the ability to provide additional ID protections including password checking. Password checking requires the user to enter the correct password during authentication in order to gain access to a server.
If password checking is enabled:
Users are not required to enter their password more often than they must if password checking is not enabled.
If an ID is stolen and the thief knows the password and decides to change it and authenticate it with the server, the fraudulent information is stored in the server's password digest field. The valid user will not be able to authenticate with the server.
To address this issue, the administrator must delete the fraudulent value in the Password digest field to lockout the thief.
Enabling Password Checking
To enable password checking:
All user and server IDs must be hierarchical.
The Administration Process should be set up.
Note: If the Administration process is not set up, you cannot set up password options for multiple users simultaneously. Instead, you must either manually edit the Person documents, or design an agent to modify the Person documents.
For details about how the Administration Process enables password checking, see “Details: Setting up password checking during authentication” in the Administration Help database.
To enable password checking:
In the Person Document in the Name and Address Book, choose Actions > Set Password Fields. Click Yes to continue. The following dialog box will appear:
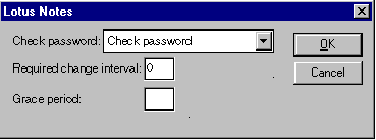
Set the password field to Check password.
The Required change interval is optional. Use it to indicate the number of days users have to enter a new password. 0 indicates no required password change.
The Grace period is also optional. Use it to indicate how frequently users must change their passwords before being locked out from the server that check passwords.
Select the Server document for a server on which you want to enable password checking. Click Edit Server.
Expand the Security section. Select Enabled in the Check passwords field.
Restart the server for the changes to take effect.
Back to Table of Contents
Enabling Multiple Passwords
In addition to enabling password checking, Notes IDs can be set up to require multiple passwords. Multiple passwords provide tighter security for server and certifier ID files by preventing any single person from accessing them. This can dissuade an individual from absconding with the certifier ID.
An ID can have a maximum of eight passwords. The administrator can determine the number of correct passwords required to use the ID. For example, it is possible to assign up to eight passwords to an ID, yet require only a subset of the assigned number for access.
To enable multiple passwords:
1. Choose the Certifiers icon from the Administration panel. Choose Edit Multiple Passwords.
2. Select the ID to assign multiple passwords to and press Enter.
Have each administrator whose passwords will be assigned to the ID complete the following steps:
1. Enter the administrator name in the Authorized User field.
2. Enter a password in the New Password field.
3. Re-enter the password in the Confirm Password field.
4. Click Add to add the User ID to the ID file.
5. Enter the number of passwords required to access the ID.
Note: Any password assigned to an ID before authorized passwords are assigned, are no longer valid.
For more on how to set up multiple passwords, see "Assigning multiple passwords to an ID" in the Administration Help database.
Back to Table of Contents
Execution Control Lists (ECLs)
Execution Control Lists (ECLs) limit programs that other users create from performing actions on the file system and databases.
The server uses ECLs to verify that the signature is valid. The server can do this because every design element in a database has the signature or name of the person who created it.
Notes looks at the signature to determine whether the ECL allows a specific action, such as whether or not to open a database or message. For example, ECLs can warn users against programs that may contain viruses.
Each workstation includes a standard ECL. ECLs are not customized for each user or workstation.
Using the Administration ECL
The Administration ECL in the Public Address Book is used to:
Establish the default ECL for new workstations.
Add Notes ID names used to sign documents.
Allow or deny users the ability to modify their ECL.
Edit the Administration ECL in the Public Address Book using Actions > Edit Administration ECL.

If administrators allow users to manage their workstation ECL, users can access the settings in File >Tools > User Preferences; Basics; Security Options.
ECL Considerations
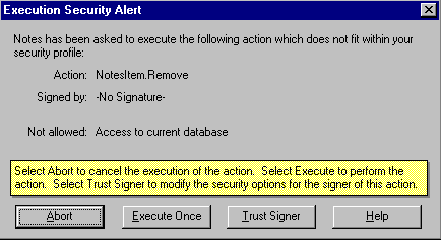
Even if the ECL restrictions are stringent and the user is not allowed to modify the workstation ECL, the ECL does not prevent users from executing programs if they choose. However, users do receive the following warning:
Back to Table of Contents
Scenario: Lost Password Problem
If a user loses or forgets a password, there is no way to recover it or to set a new password, since the password is not stored anywhere. What password options in Notes might you use to ensure you can recover the user password? What are the security implications?
Scenario Solution
One option is to assign two passwords to every user ID: one that the user can change immediately upon receipt, and a standard password known only to selected administrators. If the user subsequently loses an ID, or leaves the company with valuable information on their system, the administrator can gain access.
There is an inherent security risk in this suggested tip, in-so-far-as the administrator or individuals who know or have access to the second or backup password have access to the user ID.
To minimize the risk, consider using a variety of secondary passwords distributed among administrators. You can also consider requiring three passwords (two backup and one user password) where no one knows both backup passwords.
Back to Table of Contents
|