IBM®
Skip to main content
    Country/region select      Terms of use


     Home      Products      Services & solutions      Support & downloads      My account     

 
developerWorks
AIX and UNIX
Information Mgmt
Lotus
New to Lotus
Products
How to buy
Downloads
Live demos
Technical library
Training
Support
Forums & community
Events
Rational
Tivoli
WebSphere
Java™ technology
Linux
Open source
SOA and Web services
Web development
XML
My developerWorks
About dW
Submit content
Feedback


Notes/Domino Tutorials


Specialized System Administration Tasks 4.5

Back to Main Menu

The Specialized System Administration Tasks Learning Bytes are targeted at system administrators who are working with Domino 4.5. Administrators working with 4.5 must have successfully completed the System Administration 1 course. This Learning Byte covers the tasks involved in implementing additional Domino 4.5 Server features, including:

Using Shared Mail -- Shared Mail helps save disk space by using an object store database to store and retrieve one copy of a mail message for many Notes Mail users to view from their mail files. Administration of Shared Mail includes:

How does Shared Mail work?
Using the Shared Mail Databases
Maximizing Storage Space
Choosing a Shared Mail Option
Enabling Shared Mail
Linking Mail Files to the Shared Mail Database
Managing Shared Mail
Managing Users' Mail Files

Setting Up a Remote User -- Passthru allows users to dial into one server and gain access to other servers in the organization using Server Passthru or Remote LAN Service. Administration of a remote user of Passthru and Remote LAN Service includes:

Using a Passthru Server to Access Multiple Servers
Controlling Passthru Access to Servers
Specifying a Default Passthru Server
Specifying a Different Passthru Server
Creating the Address Book Documents
Dialing into a Group of Passthru Servers
Setting Up a User for Remote LAN Service

    Replicating Databases Using Server Passthru -- Server Passthru allows you to use an intermediary server as a stepping stone to reach a server to which you do not have direct access. Administration of Server Passthru includes:

    What is Server Passthru?
    Setting Up Passthru for Replication
      Load Balancing Server Activity Using Clusters -- A cluster is a group of Domino servers that provide a high bandwidth network connection and a common cluster name specified in the server document. Cluster servers share or load balance server activity. Cluster administration includes:

      Configuring a Cluster
      Adding a Server to a Cluster
      Removing a Server from a Cluster
      Setting up Failover
      Setting up Load Balancing
      Replicating Databases within a Cluster
      Managing Databases within a Cluster
        Maximizing System Resources Using Partitioned Servers -- Server partitioning allows a single machine to host multiple servers. For example, one physical server can be "divided" or partitioned to host two separate Web sites or multiple Domino applications within a company. Administration of partitioned servers includes:

        Planning for Partitioned Servers
        Installing a New Partitioned Server
        Managing Partitioned Servers
          Tracking Notes Activity Using the Billing System -- Billing allows you to track, compile, and analyze system usage. Administration of Billing includes:

          Using the Billing System
          Setting up Billing

          Integrating User Management in Notes and Windows NT -- When you register or delete a Notes user, you can also update the Windows NT User Manager. Additionally, you can use User Manager menu options to specify that additions, deletions, and name changes be made to the Notes Public Address Book. Administrators can perform the following tasks using either the Notes or Windows NT interface:

          Making User Management Easier
          Adding and Deleting Users
          Logging Notes Events to the Windows NT Event Viewer
            Using the Domino POP3 Server - The Domino POP3 server task allows Domino servers to be host servers for POP3 mail clients like Eudora, Pegasus, or Microsoft Exchange.

            Implementing the Domino POP3 Server
            Setting up the POP3 Mail Files


            How Does Shared Mail Work?

            This lesson introduces Shared Mail, which gives administrators a choice in messaging technology and the opportunity to save storage space.

            Router Delivers Shared Mail
            When Shared Mail is enabled, the Router splits messages into two parts: header and content.

          • Content is the message body and any attachments; it also contains a pointer to the header in the user's mail file.
          • Header is the message's To, cc, bcc, Subject, and From fields; it also contains a pointer to the content in the Shared Mail database.

            The content is stored in the Shared Mail database; it is not sent to all intended recipients. In contrast, the header is sent to each recipient.

            The Router delivering a Shared Mail message intended for three recipients

            User Viewing Shared Mail
            When a user opens a Shared Mail message, the text and attachments are seamlessly available, just as they are in message-based mail. When the user views the Shared Mail message, the pointer in the user's mail file points to the content in the Shared Mail database:

            Users viewing Shared Mail

            Note: The Shared Mail database and the user's mail files must be on the same server.

            Back to Table of Contents


            Using the Shared Mail Database


            About the Shared Mail Databases
            Shared Mail uses two kinds of databases:

          • Database link file
          • Shared Mail database

            About the database link file

          • MAILOBJ.NSF is a database link file that is created by the Router in the Notes data directory when Shared Mail is enabled.
          • It is a text file that contains the path and file name of the active Shared Mail database.
          • There can only be one MAILOBJ.NSF per server.

            About the Shared Mail database

          • The Shared Mail database is created by the Router when Shared Mail is enabled. The default file name is MAILOBJ1.NSF.
          • It is an object store that contains the message content for Shared Mail messages.
          • You can have many Shared Mail databases on a server; however, the Router can write to only one active Shared Mail database per server.

            Security features
            Since the Shared Mail database contains a large percentage of the user mail on a server, it contains several security features. The Shared Mail database:

          • Contains no views.
          • Has Local security enabled; it is encrypted with the server's public key.
          • Does not appear in the "Add Database Icon to Workspace" dialog box.
          • Is inaccessible to users at the server workspace if they use their own ID. The server has Manager access to the Shared Mail database.

            Back to Table of Contents

            Maximizing Storage Space

            The primary advantage of Shared Mail is the potential to save significant amounts of disk space.

            There are several considerations that determine the amount of space saved, such as the:

          • Average number of shared messages
          • Location of mail files
          • Type of user: local or mobile

            For example, locations with high mail traffic among users with mail files on a single mail server and few mobile users will maximize the amount of disk space they have for mail storage.
            Even with Shared Mail enabled, complete copies of mail messages will be placed in the user's mail file (not the Shared Mail database) if the user:
          • Edits and saves the mail message
          • Saves a copy of the mail message when sent
          • Encrypts incoming mail
          • Makes a local replica of the mail file

            Editing and Saving Shared Mail messages
            When a user edits and saves a Shared Mail message, the entire message is saved in the user's mail file. The following figure illustrates what happens:

            User1 edits and saves a message

            Saving sent messages
            Saved mail messages are always stored in the sender's mail file even when Shared Mail is enabled. The reason is that it is the Router's job to split the message into header and content information; in this case, the Router never sees a Saved Mail message.

            To prevent a copy of the saved message from using additional space, instruct users to send copies to themselves (cc:).

            Alternatively, you can force saved messages in specific mail files to use the Shared Mail database. See Managing Users' Mail Files later in this module.

            Encrypting mail
            Encryption is primarily designed to provide additional security for the mobile user. Encrypted mail can only be read by the person whose user ID stores the correct public or private key capable of decrypting the message. If a user encrypts:
          • Incoming mail -- Fully encrypted copies of mail messages are stored in the mail file: the Shared Mail database is not used.
          • Outgoing mail -- The encrypted content portion of the message is stored in the Shared Mail database.

            Creating a local mail file replica
            When a user creates a local replica of a server-based mail file on a laptop, desktop, or another server, the replica contains complete copies of each mail message. The Shared Mail database is not used.

            Alternatively, you can force server replicas of mail files to use the Shared Mail database. See Managing Users' Mail Files later in this module.

            Back to Table of Contents

            Choosing a Shared Mail Option


            Shared Mail options
            There are three options for the NOTES.INI file setting for Shared Mail:

          • Shared_Mail=0
          • Shared_Mail=1
          • Shared_Mail=2

            Shared_Mail=0 is the default setting. It is the messaged-based mail option available in all releases of Notes and does not enable Shared Mail. The two functional types of Shared Mail are:
          • Shared_Mail=1
          • Shared_Mail=2

            When Shared_Mail=1
          • The Shared Mail database is used for mail delivery only, not mail transfer.
          • Only messages designated for two or more users use the Shared Mail database.
          • Messages sent to a single recipient are stored only in the recipient's mail file. The Shared Mail database is not used, as shown below.

            Shared_Mail=1 and User 1 is the only recipient on that server

              The following describes the process the Router uses when Shared_Mail=1.

              1. The complete message is written to the first recipient's mail file.
              2. The Router identifies a second recipient.
              3. The message content is written to the Shared Mail database.
              4. The entire message is removed from the first recipient's mail file and replaced with a header.
              5. The header is written to the other recipients' mail files.

              When Shared_Mail=2
            • The Shared Mail database is used for mail transfer and delivery.
            • All messages use the Shared Mail database, regardless of the number of recipients.

              Shared_Mail=2, and User 1 is the only recipient on that server

              • The Router receives a message and splits it into header and content information. Messages designated for another server are written to a server's Shared Mail database, and subsequently removed if there are no recipients for those messages on that server.

                Shared_Mail=2, and the Router transfers a message from Server 1 to Server 2
                Back to Table of Contents


                Enabling Shared Mail

                There are three ways to activate Shared Mail:

              • Set the variable Shared_Mail in the NOTES.INI file
              • Use the TELL ROUTER server console command
              • Use the Public Address Book server configuration form

                Note: When Shared Mail is enabled, actual use of the Shared Mail database is not immediate; momentary background processing takes place.

                Procedure: Enabling Shared Mail using the server configuration form
                The server configuration form enables administrators to change the NOTES.INI settings using the Public Address Book interface. The server periodically reads the server configuration documents and updates the NOTES.INI variables. To enable Shared Mail, follow these steps:

                1. Choose File - Tools - Server Administration.

                2. Select the server from the list of servers to administer.

                3. Choose Configure Server from the Server's pop-up menu.

                4. Click Add Configuration.

                5. Type the server name in the Server Name field.

                6. Click Set/Modify Parameters.

                7. Click the Item down-arrow, then select SHARED_MAIL from the list and click OK.

                8. Type 1 or 2 in the Value text box and click OK. See Choosing a Shared Mail Option to help you decide which value to use.

                9. Save and close the form.

                Note: If both the NOTES.INI file and a Public Address Book Server Configuration document are configured for a variable but contain conflicting values, the setting in the Public Address Book takes precedence.

                Disabling Shared Mail
                To keep new mail from being stored in the active Shared Mail database, change the NOTES.INI Shared_Mail setting to 0. Pointers to existing mail are not deleted or disabled, so users will still have access to messages in the Shared Mail database.

                Back to Table of Contents

                Linking Mail Files to the Shared Mail Database


                New and existing mail with Shared Mail enabled

              • Once Shared Mail is enabled, new messages sent to users whose mail files are on the server and in the data path will use the Shared Mail database.
              • Administrators must link mail messages that existed in the mail files prior to enabling Shared Mail before those messages can use the Shared Mail database.

                The linking process
                LINK sets up existing mail files to use the Shared Mail database. To link a user's mail file, use the following command:

                LOAD OBJECT LINK USERX.NSF Shared_mail_database

                If you use a directory name for the first argument of this command, the Object Store Manager will link all of the mail files contained in that directory. For more information on LINK and its options, see "Ways to manage mail files that use shared mail" in the Administration Help database.

                The following figure shows the contents of three mail files in the MKTG directory before and after the linking process:

                Command entered: LOAD OBJECT LINK MKTG MAILOBJ1.NSF


                Relinking
                RELINK is a LINK command option. The LINK command links only those messages in a mail file which were never previously linked to a Shared Mail database. In contrast, RELINK links all messages, including those previously linked, to the specified Shared Mail database.

                To relink a user's mail file, use the following command:

                LOAD OBJECT LINK -RELINK USERX.NSF Shared_mail_database

                Unlinking
                UNLINK pulls messages out of the Shared Mail database and places them into users' mail files. This command should be used when you want to stop a mail file from using the Shared Mail database. For example, you could use it before you moved a user's mail file from one server to another.

                To unlink a user's mail file, use the following command:

                LOAD OBJECT UNLINK USERX.NSF

                Procedure: Moving mail files between servers
                To move a user's mail file from one server to another, follow these steps:

                1. Unlink the user's mail file on the current mail server.
                2. Use File - Replication - New Replica to make a replica of the mail file on the new server.
                3. Change the person document to reflect the new mail server.
                4. Relink the user's mail file to a Shared Mail database on the new mail server.

                Note: Unlinking the user's mail file is not necessary if you frequently run COLLECT on the server's Shared Mail databases. For more information on COLLECT, see Managing Shared Mail later in this module.

                Caution: Using File - Database - Copy is not recommended, since the database would then have a new replica ID. However, you can use the operating system to copy the mail file to the new server if you first unlink the user's mail file on the current mail server.

                Back to Table of Contents


                Managing Shared Mail


                User deletes Shared Mail messages
                When a recipient deletes a Shared Mail message, Notes deletes the pointer to the message in the user's mail file. The message content remains in the Shared Mail database.

                Stage 1: User1 deletes the pointer to the mail message

                After all mail recipients delete a Shared Mail message from their mail files, the message content remains in the Shared Mail database even though there are no pointers to it.

                Stage 2: All users delete the pointer to the mail message, but the message content remains in the Shared Mail database

                Maintaining the Shared Mail database
                Over time the Shared Mail database may fill up with content documents for which there are no pointers and content documents to which users still require access.

                To maintain database efficiency, administrators must periodically:
              • Remove deleted or disconnected messages from the Shared Mail database
              • Create a new active Shared Mail database to keep it relatively small

                Deleting disconnected messages
                To remove "deleted" or disconnected messages from the Shared Mail database, use the following COLLECT command:

                LOAD OBJECT COLLECT shared_mail_database

                Stage 3: All users delete the pointer to the shared message and COLLECT has been run on the Shared Mail database

                By default COLLECT runs at 2:00 AM. To change the daily server task schedule, change the ServerTasksAt2 parameter in the NOTES.INI file, or create a Server Program document to schedule COLLECT.

                To purge messages from a shared mail database after deleting a user's mail file, enter the following command:

                LOAD OBJECT COLLECT -FORCE shared_mail_database

                When you use the -FORCE option, if a mail file cannot be located or successfully opened for any reason, the Object Collect task behaves as if all messages in the mail file have been deleted. This will delete a content document that is referenced only by the inaccessible mail file and no other mail files because its header part has been deleted from all other mail files.

                COLLECT can also be used to remove remnant message headers from a user's mail file; for example:

                LOAD OBJECT COLLECT USERX.NSF

                Procedure: Backing up and restoring the Shared Mail database
                Back up the Shared Mail database at least once a day. It is best to use a utility that can back up open files, so the server doesn't need to be shut down when the backup takes place. To restore a backup, follow these steps:

                1. Move the latest backup to a separate directory on the server that is not part of the server's directory structure.

                2. Use the PUSH command to push changes from the backup to the damaged Shared Mail database. For example:

                PUSH SERVER1/DChem H:\BACKUP\SHARED1.NSF

                where SHARED1.NSF is the backup Shared Mail database.

                3. Run COLLECT on the Shared Mail database and on users’ mail files to remove any disconnected or damaged messages.

                Creating a new active Shared Mail database
                The active Shared Mail database should be replaced periodically to maintain efficiency or when the active Shared Mail database requires maintenance. The old Shared Mail database continues to be used by existing Shared Mail messages. To create a new Shared Mail database, use one of the following server console commands:
              • TELL ROUTER USE shared_mail_database

                The TELL ROUTER USE command performs several functions. It will:

                1. Enable Shared Mail if it is currently disabled.

                2. Create a Shared Mail database with the specified name.

                3. Make the newly created database the active Shared Mail database by placing the new database name and path in the database link file MAILOBJ.NSF.
              • LOAD OBJECT CREATE shared_mail_database

                The LOAD OBJECT CREATE command performs only one function. It will:

                1. Create a Shared Mail database with the specified name.

                Note: This command does not make the newly created database the active Shared Mail database, nor will this command enable Shared Mail if it is currently disabled.

                Back to Table of Contents

                Managing User's Mail Files


                Excluding and Including a mail file
                To exclude specific mail files or a directory of mail files from using the Shared Mail database, use the following command:

                LOAD OBJECT SET -NEVER USERX.NSF

                Note: You must use the LOAD OBJECT UNLINK command to remove the content portion of existing mail messages from the Shared Mail database and store them completely in the user's mail file.

                To re-include a mail file or directory of mail files to use the Shared Mail database, use the following command:
                LOAD OBJECT RESET -NEVER USERX.NSF

                Note: You must use the LOAD OBJECT LINK command to force existing mail messages to use the Shared Mail database.

                Controlling the use of the Shared Mail database
                To force specific mail files to use the Shared Mail database for saved messages and for replica mail files stored on other servers, use the following command:

                LOAD OBJECT SET -ALWAYS USERX.NSF

                Note: You must use the LOAD OBJECT LINK command to force existing mail messages to use the Shared Mail database.

                To once again force specific mail files to not use the Shared Mail database for saved messages or for replica mail files on other servers, enter the following command at the server that stores the replicas:

                LOAD OBJECT RESET -ALWAYS USERX.NSF

                Note: You must use the LOAD OBJECT UNLINK command to remove the content portion of existing mail messages from the Shared Mail database and store them completely in the user's mail file.

                Back to Table of Contents

                Using a Passthru Server to Access Multiple Servers

                Introduction
                In the past, occasional connections to the Notes server network from a remote site were made primarily through dialup modems. You needed a phone number for the modem of each server to which you wanted a connection.
                With Release 4 and higher, Passthru allows a client to use one or more intermediary servers as stepping stones to access a target server. The intermediate servers are called "Passthru servers."

                Advantages of Passthru

              • Although Passthru servers have many uses, they are chiefly used by mobile users. These users can dial into Passthru servers to connect with other servers on the LAN in order to replicate their mail and other databases.
              • The use of Passthru will precipitate a change in your network site plans. Rather than have each LAN server contain a modem or modem pool, you can set up a server with several modems to use as a dedicated Passthru server.

                Limits
                There are some limits to Passthru:

              • The maximum hop count is 10. This is a hard-coded limit. Typically, most setups will have one or two hops. (It is unlikely that you would ever need more than four hops.)
              • Release 3 workstations and servers cannot participate in Passthru. The only exception is that a Release 3 server can be the ultimate target of a Passthru connection.

                Dialup connections
                Passthru is most likely to be used by a remote user who dials into one server, but needs access to several servers. There are two typical scenarios for using Passthru:

              • Scenario 1: Remote access using a default Passthru server
              • Scenario 2: Remote access using a different Passthru server

                The next few lessons describe how to set up a remote user in each scenario.

                Back to Table of Contents

                Controlling Passthru Access to Servers

                Passthru access control
                There are four access control fields that control who can access a particular server using Passthru. These fields are located in the Passthru Use group in the Restrictions section of the server document in the Public Address Book. Each has a corresponding NOTES.INI variable that can be used instead of the field in the Server document. If they conflict, the Server document fields take priority over the NOTES.INI variables.

                The table describes the access control fields.

                In the next few lessons, you will see how these fields are used to control Passthru access on a server.

                Back to Table of Contents

                Specifying a Default Passthru Server


                Scenario 1: Remote access using a default Passthru server
                John Jay/DChem wishes to access his mail from his laptop over the phone. His mail server is RED/Mail/DChem and his default Passthru server is BLUE/PT/DChem. RED/Mail/DChem and GREEN/PT/DChem servers do not have modems, but BLUE/PT/DChem has a modem pool. RED/Mail/DChem and BLUE/PT/DChem are using different network protocols, so that BLUE/PT/DChem must pass through GREEN/PT/DChem, which has both protocols, to connect to RED/Mail/DChem.

                The following figure shows the process for John Jay to access his mail server using Passthru.

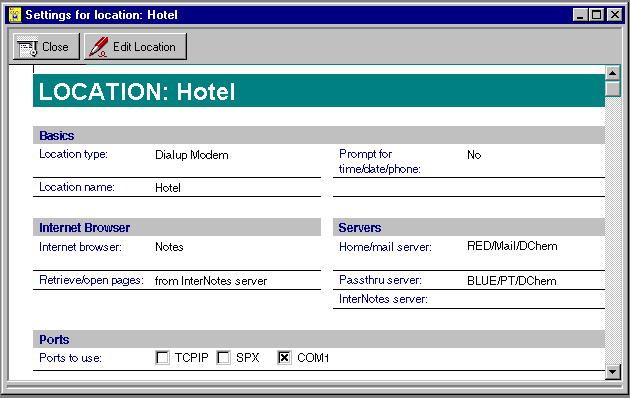
                John Jay attempting to access his mail file remotely

                Notes will require three Address Book documents to complete this connection:
              • Location document in the Personal Address Book
              • Dialup modem Connection document in the Personal Address Book
              • Passthru Connection document in the Public Address Book

                Location document
                John Jay needs a Location document in his Personal Address Book, specifying BLUE/PT/DChem as his default Passthru server and RED/Mail/DChem as his mail server. The following figure shows this Location document.

                Personal Address Book; Create - Location

                Dialup modem Connection document
                He also needs a Dialup Modem Connection document in his Personal Address Book, specifying how to call BLUE/PT/DChem, his default Passthru server. The following figure shows this Connection document.

                Personal Address Book; Create - Server - Connection

                Optionally, you can select the Location name you created earlier and set other fields in the Advanced section in the Dialup Modem Connection document.

                Passthru Connection document in Public Address Book
                Next, the administrator will have to create a Passthru Connection document in the Public Address Book, specifying the path from BLUE/PT/DChem to RED/Mail/DChem using GREEN/PT/DChem as the Passthru server. The following figure shows this Passthru Connection document.

                Public Address Book; Create - Server - Connection

                Editing the server document
                Finally, the administrator must edit the Passthru Use fields in the Restrictions section of the server documents to allow Passthru access. See Controlling Passthru Access to Servers in this module for a description of the Passthru Use fields.

                The table describes how the fields would be set up for the scenario described in this document.

                Note: John Jay does not need to authenticate with BLUE/PT/DChem or GREEN/PT/DChem since he is just being routed through these servers. Additionally, he does not need to be listed in the Access server field in the Restrictions - Server Access section of the server document, as shown in the figure below:

                Public Address Book; Server - Servers; BLUE/PT/DChem; Restrictions section

                However, John Jay will need to successfully authenticate with and have server access to the destination server (RED/Mail/DChem).

                Back to Table of Contents


                Specifying a Different Passthru Server

                Scenario 2: Remote access using a different Passthru server
                John Jay/DChem wishes to access his mail file on server RED/Mail/DChem from his laptop. His default Passthru server (BLUE/PT/DChem) is temporarily inaccessible, so he wants to use YELLOW/PT/DChem for his Passthru server.

                The following figure shows the process for John Jay to access his mail server using Passthru.


                John Jay attempting to access his mail file using Passthru Server YELLOW/PT/DChem

                Notes will require three Address Book documents to complete this connection:
              • Dialup Modem Connection document in the Personal Address Book
              • Passthru Connection document in the Personal Address Book
              • Passthru Connection document in the Public Address Book

                Dialup modem Connection document
                He will need to create a Dialup Modem Connection document in his Personal Address Book, specifying how to call YELLOW/PT/DChem, the new default Passthru server. This document is similar to the Dialup Modem Connection document shown in Specifying a Default Passthru Server.

                Passthru Connection document in Personal Address Book
                He will need to create a Passthru Connection document in his Personal Address Book specifying the path from his laptop to RED/Mail/DChem (his mail server) using YELLOW/PT/DChem (the Passthru server). The following figure shows this Passthru Connection document.


                Personal Address Book; Create - Server - Connection

                Note: As an alternative to creating a Passthru Connection document in his Personal Address Book, John Jay could create a Location document similar to the document shown in Specifying a Default Passthru Server and specify YELLOW/PT/DChem as the Passthru Server. He would need to switch to this location before attempting to access his mail file.

                Passthru Connection document in Public Address Book
                Next, the administrator will have to create a Passthru Connection document in the Public Address Book, specifying the path from YELLOW/PT/DChem to RED/Mail/DChem using GREEN/PT/DChem as the Passthru server. This Passthru Connection document is similar to the document shown in Specifying a Default Passthru Server.

                Editing the server document
                Finally, the administrator must edit the Passthru Use fields in the Restrictions section of the server documents to allow Passthru access. See Controlling Passthru Access to Servers in this module for a description of the Passthru Use fields.

                The table describes how the fields would be set up for the scenario described in this document.

                Back to Table of Contents


                Creating the Address Book Documents

                The following procedures describe how to create the Address Book documents necessary to set up Passthru as described in the previous scenarios.

                Procedure: Creating the server's Passthru Connection document
                To create a Passthru Connection document in the Public Address Book, follow these steps:

                1. Open the Public Address Book and navigate to Server - Connections.
                2. Click Add Connection.
                3. Specify "Passthru Server" as the Connection type.
                4. Fill in the Source server and domain, Destination server and domain, and Passthru server fields.
                5. Save and close the document.

                Procedure: Creating the user's Passthru Connection document
                To create a Passthru Connection document in the user's Personal Address Book, follow these steps:
                1. Open the user's Personal Address Book and navigate to Server - Connections.
                2. Click Add connection.
                3. Specify "Passthru Server" as the Connection type.
                4. Fill in the Destination server and Passthru server fields.
                5. Save and close the document.

                Procedure: Creating the user's Location document
                To create a Location document in the user's Personal Address Book, follow these steps:
                1. Open the user's Personal Address Book and navigate to Locations.
                2. Click Add Location.
                3. Specify "Dialup Modem" as the Location type.
                4. Fill in the appropriate information for Location name, Home/mail server, and Passthru server.
                5. Save and close the document.

                Procedure: Creating the user's Dialup Modem Connection document
                To create a Dialup Modem Connection document in the user's Personal Address Book, follow these steps:
                1. Open the user's Personal Address Book and navigate to Server - Connections.
                2. Click Add Connection.
                3. Specify "Dialup Modem" as the Connection type.
                4. Fill in the appropriate information for calling the Passthru server in the Server name, Area code and Phone number fields.
                5. Save and close the document.

                Back to Table of Contents

                Dialing into a Group of Passthru Servers

                You can allow users to dial in to a hunt group of Passthru servers and pass through to any member of the hunt group. Your telecommunications infrastructure must support hunt groups. Each Passthru server in a hunt group should be able to access the same destination servers.

                This connection allows Notes workstations to dial in to a hunt group of Passthru servers. This allows incoming calls to be routed to one of a group of available Passthru servers, thus spreading the load among the Passthru servers.

                Procedure: Setting up a workstation to connect using a hunt group
                To set up a workstation to connect to a group of Passthru servers using a hunt group, follow these steps:

                1. Create a Connection document of the type Hunt Group in the user's Personal Address Book to provide the name and phone number of the hunt group. This figure is shown below:


                Personal Address Book; Server - Connections; Add Connection

                2. Create a Passthru Connection document for each destination server to which you connect through the hunt group. Specify the name of the hunt group in the "Passthru server name or hunt group name" field and the name of the destination server. To specify multiple destination servers for one connection document, use wildcards, such as */DChem.

                Note: As an alternative to creating a Passthru Connection document in the Personal Address Book, the user could create a Location document similar to the document shown in Specifying a Default Passthru Server and specify the hunt group name as the Passthru Server. The user would need to switch to this location before attempting to access the group of Passthru servers.

                For more information on using Hunt Groups with Passthru servers, see "Hunt groups" in the Administration Help database.

                Back to Table of Contents

                Setting up a User for Remote LAN Server

                Remote LAN service allows Notes to take advantage of third-party products, such as Microsoft's Remote Access Service (RAS), so that remote users can dial directly into the LAN.

                In Release 4.5, Notes supports Microsoft's Remote Access Service (RAS) and AppleTalk Remote Access (ARA). Future Notes releases may support other remote access products.

                In order to use Remote LAN Service, the client's machine must have RAS or ARA installed and another machine on the LAN must be running as a RAS or ARA server. Most Remote LAN Service functions are performed by calling the RAS or ARA modules. The Notes contribution is to:

                1. Control RAS or ARA operation.

                2. Store the connection information in an Address Book connection document. This ensures that the connection can be made automatically rather than requiring the user to manually dial in and hang up.

                Procedure: Setting up a workstation to use a Remote LAN Service
                Once the RAS or ARA software is in place and tested, the administrator needs to create a Connection document of the type Remote LAN Service. To create this document, follow these steps:
                1. Open the Personal Address Book and navigate to Locations.
                2. (Optional) Create and save a Location document for the users, specifying the following:
                  a.
                  Location type of either Local Area Network or Both Dialup and Local Area Network.
                  b. Remote LAN idle timeout in the Advanced section.
                3. Navigate to Server - Connections and click Add Connection.
                4. In the Connection type field, select Remote LAN Service.
                5. In the Server name field, enter the name of the Notes server you want to access with RAS or ARA.
                6. In the Use LAN port field, select the port you have enabled to use with RAS or ARA.
                7. Click Choose a Service Type, select Microsoft Remote Access Service (RAS) or AppleTalk Remote Access (ARA), and click OK.
                8. Fill in the appropriate fields as described in the table.
                9. Fill in any other fields in the Advanced section. If you created a Location document in step #2, select the Location name from the list in the "Only from Location(s)" field.
                10. Save and close the Connection document.
                The following figure shows an example of a Remote LAN Service connection document using RAS.


                Personal Address Book; Server - Connections; Add Connection
                For more information on Remote LAN Service, see "About connecting to a remote LAN service" in the Administration Help database.

                Back to Table of Contents


                What is Server Passthru?

                Server Passthru is the process of using an intermediary server as a stepping stone from one server to a destination server to which the original server does not have direct access.

                You will remember that in order to replicate databases on servers that run different protocols, you must first replicate the database to an intermediary server that shares both protocols. We can't replicate databases stored on servers running different protocols by a direct connection.

                We could use Server Passthru to accomplish this replication. Server Passthru allows a server to use an intermediary server in order to replicate with servers elsewhere on the LAN, if they do not share a common protocol.

                Back to Table of Contents


                Setting Up Passthru for Replication


                Procedure: Setting up Replication using Passthru
                To set up replication using Passthru, follow these steps:

                1. Create a Passthru connection document that specifies the name of the Passthru server and schedules replication between the two servers.

                2. Create any other Passthru Connection documents necessary to route to the destination server.

                3. Edit the server documents of each server in order to allow Passthru access.

                Typical scenario for using Server Passthru
                Users of Server A and users of Server D work with a replicated "Load Status Tracking" (TRACK.NSF) application. Other servers in the domain do not replicate this database. To synchronize the database, Server A needs to initiate replication with Server D. The following diagram shows the servers involved and the network protocols they are running:


                Servers A can use Server B as a Passthru server to get to Server C. Server C can in turn make a connection to Server D.

                This scenario would require that you create Connection documents and edit the Server documents in the Public Address Book.

                Creating a Passthru Server Connection document
                When Notes attempts to make the connection from Server A to Server D based on the replication schedule specified in a connection document, it will use this same connection document to determine the route. First you must set up the connection from Server A to Server D using Server C as the Passthru server. This connection document also includes the enabled scheduled replication information.

                The following figure shows this document:


                Public Address Book; Server - Connections; Add Connection; Connection Type: Passthru Server
                Notes will look for another Passthru Connection document to determine the route to Server C, therefore you need a second Passthru Server Connection document from Server A to Server C using Server B as the Passthru server. This connection document does not need to include scheduled replication information. The following figure shows this Passthru Connection document. Note that the Schedule is disabled.


                Public Address Book; Server - Connections; Add Connection; Connection Type: Passthru Server
                Editing the Server documents
                Finally, in order to use a server as a Passthru Server, you must specify this use in the Server documents for each server. The four relevant fields are in the Passthru Use section. These fields are described in the Controlling Passthru Access to Servers lesson in this Learning Byte.

                The table describes how the fields would be set up for the scenario described in this document.

                Back to Table of Contents


                Configuring a Cluster

                Clusters are a feature included with Lotus Domino Advanced Services. A cluster is a group of up to six Domino servers that provide a high bandwidth network connection and a common cluster name specified in the server document. Clusters share or load balance server activity. When the specified threshold for a server is reached, the user is redirected to a more available server in the cluster.

                Servers in a cluster work together as a unit to meet capacity and availability goals that exceed the capacity of a single machine. Clusters are designed to provide the level of service needed by large organizations; high availability is achieved by using database replicas. If a server is down, databases are still available on other servers in the cluster. The user is shifted to another replica in the cluster when opening the database.

                Each server in a cluster must be on the same Local Area Network, use the same set of network protocols, and be in the same domain.

                Cluster Administration
                You administer a cluster by:

              • Adding a server to a cluster
              • Moving a server to a different cluster
              • Removing a server from a cluster
              • Setting up failover
              • Setting up load balancing
              • Replicating databases within a cluster
              • Managing databases within a cluster

                Back to Table of Contents


                Adding a Server to a Cluster


                Procedure: Adding a server to a cluster
                To add a server to an existing or new cluster, follow these steps:

                Note: You must have at least Author access with the ServerModifier role in the Public Address Book and at least Author access in the Administration Requests database to perform this procedure.

                1. Open the Public Address Book and navigate to Server - Servers.

                2. Select the server(s) you want to add to a cluster.

                3. Click Add to Cluster.

                4. If you are creating a new cluster, select Create New Cluster, then type the new cluster name.

                5. If you are adding a server to an existing cluster, select a cluster name from the list. You can add the server to the cluster immediately or use the Administration Process. If you add the server immediately, the current Public Address Book is updated to include your change.

                What happens next

                1. The Administration Process modifies the server document on the designated Administration Server for the Public Address Book and fills in the server name and the Replica ID of the Cluster Database Directory used in this cluster.

                2. When the server document changes get replicated to the new cluster server, the table shows the tasks that are started on the server.

                3. The Cluster Database Directory Manager creates the Cluster Database Directory (CLDBDIR.NSF) and populates it with information for the databases on this server.

                4. The Cluster Replicator replicates the Cluster Database Directory and Public Address Book with the most available server in the cluster.

                5. The Cluster Manager enables the SHOW CLUSTER server console command. This command displays a list of cluster members and their status. An example of the SHOW CLUSTER command is shown below:

                > show cluster
                Cluster name: Cluster1, Server name: Server1/DChem
                Server cluster probe timeout: 1 minute(s)
                Server cluster probe count: 31
                Server availability threshold: 0
                Server availability index: 100 (state: AVAILABLE)
                Cluster members (3)...
                server: Server1/DChem, availability index: 100
                server: Hub/DChem, availability index: 100
                server: Server2/DChem, availability: UNREACHABLE


                The following is an example of what you might see at the server console when a server is added to a cluster:

                03/13/97 10:51:14 AM Cluster Administration Process started
                03/13/97 10:53:18 AM Adding server to cluster Cluster1
                03/13/97 10:53:21 AM Cluster Database Directory started
                03/13/97 10:53:22 AM Cluster Replicator started
                03/13/97 10:53:27 AM Created database Cluster Database Directory: cldbdir.nsf
                03/13/97 10:53:38 AM Finished initialization of Cluster Database Directory
                03/13/97 10:54:00 AM Cluster Administration Process shutdown


                For detailed information on how the Administration Process adds a server to a cluster, see "About Adding a server to a cluster" in the Administration Help database.

                Moving a server to a different cluster
                The procedure for moving a server to a different cluster is essentially the same as adding a server to a cluster.
                After you specify the new cluster name, the Administration Process updates the server document with the new Cluster name and Cluster Replica ID. Next the Cluster Administration Process deletes the old Cluster Database Directory and creates a replica of the new directory, populating it with information for the databases on this server.

                Back to Table of Contents

                Removing a Server from a Cluster


                Procedure: Removing a server from a cluster
                To remove a server from a cluster, follow these steps:

                Note: You must have at least Author access with the ServerModifier role in the Public Address Book and at least Author access in the Administration Requests database to perform this procedure.

                1. Open the Public Address Book and navigate to Server - Clusters.
                2. Select the server(s) you want to remove.
                3. Click Remove from Cluster.
                4. Click Yes to confirm the action.

                For detailed information on how the Administration Process adds a server to a cluster, see "About Removing a server from a cluster" in the Administration Help database.

                What happens next

                1. The Administration Process removes the Cluster name and Cluster Replica ID from the server document in the designated Administration Server for the Public Address Book.

                2. After the Public Address Book replicates to the server that is being removed from the cluster, the Cluster Administration Process is started and performs the following tasks:

                • Deletes the Cluster Database Directory on the server.
                • Removes any documents referring to the removed cluster server's databases from the Cluster Database Directory on the most available cluster server.
                • Replicates the Cluster Database Directory with the other servers in the cluster.
                • Shuts down the Cluster Replicator and Cluster Database Directory Manager server tasks.
                • Removes the CLREPL and CLDBDIR task names from the ServerTasks line in the NOTES.INI file.

                Back to Table of Contents

                Setting Up Failover

                Failover occurs automatically when a database is unavailable on one server and the Cluster Manager is able to redirect the Open Database request to another server in the cluster that stores a replica.

                Failover usually occurs when a user tries to open a database that is either marked out of service or pending delete, or is on a server that is unavailable. For a complete list of circumstances under which failover occurs, see "About Failover" and its related topics in the Administration Help database.

                Procedure: Setting up failover
                Use one of the following methods to determine how failover occurs:

              • By Replica ID - Create a replica of the database on a server that is a member of the same cluster.
              • By path name - Create a second replica of the database on the same cluster server in a different directory. When more than one replica exists on the same server, the failover request is directed to a replica with the same path name as the original.

                Procedure: Enable failover for mail files
                When a user's home server is unavailable, you can enable mail routing to a replica of the user's mail file that is stored on another server within the cluster. To enable failover for mail files, use one of the following methods:

              • Edit the NOTES.INI file, and add the parameter MailClusterFailover=1.
              • Create or edit a Server Configuration document and set the parameter MailClusterFailover=1.
                User failover is automatically enabled with CLUSTER.NCF on the client.

                Note: This NOTES.INI file setting must be configured on every server in the domain through which mail routes, not just cluster servers.

                Back to Table of Contents

                Setting Up Load Balancing

                To get the best performance from the servers that are members of a cluster, you should carefully monitor database usage, then set the load balancing parameters accordingly. The table describes the NOTES.INI file parameters related to load balancing on cluster servers.

                You can set these NOTES.INI file parameters using either of the following methods:

              • Edit the NOTES.INI file and add the appropriate parameter.
              • Create or edit a Server Configuration document and specify a value for the appropriate parameter.

                After the cluster is configured and has been used for a period of time, you may want to analyze cluster performance. For more information on Cluster Analysis, see "Setting up a Cluster Analysis" and its related topics in the Administration Help database.

                Back to Table of Contents


                Replicating Databases with a Cluster

                The Cluster Replicator server task (CLREPL) keeps the databases that are stored on cluster servers synchronized. You do not need to schedule replication between servers in a cluster. When a change occurs in a database, the Cluster Replicator pushes the change to replicas on other servers in the cluster. It uses the Cluster Database Directory (CLDBDIR.NSF) to determine which other servers in the cluster store replicas of the changed database.

                To replicate a cluster server with a server that is not a member of the cluster, schedule replication using a connection document in the usual way for the Replicator (REPLICA) to exchange data.

                Forcing replication of databases within a cluster
                To force replication from the server console, type one of the following commands:

                REPLICATE <clustername>
                REPLICATE <clustername> <local filename>
                REPLICATE <clustername> <local directory>

                Procedure: Disabling cluster replication for a database
                To disable cluster replication for a particular database, follow these steps:

                1. Open the Cluster Database Directory (CLDBDIR.NSF) and navigate to Databases by Server.
                2. Open the database document for which you want disable replication.
                3. Choose Actions - Edit Document.
                4. Select Disabled in the Cluster Replication field.
                5. Save and close the document.

                Procedure: Enabling multiple cluster replicators
                To enable multiple cluster replicators (CLREPL), use one of the following methods:
              • Add two or more CLREPL tasks to the ServerTasks setting in the NOTES.INI file. This will load multiple Cluster Replicators on subsequent server startups.
              • Use the LOAD CLREPL server console command. This will load another Cluster Replicator for this server session, but not for subsequent server startups.

                Back to Table of Contents

                Managing Databases with a Cluster


                Cluster Database Directory
                The Cluster Database Directory (CLDBDIR.NSF) is a database that resides on each server in a cluster and contains information about all the databases within a cluster. Each server in the cluster stores a replica of the Cluster Database Directory. The Cluster Replicator keeps replicas of this database in tight synchronization. The following figure is an example of a document in the Cluster Database Directory.


                Cluster Database Directory document
                Moving a database from a cluster server
                Use the Database Tools dialog box to move a database from one cluster server to another. The destination server does not have to be a member of a cluster. The Administration process creates a replica on the destination server, then marks the database for deletion on the source server. The following figure shows the Move a database tool:


                File - Tools - Server Administration; Database Tools; Move a database
                To use this feature, you must ensure the following access:
              • Administrator must have Manager Access to the source database.
              • Administrator must have Create replica databases and Create new databases access on the destination server.
              • At least one server in the domain that stores a replica of the database must have Create replica databases access on the destination server. The destination server must have at least Reader access to this replica.

                For more information on the details of how the Administration Process moves a database, see "Details: Moving databases from a cluster server" in the Administration Help database.

                Cluster management
                Use the Database Tools dialog box to perform additional cluster management. The following figure shows the Cluster Management Tool:


                File - Tools - Server Administration; Database Tools; Cluster Management

                The table describes the options available with this tool.

                When you select one of these options, the availability of the database in the Cluster Database Directory gets updated.

                For more information about clusters see "About Notes server clusters" and its related topics in the Administration Help database.

                Back to Table of Contents

                Planning for Partitioned Servers


                Server Partitioning
                Server Partitions is a feature included with Lotus Domino Advanced Services. It is available when you install a server on a Windows NT or UNIX computer. Use partitioned servers to set up multiple Domino servers on the same computer. The partitioned servers share the system resources. Partitioned servers on the same computer can belong to different Domino domains. Use partitioned servers to set up:

              • Multiple Domino Web Application Servers on the same computer.
              • Multiple Domino servers in different domains.

                Each partitioned server can also be a member of a cluster if you require high availability of Notes databases.

                Carefully plan your naming scheme. Any administrator should be able to immediately distinguish one partitioned server from another. Avoid changing a server name after you install.

                Procedure: Planning for partitioned servers
                Consider the following questions when planning to use partitioned servers.

                1. How do partitioned servers fit into your current Domino environment?

                2. How many partitioned servers should you install?

                3. What network protocols should you use for the servers?

                4. If you choose the TCP/IP network protocol, should you use unique IP addresses for each server or should they share the same network interface card and IP address?

                5. What should you name each partitioned server?

                6. How do you determine the data directory name for each partitioned server's data files?
                For more information on these considerations, see "Planning a partitioned server configuration" and its related topics in the Administration Help database.
                  Note: In order to use server partitions, you must obtain a Lotus Domino Advanced Services license.

                  Back to Table of Contents


                  Installing a New Partitioned Server

                  This document provides an overview of the process of installing an additional partitioned server, including the tasks necessary to install and the order in which they should be performed. Complete details are available in the Administration Help database and the Lotus Domino Install Guide for Servers.

                  Partitioned servers use different Notes data directories and NOTES.INI files. When you install partitioned servers, install a separate data directory for each server.

                  The first time you install a partitioned server, name both the program directory, which by default is NOTES, and the data directory. During subsequent installs, name the data directory only.

                  Procedure: Installing an additional partitioned server
                  To install a second and subsequent Domino partitioned servers on a Windows NT computer, follow these steps:

                  1. Install and set up the first partitioned server. Be sure to select the Advanced Services tab to install Advanced Services and Advanced Services data.

                  2. Run the Lotus Domino 4.5 Powered by Notes Installation Program.

                  3. At the Install Options screen, select "Customize features - Manual install" to install the additional Domino partitioned server and click OK.

                  4. Enter the drive and directory where you want this server's Domino data files to reside and click Next. We recommend that you use the name of the new partitioned server to name its data directory.

                  Note: When installing additional Domino partitioned servers, the program directory field does not appear because all Domino partitioned servers share the same program files.

                  5. By default, both the Domino and Advanced Services tabs have the appropriate features selected for an additional Domino partitioned server install. Do not select or deselect any of the features. You must install the default features selected.

                  Note: You do not need to select the "Advanced Services" option for an additional partitioned server install.

                  6. Continue with the installation as usual.

                  7. Click Done when installation is complete.

                  8. Repeat this procedure for each additional Domino partitioned server you want to install.

                  After you install your Domino partitioned servers, set up the servers in the usual way. If you are installing the first server in an organization or domain, see "Setting up Domino on the first server" in the Domino Install Guide for Servers. For information on setting up additional servers, see "Setting up Notes on an additional server" in the Administration Help database.

                  For more information about setting up the a partitioned server using the TCP/IP protocol, see "Ways to configure partitioned servers for TCP/IP" in the Administration Help database.

                  Back to Table of Contents

                  Managing Partitioned Servers


                  Notes client software
                  Each partitioned server has its own Notes client which shares its system resources and Notes data directory. The Setup program automatically assigns a unique partition number to each partitioned server. Partition numbers guarantee separate system resources for each partitioned server.

                  Perform administration tasks on a partitioned server in the same way you would perform administration tasks for any Domino server.

                  Failures and shutdowns
                  One partitioned server shutdown or failure does not affect other partitioned servers that run on the same computer. If one server shuts down, the others continue to run. If a partitioned server encounters a fatal error, an automatic cleanup procedure allows the server to restart without restarting the computer. For this to occur, each partitioned server's NOTES.INI file must contain the KillProcess=1 setting.

                  For more information on partitioned servers, see the Lotus Domino Install Guide for Servers.

                  For troubleshooting information, see "Why are partitioned server problems occurring?" in the Administration Help database.

                  For information on removing a partitioned server, see "About removing partitioned servers" in the Administration Help database.

                  Back to Table of Contents


                  Using the Billing System

                  Billing is a feature included with Lotus Domino Advanced Services. A Domino server that has the Billing server task enabled becomes a "billing server". It tracks whatever billing activities you specify.

                  The next lesson describes an overview of how to set up a Domino billing server.

                  Complete details are available in the Administration Help database.

                  Back to Table of Contents

                  Setting Up Billing


                  Procedure: Setting up billing
                  To set up billing, follow these steps:

                  1. Specify the type of Domino/Notes activities you want tracked by including the appropriate activities in the BillingClass parameter in the NOTES.INI file. The Billing classes are outlined in the table. For more information on Billing classes, see "About Notes Billing classes" and its related topics in the Administration Help database.

                  2. Enable the Billing server task by adding Billing to the ServerTasks line of the NOTES.INI file. The Billing server task collects the billing information. For more information on the Billing server task, see "About the Notes billing server task" and its related topics in the Administration Help database.

                  3. Configure the Billing parameters. The table describes the NOTES.INI file parameters you can set to configure Billing. For more information on these NOTES.INI file settings, see "About NOTES.INI settings for Billing" and its related topics in the Administration Help database.

                  For more information on the Billing database, see "Viewing the Billing database" and its related topics in the Administration Help database.

                  Back to Table of Contents

                  Making User Management Easier


                  Notes and Windows NT Integration
                  When you register or delete a Notes user, you can also update the Windows NT User Manager. Additionally, you can use User Manager menu options to specify that additions, deletions, and name changes be made to the Notes Public Address Book. Administrators can perform the following tasks using either the Notes or Windows NT interface:

                • Add and delete users
                • Log Notes Events to the Windows NT Event Viewers

                  To use these features, you must have a properly certified Notes ID, appropriate access to make any changes to the Public Address Book, and be a member of the local Administrator Group or Account Operator Group in Windows NT.

                  Back to Table of Contents


                  Adding and Deleting Users


                  Adding Users
                  During user registration, administrators can add an NT user account and specify the NT Group Name as shown in the following figure:


                  File - Tools - Server Administration; People; Register Person
                  Additionally, administrators can specify an NT user name as shown in the following figure:


                  File - Tools - Server Administration; People; Register Person; Continue

                  For more information on registering Notes users from within Windows NT, see "Ways to register Notes users with Windows NT User Manager" in the Administration Help database.

                  Enable Single Password Logon
                  The NT account password will be set to the first 14 characters of the Notes password supplied during user registration. Note that changing a Notes password does not affect the Windows NT password.

                  This option is only available on clients running a minimum of Notes Release 4.5 for Windows NT.

                  Deleting Users
                  In the Public Address Book, administrators can use the Delete Person action button to delete the selected person's NT user account. When the Administrator deletes a person on a server that is running Windows NT, the administrator will be asked whether to delete the person's Windows NT network account. This prompt appears regardless of whether or not a Windows NT account for the user exists in User Manager.

                  The Administration Process must be set up in order to use this action button. Note that deleting the person document does not delete the NT user account; you must use the Delete Person action button.

                  For more information on deleting Notes users, see "About how the Administration Process deletes a user name" in the Administration Help database.

                  Back to Table of Contents


                  Logging Notes Events to Windows NT Event Viewer


                  Procedure: Log Notes Events to the NT Event Viewer
                  To log Notes Events to the Windows NT Event viewer, follow these steps:

                  1. Open the Statistics and Events database (EVENTS4.NSF).
                  2. Choose Create - Monitors - Event Monitor.
                  3. Select Event Notification Enabled in the Enabled/Disabled field.
                  4. Select Server in the Event type field.
                  5. Select Log to NT Event Viewer in the Notification method field.
                  6. Enter the server name(s) to monitor or * for all servers.
                  7. Select an Event severity.
                  8. Save and close the document.

                  Events are logged to the Application View of the NT Event Viewer by level of severity according to the table.

                  Back to Table of Contents


                  Implementing the Domino POP3 Server


                  Domino POP3 Server Requirements
                  The Domino POP3 server task allows Domino servers to be host servers for POP3 clients. Some popular POP3 clients are:
                • Eudora and Eudora Pro
                • Pegasus
                • Microsoft Exchange
                • Netscape Navigator Mail

                  The Domino POP3 server task only enables retrieval of mail files from the Domino server. To allow the POP3 client to send mail, a SMTP server or the Domino SMTP MTA must be installed and enabled.

                  Hardware and Software Requirements for the POP3 server
                  To properly run the Domino POP3 server task, the following is required:
                • A server with Domino 4.51 Installed and tested.
                • TCP/IP Enabled.
                • Mail Routing Enabled.
                • SMTP Server or MTA installed.

                  Back to Table of Contents

                  Configuring the Domino POP3 Server Task


                  Configuring Domino Mail Files for POP3 Use

                  Step 1: Creating a Domino Mail File for each POP3 Client
                  You must manually create a mail file for each POP3 client by following these steps.

                  1. Choose File > Database > New.

                  2. In the server field, select a Domino server which is running the POP3 server task.

                  3. In the title field, enter the title of the client's mail file. Example - Daffy Duck's Mail

                  4. In the file name field, enter a path name and the file name for the mail file. If the user has a separate Domino mail file, make sure they are separate.

                  5. Select the template Mail (R4.5)

                  6. Click OK

                  Step 2: Creating a Person Document for a POP3 Client
                  Manually create a Person document in the Public Address Book for each POP3 client.

                  1. Open the Public Address Book

                  2. Choose Create > Person

                  3. Complete the Name section
                  a. Enter a first name, middle initial, and last name.
                  b. In the User Name field enter the hierarchical name for the POP3 client.
                  c. In the Short Name field enter the first letter of the first name, and the full last name with no spaces.
                  Example: dduck
                  d. In the HTTP Password field enter the password the POP3 client will use to log into the server.

                  4. Complete the Mail section
                  a. In the Mail system field, select POP3. Do not choose Internet.
                  b. In the Domain field enter the Notes Domain of the POP3 server.
                  c. In the Mail server field enter the name of the POP3 server.
                  d. In the Mail file field enter the path and name of the client's mail file that was created earlier.

                  5. In the Encrypt incoming mail field in the Misc. section, select NO.

                  Step 3: Starting the POP3 Server
                  To run the POP3 server enter the following server command: LOAD POP3

                  To stop the POP3 server, enter the following server command: TELL POP3 QUIT

                  To load the POP3 server task automatically, add POP3 to the ServerTasks setting in the NOTES.INI file.

                  Back to Table of Contents

                •     About IBM Privacy Contact