 |

Introduction

With Release 5.03, your Notes client contains additional features in your calendar; for distinguishing your work week, and for printing your schedule in a wider variety of formats. This learner directed offering will provide you with information about these Calendar enhancements.
While you may already know that R5 includes new table style choices, you may not have thought about using tables to help you deliver your message. Here we will explore the steps needed to create a Tabbed Table as an effective way to present information.
If you are not yet experienced with R5, we recommend that you take the Notes User Update course, available in both classroom and self-paced formats. For more information about these programs, see the Lotus Professional Services Education page at www.lotus.com/home.nsf/welcome/education.
Displaying Your Work Week

Setting your workweek view
A new calendar view you allows you to customize a view to reflect your own specified work week. This enables you to display and print your calendar according to your designated work days.
Follow these steps to customize your work week view.
Step
|  |
Action |
1. |  | Open your calendar.
|
2. |  | Click Tools, and choose Preferences.
|
3. |  | Select the Calendar tab, then select the Display tab.
|
4. |  | In the Advanced section select the days you want to include in your work week view, then click OK.

|
5. |  | Close the Calendar and reopen it.

|
 | When the Calendar is reopened you will see the new work week days that you selected. In the upper right corner is an additional display selection button, to change the view to the number of days in your work week (5 is the default).
 |
Printing your work week
In the print dialog box select the work week view from the content type menu. If the work week view is already displayed on the screen, when you choose File -> Print that view is automatically considered the content type.
Customizing print page types
You now have the option to print your calendar in any of these page types:
Full Page
Day Timers Senior Desk
Day Timers Senior Portable
Day Timers Junior Desk
Day Timers Junior Portable
Franklin Day Planner Monarch
Franklin Day Planner Classic
3 X 5 Index Cards Avery 5388
The following paper sizes are supported:
A4
A5
B4
B5
To select a page type, choose a content type, then click Customize. You can use Preview to view the lay-out onscreen. Most of these options print best in portrait mode.
Did You Know?

Restoring Bookmark defaults
If you inadvertently remove any of your default bookmarks (i.e., replicator, designer, workspace), you can now retrieve them without deleting your bookmark.nsf file. To do this, open one of your bookmark folders (i.e., Databases or Favorites), select the drop down arrow at the top of the frame, and select Restore Bookmark Defaults.
Using keyboard shortcuts in a view
The following keyboard shortcuts are available for quick navigation within a view.
To do this
|  |
Press
|
| Move to the far right of a view |  | END |
| |  |  |
| Move to the far left of a view |  | HOME |
| |  |  |
| Move to the bottom of a view |  | CTRL+END |
| |  |  |
| Move to the top of a view |  | CTRL+HOME |
| |  | |
Opening another person's calendar
If you have been given access to open another person's calendar, you can do this from the Calendar Tools menu. Selecting this option opens a directory search dialog called Open Calendar. Select the directory and the name of the person.
Tables to Go!

Creating an expanded tabbed table
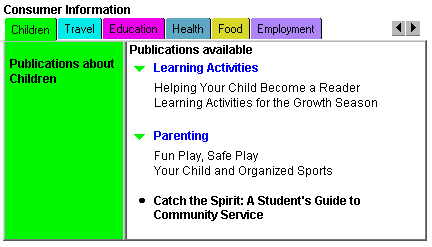
Tables are an effective way to organize and present information. With Notes R5, table rows can be viewed individually, using a "tabbed" display. In the example below, the table contains eight tab rows, although only six tabs are visible. When the entire set cannot be displayed, Notes automatically inserts forward and back navigation buttons at the top of the table.

Follow these steps to create the tabbed table seen here.
Creating the Table
- Choose Create-Table.
- In the Table Create dialog box, enter the number of rows and columns.
- Choose the Table Type icon for a tabbed table. Click OK.

The table will look like this.

Changing the column widths
- Click the Table layout tab.

- Change Table width field to fixed width. Change the column width of the first column to 1.15". Change the column width of the second column to 3".
Now the table will look like this.

Assigning text to the tab row labels
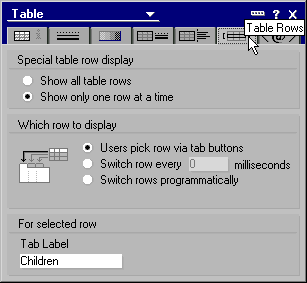
- With the cursor within the table, choose Table-Properties. Click the Table Rows properties tab.

- In the Tab label field type the text for the label of the first row, then click the accept checkbox.
- To enter label text for the other rows, click directly on the tab for that table row, then edit the Tab label field in the Table properties box.
 | When the tabs expand beyond the fixed table width, navigation arrows appear, as shown below. |
Applying cell color
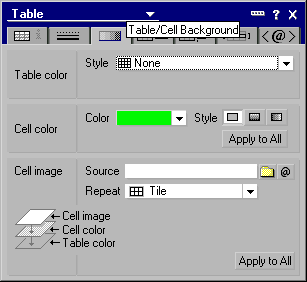
- Click in the first row of the table. In the Properties box click the Table/Cell Background tab.
- Choose a cell color. Repeat for each tab row.

 | Applying color to the first cell also applies it to the row tab. Another way to apply color to entire rows is to choose an alternating row Style for the entire table. |
|

