 |

Implementing Internet Messaging Servers and Clients

Back to Main Menu
Introduction

This Learner-Directed offering provides information about the tasks required to implement Internet messaging servers and clients. This offering is a supplement to the Lotus Education course, Implementing a Domino Infrastructure, and assumes knowledge of the R5 Domino Administrator interface and the Domino R5 server and workstation implementation tasks taught in that course.
This Learner-Directed Offering provides details on setting up a POP3 server and client. For other protocols, LDAP, IMAP, and NNTP, there is a checklist that provides the main tasks of their setup. SMTP and HTTP are mentioned here and are covered in Implementing a Domino Infrastructure.
For additional information on configuring all Internet protocols, refer to the Domino 5 Administration Help database.
Table of Contents

Internet Protocols
Configuring Internet Protocols
Starting Internet Messaging
Setting up POP3
Setting up IMAP
Self Assessment 1
Setting up LDAP
Setting up NNTP
Setting up Internet Mail Accounts
Self Assessment 2
Internet Protocols Domino Supports

Internet protocols
The Domino server and Notes client support several standard Internet protocols. This enables communication with clients and servers from other vendors who support the same Internet protocols. The following table lists and describes these Internet protocols.
Protocol | Description |
LDAP
(Lightweight Directory Access Protocol) | Enables LDAP clients to access LDAP directory services. For example, when addressing an e-mail, the sender can avoid a delivery failure by querying a directory on an LDAP server to verify the recipient's e-mail address. |
SMTP
(Simple Mail Transfer Protocol ) | Enables the transfer of a mail message to a recipient's mailbox on a server. A different protocol must be used, typically POP3 or IMAP, for the recipient to retrieve the message. |
POP3
(Post Office Protocol Version 3) | Enables a POP3 client to retrieve messages from a mailbox on a POP3 server. The POP3 client periodically connects to this server to download new mail to a local mailbox. The user reads mail from this local mailbox and not directly from the server. |
IMAP
(Internet Mail Access Protocol) | Enables an IMAP client to access a mailbox on an IMAP server.
IMAP can mimic POP3 functionality, but IMAP clients can also:
- Access messages directly on the server.
- Synchronize local edits with server edits.
|
NNTP
(Network News Transfer Protocol) | Enables users to participate in newsgroup discussions.
Domino supports two types of newsgroups:
- USENET newsgroups span the Internet.
- Private newsgroups have a narrower scope.
|
HTTP
(Hypertext Transfer Protocol) | Enables clients to transfer data to and from Web servers. |
Back to Table of Contents
Configuring Internet Protocols

Internet protocol support can be enabled during server setup
Administrators can enable Internet ports and their corresponding server tasks during server installation and setup. The installation program enables the ports in the Server document. The server-setup database, SETUP.NSF, allows the administrator to select tasks that will start automatically at server startup. For additional security, SSL can be implemented for each of the protocols, on a different port.
Note: SSL is discussed in Implementing a Domino Infrastructure and
in the Learner-Directed Offering entitled Implementing and Maintaining Domino Web Servers.
Server document settings
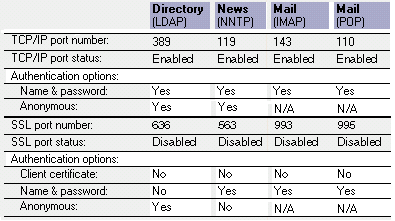
The following figure shows the configuration fields in the Server document for several Internet protocols. The port values listed are the defaults for each of the server tasks, based on Internet standards. This is recommended unless your site requires customization.
Note: The fields shown in the following figure are shown here side-by-side but are actually found on different tabs in the server document; Ports tab-->Internet Ports tab, and then the Directory tab, News tab, or Mail tab.

Back to Table of Contents
Starting Internet Messaging

Procedure: Automatically starting server tasks
Selecting Internet messaging protocols during server setup adds the appropriate task to the ServerTasks line in the NOTES.INI file. Server tasks not selected during server setup can be added to the NOTES.INI later. Follow these steps to automatically start any Internet server task when the server starts.
Step | Action |
1 | Locate the NOTES.INI file.
Note: By default, the NOTES.INI file is located in the Domino program directory. |
2 | Open the NOTES.INI file in a text editor. |
3 | Search for the ServerTasks= line. |
4 | Add the appropriate server task to the ServerTasks line. For example, the ServerTasks line may contain the following:
ServerTasks= Replica, Router, Stats, AMgr, Adminp, Sched, HTTP, POP3, IMAP, LDAP, NNTP |
5 | Save the NOTES.INI file, and close the text editor. |
6 | The server tasks listed will start automatically upon server restart. |
Note: The SMTP task is not started from the NOTES.INI or the server console. The setup of SMTP is covered in the Lotus Education course, Implementing a Domino Infrastructure.
Procedure: Manually restarting a server task
Follow these steps to manually restart the server task, if the server monitor indicates that the server task is not responding.
Step | Action |
1 | From Domino Administrator, select the server to administer. |
2 | Select the Server tab-->Status tab. |
3 | To stop the server task:
a. Select the task to stop from the list of tasks running on the server.
b. Choose Task-->Stop from the tools menu.
c. Click Yes to confirm stopping the task. |
4 | To start the server task:
a. Choose Task-->Start from the tools menu.
b. Select the task to start from the list of tasks.
c. Click Start Task. |
Back to Table of Contents
Setting Up POP3

What is the Domino POP3 server task?
The Domino server uses the POP3 server task to serve mail when a POP3 client selects to retrieve it. POP3 is not involved with the initial sending of messages to a mailbox on a server--sending Internet mail is handled by the SMTP protocol.
Checklist: Setting up POP3
Configure the server and clients to use the Domino server as a POP3 server. Complete these tasks to set up POP3 service.
 | Task | Procedure |
o | 1 | Start the POP3 task on the Domino server. |
o | 2 | Enable the POP3 port in the server document,
Ports tab-->Internet Ports tab-->Mail tab-->POP3 column. |
o | 3 | Enable the SMTP listener task on one or more Domino server. |
o | 4 | Set up POP3 mail users. |
Procedure: Setting up a POP3 mail user
Setting up a POP3 user includes creating the mail file for the user, listing the user in the Domino Directory, and configuring the=POP3 client software. Follow these steps to set up a POP3 user:
Step | Action |
1 | Create a mail file for the user based on the Mail (5.0) template (MAIL50.NTF), on the POP3 server. Then set the database ACL as follows:
- Add the user as Manager.
- Add the user's mail servers as Manager.
- Remove your name from the database ACL.
|
2 | Create a new Person document, and complete the following fields:
Basics tab:
- First name
- Last name
- User Name specified on the POP3 client
- Internet Password
Mail tab:
- Select POP3 for the Mail system.
- Specify the Notes domain to which the POP3 server belongs.
- Specify the name of the POP3 mail server.
- Specify the path and file name for the user's Mail file.
- Select an Internet message storage format.
- Enter the Internet address specified on the POP3 client.
- Select No in the Encrypt incoming mail field.
Click Save and Close. |
3 | Configure the POP3 client software as described below. |
Required information for configuring the POP3 client software
The steps to configure POP3 client software for mail are specific to each manufacturer, but the following information is required:
The fully qualified domain name of the Domino server running the POP3 task (for example, PTMail03.world.com).
The POP3 client user name. This name must map to one of the names included in the Name section of the Person document in the Domino Directory.
The fully qualified domain name of the SMTP server. This enables you to send messages to others.
Any other options you need enabled.
Note: For examples of configuring different POP3 clients, refer to the Domino 5 Administration Help database.
Back to Table of Contents
Setting Up IMAP

What is the Domino IMAP server task?
The Domino server supports the Internet Mail Access Protocol (IMAP), defined in RFC 2060, for reading mail. The Domino IMAP server, like all IMAP servers, enables IMAP clients to access their messages. IMAP is not involved with the initial sending of messages to a mailbox on a server--sending Internet mail is handled by the SMTP protocol.
Examples of IMAP clients
Outlook Express
Netscape Messenger
Pine/PC-Pine
Simeon
Checklist: Setting up the IMAP service
Complete the following tasks to configure the IMAP service.
 | Task | Procedure |
o | 1 | Enable the IMAP port in the server document, Ports tab-->Internet Ports tab-->Mail tab-->IMAP column. |
o | 2 | Set up IMAP users.
- Create Person documents and mail files for users.
- Convert the mail files for IMAP access.
- Configure the IMAP client software.
|
o | 3 | Start the IMAP server task on the Domino server. |
Procedure: Setting up an IMAP user
Setting up an IMAP user includes setting up a mail file for the user, listing the user in the Domino Directory, and configuring the IMAP client software. Follow these steps to set up an IMAP user.
Step | Action |
1 | Create a mail file for the IMAP user based on the Mail (R5.0) template (MAIL50.NTF) on the mail server, then set the database ACL as follows:
- Add the user as Manager.
- Add the userís mail servers as Manager.
- Remove your name from the database ACL.
|
2 | Create a new Person document, and complete the following fields:
Basics tab::
- First name
- Last name
- User Name specified on the POP3 client
- Internet Password
Mail tab:
- Select IMAP for the Mail system.
- Specify the Notes domain to which the IMAP server belongs.
- Specify the name of the IMAP mail server.
- Specify the path and file name for the userís Mail file.
- Select an Internet message storage format.
- Enter the Internet address specified on the IMAP client.
- Select No in the Encrypt incoming mail field.
Click Save and Close. |
3 | Enable the mail file for IMAP access using the following server console command:
load convert -m path\mailfile * mail50.ntf
where:
path is the location of the mail file(s), relative to the data directory.
mailfile is the name of the userís mail file.
Example:
load convert -m mail2\jdoe.nsf * mail50.ntf
|
4 | (Optional) Create a full-text index of the mail file so the IMAP user can search for information in messages and attachments. |
5 | Start the IMAP server task on the Domino server. |
6 | Configure IMAP client software according to the manufacturer's instructions. |
Back to Table of Contents
Self Assessment 1

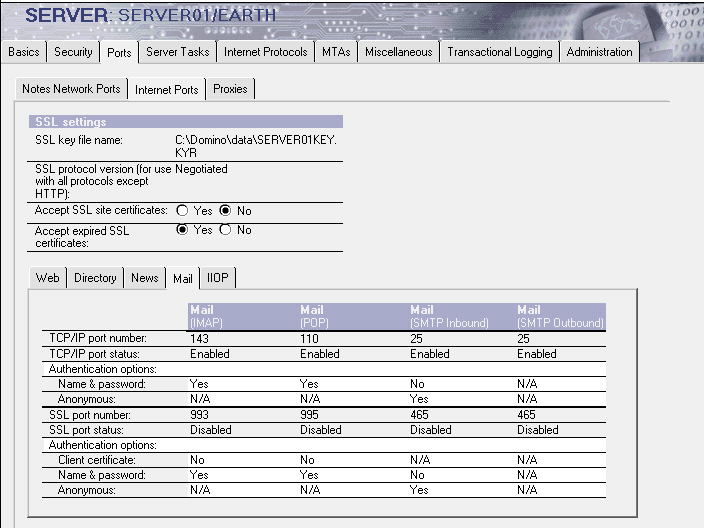
Review the Server document below, then answer the four questions following it. The first two questions refer to this server document.

1. What Internet mail ports are enabled on this server? Answer
2. Will users be able to send Internet mail through this server as well as retrieve delivered messages? Answer
3. Which protocol requires converting the mail file, IMAP or POP? Answer
4. In setting up the POP3 client, would PTMail03/World be an appropriate name for a Domino POP3 server? Answer
Back to Table of Contents
Setting Up LDAP

What is the Domino LDAP server task?
The Domino LDAP server task provides LDAP clients access to Domino Directories and to directories on other LDAP servers. Domino R5 supports the following features:
LDAP V3
Secure Sockets Layer (SSL) for the LDAP connection
Referrals that direct LDAP clients to another LDAP server, when the information requested is not found in a Domino Directory
Attributes defined by RFCs 2251-2256 and the Lightweight Internet Person Schema (LIPS)
Lightweight Directory Interchange Format (LDIF) for import and export between the Domino Directory and other LDAP directories
A number of other LDAP-based capabilites
Checklist: Setting up the LDAP service
Complete the following tasks to use the Domino server as an LDAP server.
 | Task | Procedure |
o | 1 | Specify a default Global Domain document. |
o | 2 | Specify a default Configuration document and edit settings on the LDAP tab.
(Optional) |
o | 3 | Set up a Directory Assistance database.
(Only if searches will extend beyond the primary Domino Directory) |
o | 4 | Customize the default LDAP port information in the server document.
(Only if needed) |
o | 5 | Create a full-text index for the primary Domino Directory on the LDAP server.
(Optional but strongly recommended if LDAP users will search for attributes other than names.) |
o | 6 | Start the LDAP server task on the Domino server. |
o | 7 | Configure LDAP clients to connect to the Domino LDAP server. |
What is Directory Assistance?
Directory Assistance allows a company to extend directory services from a serverís primary Domino Directory to secondary Domino Directories and to directories on LDAP servers. Administrators can set up Directory Assistance to:
Search for e-mail addresses.
Search for other attributes, such as a person's telephone number.
Authenticate Web clients.
Procedure: Setting up Directory Assistance for LDAP
After determining which Domino and LDAP directories to use, complete these tasks to set up Directory Assistance.
Step | Action |
1 | Create the Directory Assistance database using the Directory Assistance template (DA50.NTF). |
2 | Click Add Directory Assistance and configure access to other LDAP servers as follows:
Basics tab:
| Field |
|
| Domain Type |
|
| Domain Name |
Enter a descriptive name to indicate the domain for which name lookups should be performed.
|
| Company Name |
Enter a descriptive name for the company or division for which name lookups should be performed.
|
| Search Order |
Enter a number to indicate the precedence of this document compared with other Directory Assistance documents in this database.
|
| Group expansion |
Select Yes to allow group expansion during authorization of Web clients.
|
| Nested group expansion |
Select Yes to allow nested group expansion during authorization of Web clients.
|
| Enabled |
Select Yes to enable this document.
|
Rules tab:
| Field |
|
Organization
OrgUnit
Country |
Specify the names of the Organizations and Org Units that will trigger a lookup to the LDAP server specified on the LDAP tab.
|
| Enabled |
Select Yes to enable this rule.
|
| Trusted for Credentials |
Select Yes to allow Web clients in this organization to authenticate with the Domino server by supplying the name & password, or an X.509 certificate, contained in the LDAP Directory specified on the LDAP tab. For this to work, the field on the LDAP tab labelled Perform LDAP search for must have Notes Clients/Web Authentication selected.
Or, select No to disallow this type of authentication.
|
LDAP tab:
| Field |
|
| Hostname |
Enter the Fully Qualified Domain name of the LDAP server in Internet format. For example: LDAP.ACME.COM
|
| Base DN for search |
Enter a search base if limited search capabilities are required.
|
| Perform LDAP search for |
Select Notes Clients/Web Authentication to allow the Domino server to chase referrals for Notes users and to allow the target LDAP server to be used for authentication of Web users.
Select LDAP clients to allow this Domino server to supply LDAP clients with a referral to another LDAP server.
|
| Channel encryption |
Select SSL to encrypt data passed over LDAP connections, or None to have non-encrypted connections.
|
| Port |
Accept the default, 389, unless an alternate SSL port is required.
|
| Timeout |
Accept the default, 60 seconds, unless a different time limit is required for searches.
|
| Maximum number of entries returned |
Accept the default, 100, unless a greater or smaller number of entries should be returned. This applies only to Notes clients, because Domino supplies LDAP clients with a referral to another LDAP server, and not actual entries.
|
|
3 | Create Directory Assistance documents for secondary Domino directories. |
4 | Replicate the Directory Assistance database to selected directory servers. |
5 | Set Directory Assistance Information in the server documents of the designated directory servers.
(Basics tab --> Directory Assistance database name field) |
How a Notes Client can use LDAP
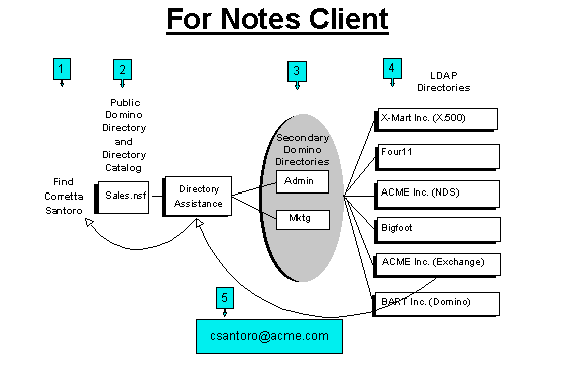
The following process and diagram show how Directory Assistance can be used by a Notes user.
1. A Notes user addresses a memo to Corretta Santoro and presses F9 to complete the address.
2. The Notes client searches the local address books, the Domino Directory, and Directory Catalogs.
3. Domino refers to Directory Assistance and searches other Domino Directories.
4. Domino refers to Directory Assistance and searches LDAP directories.
5. The name is found and the e-mail address, csantoro@acme.com, is returned to the Domino server which relays the e-mail address to the Notes client.

Note: The Domino LDAP task does not need to be loaded on the Notes user's directory server. The Domino server task itself searches the LDAP directories configured in Directory Assistance for the Notes client. The LDAP task is only for listening for LDAP-client connections. However, a Notes user can turn the Notes client into an LDAP client and access LDAP servers directly, by creating an Account document in the Notes user's local address book.
Checklist: Setting Up a non-Notes LDAP client
The Domino LDAP server supports any LDAP-compliant client. Complete these tasks to set up a non-Notes LDAP client to connect to the LDAP service.
 | Task | Procedure |
o | 1 | Configure the LDAP client software. Specify the host name of the Domino server running the LDAP service, for example, PTHub.world.com, or the IP address for the server. |
o | 2 | (Optional) If the LDAP user will connect using name and password, or client certificate authentication, create a Person document in the primary Domino Directory used by the LDAP service and include the user's Internet password or client certificate. |
Examples of LDAP clients
- Soft-Switch Directory Explorer
- Microsoft Internet Explorer 4.0
- Netscape Communicator 4.0
- Notes R5 (by using an Account document)
How an LDAP client can use a Domino server running the LDAP task
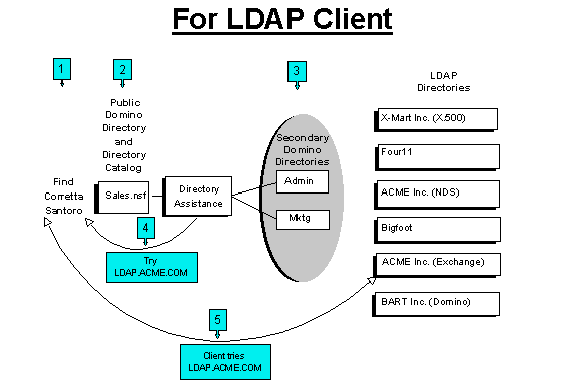
The following process and diagram show how Directory Assistance can be used by an LDAP user.
1. An LDAP user searches for Corretta Santoro.
2. The LDAP client requests the name from its LDAP server, a Domino server. The Domino server searches the Domino Directory, and Directory Catalog.
3. Domino refers to Directory Assistance and searches other Domino Directories.
4. Domino refers to Directory Assistance and finds an LDAP server listed. Domino returns the name of the LDAP server, LDAP.ACME.COM to the LDAP client.
5. The LDAP client receives the referral and contacts Acme's LDAP server directly.

Back to Table of Contents
Setting Up NNTP

What is NNTP?
The Network News Transfer Protocol (NNTP) is the Internet protocol used by USENET newsgroups for posting, distributing, searching, and retrieving messages. The concept is very similar to a Notes Discussion database because newsgroups are in a discussion format. Domino newsgroups must be based on the NNTP Discussion template (NNTPDI50.NSF).
Checklist: Configuring NNTP
Complete these tasks to set up the NNTP server and clients.
 | Task | Procedure |
o | 1 | Configure the NNTP server port, access, and newsfeed settings. |
o | 2 | Start the NNTP server task on the Domino server. |
o | 3 | Create public and private newsgroups using the NNTP discussion template (NNTPDI50.NSF). |
o | 4 | Set up Connection documents to other NNTP servers to send and receive newsfeeds. |
o | 5 | Configure NNTP clients to connect to the server. |
Back to Table of Contents
Setting Up Internet Mail Accounts

Notes clients can access non-Notes mail
A user may have a mail account with America Online or some other Internet Service Provider (ISP). Account documents allow users to set up separate accounts for each mail and news protocol. Account documents are stored in the Personal Address Book on the Notes workstation.
How to create Account documents
There are three ways to create Account documents:
- Administrators can include account information in a User Setup Profile.
- Users can provide mail account information during workstation setup (see the Domino 5 Administration Help database).
- Users can create their own Account documents. (see the Notes 5 Help database).
Procedure: Setting up an Internet mail account for Notes users
Follow these steps to edit the setup profile that will set up an Internet Mail account for your Notes users.
Step | Action |
1 | From Domino Administrator, select the server to administer. |
2 | Select the People & Groups tab-->Domino Directories section-->Address Book section-->Setup Profiles view. |
3 | Edit an existing setup profile, or click Add Setup Profile. |
4 | If this is a new setup profile, enter the profile name on the Basics tab. |
5 | On the Accounts tab, fill in the following fields:
- Enter the Account name.
- Enter the server address to access the mail account.
- Enter the protocol to use to access the server.
- Enter 1 to use SSL for the connection, or 0 not to use SSL.
|
6 | Click Save and Close. |
Back to Table of Contents
Self Assessment 2

1. What database enables the Domino server to query other LDAP servers? Answer
2. Can the Domino server provide names from secondary Domino directories as well as from LDAP servers? Answer
3. Is NNTP used to send e-mail between two specific users? Answer
4. For Notes clients to act as Internet-messaging clients what kind of document is needed and in what database is it created? Answer
Back to Table of Contents
Answer to Self Assessment 1, Question 1

1. This server has the ports for all of the Internet mail protocols enabled:
- IMAP and POP3 are enabled so both types of Internet-mail clients can retrieve mail from their mail files.
- SMTP inbound is enabled so the server can receive Internet mail which the Domino mail router can deliver to user mail files.
- SMTP outbound is enabled so that users can use this server to send messages to the Internet.
Note: SMTP requires additional setup covered in the Lotus Education course, Implementing a Domino Infrastructure.
Answer to Self Assessment 1, Question 2

2. Yes. The SMTP ports are enabled so users can use this server to send messages to the Internet. There are other fields in the server document and other documents that need to be configured for SMTP. These are covered in the Lotus Education course, Implementing a Domino Infrastructure R5 course.
Answer to Self Assessment 1, Question 3

3. IMAP requires converting the mail file while POP3 does not. The administrator must convert the mail file for an IMAP user, by loading the convert task with the -m option. This conversion enables functionality that IMAP provides.
Answer to Self Assessment 1, Question 4

4. No. The Domino POP3 server needs to be specified in Internet format, also called Fully Qualified Domain Name (FQDN).
Example: PTMail03.world.com
Back to Table of Contents
Answer to Self Assessment 2, Question 1

1. The Directory Assistance database needs to be set up to look for names and attributes in directories on other LDAP servers.
Back to Self Assessment 2 Questions
Answer to Self Assessment 2, Question 2


|

