
 |
by Kioko Mwosa
and Firas Yasin


Level: Intermediate
Works with: Domino.Doc and QuickPlace
Updated: 06/04/2002
Inside this article:
Domino.Doc architecture
QuickPlace and Domino.Doc integration
Customizing Domino.Doc templates
Configuring Domino.Doc
Customizing QuickPlace
Testing integration
Related links:
Sandbox samples
IBM Redbook: Customizing QuickPlace
IBM Redbook: Creating Customized Solutions with Domino.Doc
Domino Java toolkit download
Domino.Doc Administrator's Guide
Domino.Doc Best Practices white paper
Get the PDF:
 (149 KB) (149 KB)

|
 |
Lotus QuickPlace helps teams communicate and collaborate, allowing them to achieve their goals quickly and efficiently. Along the way, a QuickPlace can accumulate a great deal of valuable information. However, sooner or later most teams eventually go on to other projects—as they meet their objectives and members are needed elsewhere. When this happens, the QuickPlace may no longer be a center of high activity, but it may still contain important documents of use to future teams.
This article tells you how to set up a process that allows fast access to previously used QuickPlace content, in a way that lets you continue to use these documents in your new QuickPlace. To do this, we'll integrate QuickPlace with Domino.Doc, an enterprise document management system. We'll explain how to add an additional search link in QuickPlace so that users can search directly within Domino.Doc, and how to create a URL link from QuickPlace to a document now stored in Domino.Doc. This article assumes you have a good working knowledge of using and administering QuickPlace and Domino.Doc. We also assume you're familiar with programming LotusScript and Java agents in Domino.
For more information about integrating QuickPlace with Domino.Doc and other Lotus applications, see the IBM Redbook, Customizing QuickPlace.
QuickPlace architecture
QuickPlace is the answer for team collaboration. It provides a tool that allows project managers to assign tasks and monitor the progress of each. It also offers a team calendar (not to be confused with the Domino calendar), that shows upcoming events affecting the team. QuickPlace also gives you simple workflow management. It is easy to use, allows instant access to users on the Web, and lets you customize it to fit your organization's needs.
In addition, QuickPlace provides limited document management functionality, although these features are not its primary purpose. However, you can enhance your ability to manage QuickPlace content by using Domino.Doc, the solution to document management. Due to the highly customizable nature of both Domino.Doc and QuickPlace, you can integrate the two, using QuickPlace's toolkit and the Domino.Doc API.
To help you understand how QuickPlace/Domino.Doc integration works, we'll begin by discussing the architecture of QuickPlace and its toolkits. QuickPlace is built on the Domino architecture. However, you should not consider QuickPlace as a Domino database, but more as a separate application with its own characteristics.
In the figure below, the two main components of a QuickPlace are the QuickPlace templates and the QuickPlace databases. A QuickPlace "place" is created by applying these QuickPlace templates. The look-and-feel of the place, however, is maintained by the QuickPlace databases.
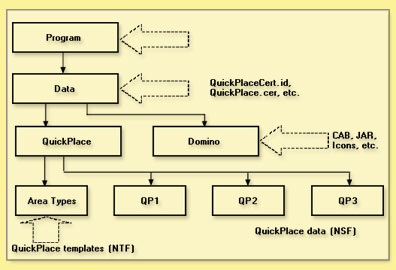
QuickPlace creates a place by using three Domino databases:
- Main.nsf, as the name suggests, is the main component of any QuickPlace place. In it are all the documents that the place contains (with the exception of Rooms). For simplicity, we will use QuickPlaces without rooms in the examples in this article.
- Contacts1.nsf plays a major role in keeping information about the QuickPlace members.
- Search.nsf is a searchable database that allows users to search their QuickPlaces.
Keep in mind that a document stored in QuickPlace (as with any Domino document) has properties. These properties provide very valuable information that we can use to determine which documents to send to Domino.Doc and which to keep in QuickPlace.
You can customize QuickPlace with HTML, Java, LotusScript, or C. Each language's toolkit has its own characteristics and uses. For the purposes of this article, we will use the Java toolkit. To use the Java toolkit, you must install the Domino toolkit for Java. You can download the Domino Java toolkit from the IBM Trials and Betas Web site. Then add the API path to your computer (or add the path to the API at the project path if you are using an advanced compiler). For example, if you install the toolkit with all the default options, then the path for the notes.jar file might be:
C:\DTJava\Lib\notes.jar
If you are using a text editor to write your code, you can add this full path to the system class path file. To do this:
- Open the Control Panel.
- Double-click the System icon.
- Click the Advanced tab.
- Click the Environmental Variables button.
If a variable classpath exists, then append the path to the value that already exists in the Variable Value field. However, if the classpath variable does not exist on your system, create a new variable by clicking the New button and naming the new variables "classpath;" then add the full path in the Variable Value field.
Domino.Doc architecture
Domino.Doc is a flexible, out-of-the-box document management system that is easy to deploy and that can be tailored to meet your specific needs. It is designed as an enterprise document management system built on top of the Domino platform. Domino.Doc provides library services for documents, such as document profiling, version control, check-in/check-out, collaboration, and security. These services allow Domino.Doc to be put to a wide variety of uses ranging from a repository for Web content management for an Internet site, to specialized FDA submission applications.
The Domino.Doc storage paradigm is based on a hierarchical model with the library serving as the main entry and navigation point. This is where administrators can define who has access to the system and at what level. The security levels within Domino.Doc are Manager, Editor, Draft Editor, Reader, and No Access. Users are prompted for a login and password to be authenticated by the system.
The next level of categorization in Domino.Doc is a file room. This is actually a property in a file cabinet that allows it to appear categorized in a view in the library. A file cabinet can appear in more than one file room, although users will be pointed to the same file cabinet regardless of which file room they accessed it from.
A file cabinet consists of a binder database and one or more document databases. The binder database stores information about the binders including all the binder metadata. It also contains the links to the various document databases referenced by the binder. The document database contains information about the documents including all the metadata, the attachments, and the various views used to display the documents. Metadata within the database is stored in subforms that can be customized to your needs using Domino Designer.
There are various ways for you to customize Domino.Doc. The Domino.Doc API is a Win32 application and can be instantiated from LotusScript, C++, and Visual Basic. However, if you are following the steps outlined in this article, you will need to be familiar with using Domino Designer and LotusScript.
You can find more information about setting up and configuring Domino.Doc in the Domino.Doc Administrator's Guide, the IBM Redbook Creating Customized Solutions with Domino.Doc, and the Domino.Doc Best Practices White Paper. Also, you can download the sample code contained in this article (along with other examples of customizing Domino.Doc) from the Domino.Doc Samples database in the Sandbox.
QuickPlace and Domino.Doc integration
We have briefly described the value of both QuickPlace and Domino.Doc as individual products. However, the ability to integrate the two provides you with the benefit of managing your fast-growing QuickPlace content, using Domino.Doc as your archive repository. The information generated by a QuickPlace should not be lost once the QuickPlace is no longer actively used. Instead, there may be a great deal of value in recycling this content by storing it for future retrieval. Domino.Doc can be the storage repository and can serve as the means through which your QuickPlace documents are published to your portal, intranet site, and elsewhere in your corporation. Adding workflow and publishing capabilities to documents in Domino.Doc gives you the flexibility to fully leverage your document management tools.
This section describes an example of how to use Domino.Doc to manage QuickPlace content. These are the areas that will be covered in this example:
- Modifying the Domino.Doc search to allow it to be called from a QuickPlace.
- Moving QuickPlace documents to Domino.Doc. This involves creating a URL to a Domino.Doc document and adding a Domino.Doc search link to a QuickPlace.
This article describes a way to move content created in QuickPlace into a Domino.Doc folder. To do this, we'll create a folder in QuickPlace, and create a PlaceBot that will send pages in that folder to the Domino.Doc library.
Prerequisites
Before beginning Domino.Doc and QuickPlace integration:
- Make sure that the Domino.Doc client is installed on the server. You need this to work with the Domino.Doc API.
- Download and unpack the Domino.Doc Samples database (ddsample4.nsf) from the Sandbox. This contains code you'll need for building URL links to Domino.Doc documents. To unpack the database, click on Doc_Samples.exe. and follow the instructions. The program will place a copy of the database into the folder you specify.
- Download the QuickPlace Router integration samples database (QPRouter.nsf) and two LotusScript files (DDocLibrary.lss and Upload.lss) from the Sandbox. You should unzip these files into a folder on your local drive, for example c:\temp.
Customizing Domino.Doc templates
We recommend you create a custom template when doing any modifications to the library and the file cabinets, rather than changing the original "out-of-the-box" templates. To do this:
- Bookmark the domdoc.ntf template on your workspace page.
- Click it once to select it, and choose File - Database - New Copy.
- Create a new copy of domdoc.ntf on your server and name it domdoc_custom.ntf.
- Give the new template the title Domino.Doc Library Template Custom.
- In Database Properties, make sure that the Template Name is DominoDocLibraryCustom.
Customizing the Library template
To allow the Domino.Doc Advanced Search form to be called from the QuickPlace, you need to modify the HTML form in domdoc_custom.ntf by adding new fields and applying some @Formulas to them.
First, open the HTML form using Domino Designer and create the following five fields above the HTMLTags field:
| Field name | Type | Value |
| Query_String | Text
Computed for Display | Query_String |
| Params | Text
Computed for Display | @ReplaceSubstring(@RightBack(Query_String ; "&") ; "+" ; " ") |
| ParamList | Text
Computed for Display | @ReplaceSubstring(@Right(Query_String ; "&") ; "+" ; " ") |
| ParamAttributes | Text
Computed for Display
Allow Multiple Values | @If(ParamList != "" ; @Word(@Explode( ParamList ; "&") ; "=" ; 1) ; "") |
| ParamValues | Text
Computed for Display
Allow Multiple Values | @If(ParamList != "" ; @Word(@Explode( ParamList ; "&") ; "=" ; 2) ; "") |
Next, select the HTMLTags field and change its value to the following:
'The first three lines get the value of the query fields and parse the search string
URL:=@Replace("URL" ; ParamAttributes : "URL" ; ParamValues : "MyHomePage?OpenForm");
titleTemp := "Domino.Doc";
DbName:=@ReplaceSubstring(@Subset(@DbName;-1);"\\";"/");
'The remaining lines of code load the Domino.Doc frameset and display the search results
"<Title>" + titleTemp + "</Title><FRAMESET FRAMEBORDER=0 BORDER=0 FRAMESPACING=1 COLS=\"175,*\"><frameset frameborder=0 border=0 framespacing=0 rows=\"275,*\"><FRAME NAME=\"Left\" SRC=\"/" + DbName + "/WebNavigationPanel?OpenForm&Page=MHP\" MARGINWIDTH=0 MARGINHEIGHT=0 SCROLLING=\"NO\"><FRAME NAME=\"Tree\" SRC=\"/" + DbName + "/BlankForm?ReadForm\" MARGINWIDTH=0 MARGINHEIGHT=0></frameset><FRAMESET FRAMEBORDER=0 BORDER=0 FRAMESPACING=0 ROWS=\"53,*\"><FRAME NAME=\"Header\" SRC=\"/" + DbName + "/WebHeaderPanel?OpenForm\" MARGINWIDTH=0 MARGINHEIGHT=0 SCROLLING=\"NO\"><FRAME NAME=\"Bottom\" SRC=\"/" + DbName + "/" + URL + "\" MARGINWIDTH=0 MARGINHEIGHT=0></FRAMESET></FRAMESET>"
Remember to save and close the HTML form.
To upload the content of a QuickPlace page into Domino.Doc, you will need to add a Script Library to your custom library template. To do this:
- In Domino Designer, open QPRouter.nsf and make a copy of the Script Library DDocLibrary. (QPRouter.nsf is the QuickPlace Router database, containing QuickPlace integration samples. As mentioned above, you must download this database from the Sandbox.)
- Navigate to Script Libraries under the Resources section.
- Make a copy of DDocLibrary.
- Open your custom template domdoc_custom.ntf and paste the copy of the DDocLibrary Script Library.
- Open DDocLibrary. Click Declarations, and scroll down to Sub InitLibrary.
- You need to change the hardcoded library path contained in the Sub InitLibrary section of the DDocLibrary Script Library to match your Domino.Doc library path. The line you need to modify is currently set as thelib$ = "notes://PORTER/domdoc/MillenniaLibrarylib.nsf".
Customizing the File Cabinet template
To customize the File Cabinet template, do the following:
- Create a new copy of the filecab.ntf on the server and call it filecab_custom.ntf.
- Give it the title File Cabinet Template Custom.
- In Database Properties, make sure the name of the template is DominoDocFileCabinetCustom.
- Create a new subform named QPDocument in the filecab_custom.ntf template.
- Create a table with four rows and two columns. Fill in this table as follows:
- In the first cell, create a Computed for display Text field named DocuType. The value for this cell should be DocType.
- In the next row, create a Editable Text field named Subject.
- In the third row, create an Editable Names field named From.
- In the fourth row, create an Editable Date/Time field named Date_Received.
- Next you must add the functionality to create URLs to documents in Domino.Doc. Delete the following elements from the filecab_custom.ntf template since you will add new elements by the same name from the samples database:
- Forms to remove: HTML and $$ViewTemplate for WebNoFolders
- Agents to remove: (DDMAutoLaunch)
- Subforms to remove: WebTaskBarBinder and WebTaskBarDoc
- From the Domino.Doc Samples database, click the “Building links to Binders and Documents” example. Detach the DLUrl.nsf database onto your local machine. You can save it to a temporary directory, for example, c:\temp.
- Using Domino Designer, open the DLUrl.nsf database and copy the following elements to the filecab_custom.ntf template:
- Forms to copy: HTML, URL, and $$ViewTemplate for WebNoFolders
- Agents to copy: WebURLOpen and (DDMAutoLaunch)
- Subforms to copy: WebTaskBarBinder and WebTaskBarDoc
To allow your users to choose a specific QuickPlace document form to search from Domino.Doc Advanced Search, you need to add a subform that captures this information.
- From the Domino.Doc Samples database, click the Search Forms example.
- Detach the FCSearch.nsf database and store it locally, for example, in c:\temp.
- Open the FCSearch.nsf database using Domino Designer.
- Copy the Search subform into both the domdoc_custom.ntf template and the filecab_custom.ntf template.
Configuring Domino.Doc
Now that you have completed customizing all the Domino.Doc elements required to make the integration sample work, the next step is to create a library and a file cabinet to store archived QuickPlaces.
- From the Domino.Doc Site Administration database, create a new library. For this example, we will call the Domino.Doc library Archive. Name the Library Design Template domdoc_custom.ntf and the File Cabinet Template filecab_custom.ntf.
- Open the new Archive library.
- Select Library Administration and create a new document type called QPDocument.
- Create a new file cabinet called Archived QuickPlace Documents. Check that the QPDocument type is selected as the default document type for the cabinet. Invite users at the appropriate access level. These users should be the same people who have access to the QuickPlace.
Customizing QuickPlace
You are now ready to customize QuickPlace so that you can integrate it with Domino.Doc.
- Select your server name to instruct the QP-Ddoc Upload agent in the QPRouter.nsf database to run. The properties of this agent are:
Name = QP-DDoc Upload
When should this run = On Schedule, More than Once a Day, Once every hour. This agent can be set to run less frequently depending on how much data you will be moving from the QuickPlace to Domino.Doc.
- Copy the QPRouter.nsf database to your Domino\Data directory. There are three views in this database: Inbox, Uploaded and $All. (For more background information on these, see the IBM Redbook Customizing QuickPlace.)
- Create your new QuickPlace. (You can follow the instructions provided in QuickPlace Help.)
- Customize your new QuickPlace by adding a new folder named Domino.Doc. To do this, choose Customize - Rooms - New - Folder. Select Standard List as the Type.
- Create the QPRouter PlaceBot in the QuickPlace. To do this, choose Customize - PlaceBots - New PlaceBot. Give it the title QPRouter. Then import the Upload.lss LotusScript file you downloaded from the Sandbox. This PlaceBot will run on a scheduled basis, more than once daily, every hour. It will only affect pages in the Domino.Doc folder.
- Click Done.
- Create a link that will launch the advanced search form in QuickPlace. To do this, choose Customize - New - Link Page in the new QuickPlace. Give the new page the title Search Domino.Doc, with the following URL format:
http://yourserver/domdoc/yourlib.nsf?Open&URL=WebAdvancedSearchAll?Open
where yourserver is the name of your server, and yourlib.nsf is the file name of your library.
- Open the link in a new window and publish it.
Testing integration
Now that you have completed customizing both QuickPlace and Domino.Doc, you are now ready to test the integration.
- Create a document in the QuickPlace with an attachment.
- Move the attachment into the Domino.Doc folder by clicking on the attachment and selecting the Move to Folder menu option. This triggers the QPRouter PlaceBot. The document should appear in Domino.Doc in the Archived QuickPlace Documents file cabinet after a few minutes.
- From the QuickPlace, do an advanced search in Domino.Doc using the Search Domino.Doc link. Fill in some keywords that you know exist in the moved document, click the Search menu option in Domino.Doc, and verify that the document exists.
- Go to the document profile and create a URL for the document. From the document menu in the profile, click on Create URL for File; this will create a URL for the actual document attachment.
- Copy and paste this URL into your new QuickPlace.
Domino.Doc and QuickPlace together: The power of two
QuickPlace enables your organization's teams to communicate and share knowledge. Domino.Doc lets you manage that knowledge in a way that makes it available for the benefit of others. Together, these two products complement each other, providing a powerful tool your users can take advantage of to form high-performing teams that can better achieve their goals.
Our intent in writing this article was to help you learn how to use Domino.Doc to manage content generated by QuickPlaces. We've covered a great deal of ground in a short time: creating a custom Domino.Doc template, modifying the Advanced Search form, and creating a new Domino.Doc document type and URL builder for document attachments. We've also explained:
- Creating a router database that moves attachments from QuickPlace into Domino.Doc
- Configuring QuickPlace to allow you to add a PlaceBot to work with the router database
- Creating a folder to archive QuickPlace content in Domino.Doc
- Creating a link to QuickPlace content to perform Advanced Searches directly in Domino.Doc
This may seem like a lot to do. But if you copy and modify the examples we've provided, you should be up and running pretty quickly. And as always, feel free to experiment and adapt our samples to suit your own needs.
ABOUT THE AUTHORS
Kioko Mwosa is a Domino.Doc Product Specialist in the Worldwide Technical Sales Team. His current role includes supporting the Sales Team on customer calls, assisting customers with high-level system architecture, and providing technical assistance for customization and deployment of Domino.Doc. He is also the author of the Domino.Doc Best Practices White Paper. Kioko is also an activist against the sale of conflict diamonds.
Firas Yasin is a Software Engineer for IBM, providing pre-sales support for several Lotus products. He currently concentrates on QuickPlace and Sametime development and customization. He is also one of the authors of the IBM Redbook Working with the Sametime Community Server Toolkit. A University of Kentucky graduate, Firas lives in Lexington, Kentucky and enjoys tennis when he's not working. |
|