 | 
Creating a Sent Mail folder
by
Bret
Swedeen


Level: Intermediate
Works with: Domino 4.5
Updated: 07/07/1998

Inside this article:
Before you get started
The Sent Mail solution
The 100% solution

Related links:
Lotus Support
Lotus Messaging

Get the PDF:
 (104Kb) (104Kb)


|  |
[Editor's note: The Special Report column is brought to you by Lotus Support, and features articles that dive into issues important to both Domino/Notes administrators and developers. This month's article describes one way for administrators to reduce users' confusion between views and folders in their mail databases -- by replacing the Sent view in the mail database with a Sent Mail folder.]
 In response to your feedback, this article now includes a new MoveToSentMail sub procedure that executes only when necessary, and no longer loops through the Sent view. In response to your feedback, this article now includes a new MoveToSentMail sub procedure that executes only when necessary, and no longer loops through the Sent view.
Since the introduction of folders in Notes Release 4.0, users have often confused them with views. Views, on the one hand, are a flexible way to display groups of documents based on a selection criteria. This criteria can be as general as "all documents in the database" or as specific as "documents that were created after a certain date and contain a particular value within a particular field." Folders, on the other hand, are a flexible way to organize documents. A document does not need to meet specific selection criteria to be stored in a folder. Typically, users create folders on an as-needed basis and place documents in those folders by a set of loosely-defined rules.
One place users get the most confused about folders and views is in their own mail databases. When you install the Notes client, the default setting in the user mail preferences is to save a copy of every mail message sent. Unless users change this preference, the Sent view in their mail database can amass an overwhelming amount of documents. Typically, users will eventually do a little housecleaning and delete some documents from this view while saving others. Of the documents they want to keep, users may decide to either leave them in the view, or perhaps drag them to a folder, and here is where the confusion begins.
Basic folder functionality allows documents to appear as they are dropped into the folder, and disappear as they are dragged out. The Inbox of the mail database is a perfect example of the folder functionality in action. The Sent view, however, does not respond to dragging and dropping the same way as the Inbox folder.
Views display documents based on a selection criteria. Since dragging a document to a folder doesn't change any values in the document, the document continues to meet the view's selection criteria. Thus, a document continues to appear in the view after it is dragged to a folder. Users who don't understand the functional difference between a view and a folder may drag a document from the Sent view to a folder, and then delete that document from the Sent view. These users learn the hard way that deleting a document from the Sent view deletes the document itself from the database (whether or not the document also appears in a folder).
As a Domino or Notes administrator, you've probably explained this Sent view behavior many times to your users. There are, however, two quick ways to reduce users' confusion:
- The first approach is to change the Save Sent Mail user preference to "Don't keep a copy." With this change, any message that the user sends won't get saved, and thus, won't appear in the Sent view. However, whenever users do want to save a copy of a sent message, they can do so by clicking the Send and File button from the action bar instead of the Send button. This Send and File button allows a user to save a copy of the message to a specified folder. Unfortunately, any saved message still appears in the Sent view, and this may cause confusion for some users.
- The other approach is to change the Save Sent Mail user preference to "Always prompt." Then, when users send a message, they are prompted whether to also save a copy. This approach causes the Sent view to be populated by only those messages a user wants to keep. Unfortunately, if users then drag these messages to a folder for organizational purposes, the messages still appear in the Sent view -- and this too, may cause confusion for some users.
The ideal approach to reduce this potential for confusion is to make the Sent view act like a folder. When users drag a message out of the view and place it in a folder, the message disappears from the view and appears only in the destination folder. This approach is possible; however, you must be willing to alter the design of the standard mail database. The alterations are simple as you'll see in this Special Report.
Note: To implement a Sent Mail folder, as presented in this article, you must be using Notes Release 4.5 or later.
Before you get started
Changing the basic functionality of the Sent view in the mail database involves more than a couple of menu selections or NOTES.INI settings. You must add the new functionality directly to the mail database or its design template. Since we're about to alter a very important database, I suggest you first apply the proposed changes directly to your own mail database. If you like the results, you can consider applying these changes to the design template. Then, when the Design task runs on your server(s), the changes in the template spread throughout your Notes environment. Of course, if you don't like the changes, you can easily wipe them out by refreshing the design of the database you changed. The database then returns to its original, default state, and no harm is done.
Should you decide to alter the Notes Mail template, you should complete the following steps before you get started:
- Locate your mail template and make a backup copy of it in a safe location, such as on a diskette or in a directory on a network file server. The mail template is located in the Notes data directory, and the file name for the template reflects your current release of Notes (such as, MAIL45.NTF for Release 4.5x, or MAIL46.NTF for Release 4.6).
- Prepare a way to document the changes you make, in case you need to reapply them in the future (for example, because of an upgrade or reinstallation). You can create a simple database to store your documentation, or a simple word processing document will suffice. However, if those options are too laborious, you can always opt for the "primitive" method of pen-and-paper.
Note: Changes, such as the ones described in this article, are not supported by Lotus Technical Support. Before applying such changes, please take time to judge whether these changes make sense for your Notes environment.
The Sent mail solution
Your objective for modifying the mail database is to make the Sent view act more like a folder: as messages are dragged out of the view, they disappear. Since we can't change the fundamental way a view works, we'll need to replace the Sent view with a folder.
Note: If you are applying these changes to a mail database that inherits its design from a template, you will receive a warning prompt each time you place certain components of the database into edit mode. You can either ignore these warnings, or disable the design inheritance by selecting the database in the Notes workspace and then choosing Edit - Properties. Then, on the Design tab, de-select the option "Inherit design from a template."
Creating the new Sent Mail folder
Use the following steps to create the new Sent Mail folder:
- Open your mail database and choose Create - Design - Folder.
- In the dialog box that appears, enter a name for the new folder. (I suggest using the name "Sent Mail;" however, any name that does not duplicate one of the current views or folders is acceptable.) Then, click the Options button.
- In the dialog box that appears, select a view or folder from which to inherit the design for your new folder. Since our new folder is a substitute for the Sent view, select the Sent view and click OK.
- Click OK to create the folder, and your new Sent Mail folder appears:
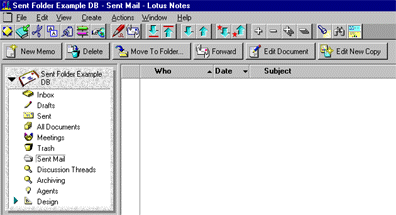
Notice that the new folder appears in the folder section of the Navigator pane. Since this new folder is a replacement for the Sent view, it might make sense to have the folder appear where the Sent view is currently located. Unfortunately, there is no way to control the placement of views or folders above the Trash folder in the Navigator pane. These items are controlled internally by the Notes client; however, we can at least control whether or not they appear in the Navigator pane.
Hiding the Sent view
Since we can't put our new folder where the Sent view is, we should at least hide the Sent view. To do this:
- In the Design section of the Navigator pane, select Views and then double-click on ($Sent). The view opens in edit mode -- ready to accept changes.
- Choose Design - View Properties.
- In the dialog box that appears, change the name of the view from its current entry, ($Sent), to (($Sent)). Adding the extra set of parentheses causes the view to be hidden.
- Save your changes and close the Sent view.
- In the upper portion of the Navigator pane, verify that the Sent view no longer appears:
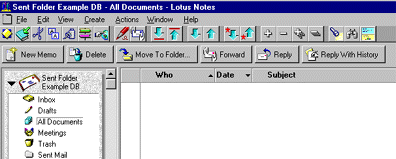
Even though the Sent view is now hidden, it's still accumulating a copy of every sent message that is also saved (either automatically -- via the "Always keep a copy" setting in the mail preferences -- or manually, via the "Always prompt" setting in the mail preferences and clicking Yes when prompted). However, since the view is hidden, users can't use it to access any of the messages previously sent and saved.
Adding to the LotusScript libraries
Now, we need to get the messages that still appear in the hidden Sent view to automatically appear in our new Sent Mail folder. To accomplish this task, we'll need to add a little LotusScript code to the database's Script Libraries:
- In the Design section of the Navigator pane, select Script Libraries, and then double-click on EmailProcessing.
- In the Event dropdown list, select Initialize. An empty sub procedure called Initialize appears.
- Copy the code shown below and paste it right on top of the Initialize procedure.
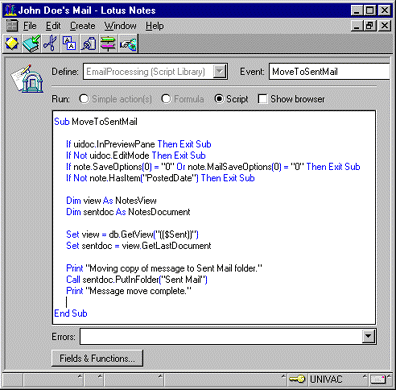
1.Sub MoveToSentMail
2. If uidoc.InPreviewPane Then Exit Sub
3. If Not uidoc.EditMode Then Exit Sub
4. If note.SaveOptions(0) = "0" Or note.MailSaveOptions(0) = "0" Then Exit Sub
5. If Not note.HasItem("PostedDate") Then Exit Sub
6. Dim view As NotesView
7. Dim sentdoc As NotesDocument
8. Set view = db.GetView("(($Sent))")
9. Set sentdoc = View.GetLastDocument
10. Print "Moving copy of message to Sent Mail Folder."
11. Call sentdoc.PutInFolder( "Sent Mail" )
12. Print "Message move complete."
13.End Sub
4. Now, remove the line numbers from the beginning of each line. (The line numbers are just there for explanation purposes.) When you are finished, the new sub procedure (MoveToSentMail) appears, and Initialize returns to being an empty sub procedure:
The MoveToSentMail sub procedure executes in the following manner:
- Lines 2 through 5 are conditions that cause the sub procedure to exit. These conditions are situations where a message wasn't sent or saved. For example, reading a message, sending but no saving a message, and saving but not sending a message are all situations where you don't want this sub procedure to execute.
- Lines 6 and 7 declare variables.
- Lines 8 and 9 set the values of these variables:
-- view: Refers to the Sent view of the current database, which is identified by "db" ("db" is a variable previously defined in other parts of the Script Libraries).
-- sentdoc: Refers to the last document listed in the Sent view. Because of the view's sort order, a recently sent message always appears at the end of this view.
- Line 10 prints a message on the status indicating that a message is being moved to the Sent Mail folder. Line 11 performs the actual message move. Finally, line 12 prints another status bar message indicating the message move is complete.
We've added the MoveToSentMail sub procedure to the EmailProcessing Script Library because this library contains other sub procedures that are sometimes called during the Close and Save events of certain forms, such as Memo. Whenever possible, variables previously defined in other parts of the Script Libraries are used (such as "note" and "db"). New variables are declared in the context of this sub procedure, so if necessary, we could easily revert to the original template. We would only need to delete the MoveToSentMail sub procedure, delete the Sent Mail folder, and "un-hide" the Sent view.
Updating the forms
Well, adding the LotusScript sub procedure was fairly painless. Now we're ready to go, right? Wrong. Even though we have code that puts a copy of whatever appears in the Sent view into the Sent Mail folder, we're not ready to call this code yet. To use the new MoveToSentMail sub procedure, we need to add code that calls the sub procedure in the Queryclose event for every form that sends mail. Let's start with the Memo form:
- In the Design section of the Navigator pane, select Forms, and then double-click on Memo.
- In the Event dropdown list, select Queryclose and add the following line of code in bold. (This code will call our MoveToSentMail sub procedure.)
Sub Queryclose(Source As Notesuidocument, Continue As Variant)
Call MoveToSentMail()
Call EmailClose(Continue)
End Sub
You should repeat these steps to modify the rest of the forms that send mail, including any custom forms that you may have created. Below is a list of the standard forms that need the additional code:
- Memo
- Reply
- Reply With History
- Personal Stationary
- Phone Message
- Memo To Database Manager
- Task
- Calendar Entry
Each of these forms (or, as LotusScript sees them, "documents") is considered an object, and each object has associated events. For example, closing a document is an event (Queryclose), and opening a document is an event (Queryopen). When you select the Event dropdown list, you can see all of the events associated with the document object. When one of the listed events occurs, the event can trigger the execution of specified LotusScript code. We'll use one of these object events to call our new MoveToSentMail sub procedure.
We want to move all sent messages into the Sent Mail folder when they are saved (either automatically or manually). Therefore, calling our new MoveToSentMail sub procedure from the document's Querysave event might make sense; however, the Querysave event actually occurs before the document is saved. Our sub procedure relies on the document existing in the Sent view, which is possible only after the document is saved. Therefore, the Querysave event is not the appropriate place to call our sub procedure.
The document event we want to use is Queryclose, because this event takes place after Querysave, yet before the document is closed. When a document is saved, our MoveToSentMail sub procedure finds it in the Sent view and moves it to the Sent Mail folder.
Putting the new Sent Mail folder to the test
At this point, we have created a new folder (Sent Mail), hidden a view (Sent), added a LotusScript sub procedure (MoveToSentMail), and added the calling code to the Queryclose event to the appropriate forms. Now, we have to verify that everything works as intended. As you've probably guessed, testing means sending lots of messages and verifying that any message that appears in the Sent view also appears in the Sent Mail folder. And, you'll need to test each of the forms. Let's start again with the Memo form:
- For testing purposes, "un-hide" the Sent view. In the Design section of the Navigator pane, open the (($Sent)) view, choose Design - View Properties, and change the name of the view back to ($Sent).
- Choose File - Tools - User Preferences, select Mail, and in the Save Sent Mail field, select "Always keep a copy."
- Choose Create - Memo, enter a destination address, and test sending the message using some of the following methods:
-- by clicking Send.
-- by clicking Send and File.
-- by choosing Actions - Send.
-- by choosing Actions - Send and File.
-- by choosing File - Close, selecting Send and save a copy, and clicking OK.
-- by choosing File - Close, selecting Send only, and clicking OK.
-- by choosing File - Close, selecting Save only, and clicking OK.
-- by choosing File - Close, selecting Discard changes, and clicking OK.
- Watch the Sent view and the new Sent Mail folder. Any message that appears in the view should also appear in the folder.
- Now, change your mail preferences to "Don't keep a copy," and repeat Step 3. Watch the Sent view and the new Sent Mail folder. Messages should not appear in the view or the folder during this test.
- Finally, change your mail preferences to "Always prompt," and repeat Step 3. Watch the Sent view and the new Sent Mail folder. Messages should appear in the view and the folder only when you click "Yes" when prompted whether to save a copy of the message.
You should repeat these steps to test the rest of the forms that send mail, including any custom forms that you may have created. (For example, test the forms Reply, Reply With History, Personal Stationary, Phone Message, and Memo To Database Manager).
You may notice during your testing that sending a message using the Send and File option doesn't work in an ideal manner. The sent message is placed in the Sent Mail folder even though you already placed the message in a different folder. If, at this point, you delete the message from the Sent Mail folder, the previously filed copy is also deleted.
The whole idea behind the Sent Mail folder is to reduce, if not eliminate, the confusion between views and folders. For the most part we have achieved our objective; however, in the process, we have created a new problem (or to be politically correct: a side-effect). To consider our solution complete, we need to eliminate the side-effect we created, and this requires further alteration of the mail database. I should warn you, however, that the following changes are not as easily removed as the previous changes. Therefore, proceed with caution.
The 100% solution
Up until now, I've lead you through database modifications that are easy to undo. These changes have produced a solution that meets 90% of the objective. For some administrators, the 90% solution is perfectly acceptable; however, if you want the 100% solution, further database modifications are needed. These modifications, you should note, are not as easily undone as the previous changes. Therefore, let me explain the additional alterations first. Then, if you don't mind these database modifications in order to reach the 100% solution, you can come back to this point in the article and actually apply the changes to your own mail database.
To fix the Send and File behavior, we need to do a little detective work. First, let's examine the Send and File action to see how its code works. The objective of this investigation is to find something to allow us to skip our new MoveToSentMail sub procedure whenever users use the Send and File action.
Examining how the Send and File code currently works
So, we start our detective work by examining the Send and File action in the Memo form to understand better how the code works. Open the Memo form, choose View - Action Pane, and select the Send and File action. The following formula appears in the formula window:
FIELD tmpAction := @If(DefaultMailSaveOptions = "1"; "Mailing"; @DeleteField);
FIELD MailOptions := @DeleteField;
@If(@Command([MailSend]); @True; @Return(0));
FIELD tmpAction := "SendAndFile";
@If(@PostedCommand([FileSave]); @True; @Return(0));
@If(@PostedCommand([Folder]); @True; @Return(@False));
@PostedCommand([FileCloseWindow])
Notice that this formula adds a field called tmpAction to the current document. This field then receives the value SendAndFile (shown above in bold).
Next, we need to determine how the Memo form uses this Send and File code. Most of the document events call sub procedures in the Script Libraries, so we can look for the code there. Common-sense tells us that the Send and File action is most relevant to EmailProcessing script library (which is the same place we added our MoveToSentMail sub procedure). Open this script library, choose Edit - Find/Replace, and enter "tmpAction." Notice that the variable only appears in the EmailOpen and EmailSave sub procedures. We're just concerned with what happens when the document is saved -- namely, the EmailSave sub procedure uses tmpAction to determine what action has been selected and then handles the message accordingly.
Making "Send and File" work with our Sent Mail code
To make our Sent Mail code work correctly, we could use tmpAction in a similar way to the EmailSave sub procedure; however, tmpAction is removed from the current document during the EmailSave sub procedure, which is called during the QuerySave event:
note.RemoveItem("tmpAction")
Since we call MoveToSentMail during the QueryClose event (which takes place after QuerySave), tmpAction isn't available. We could adjust the EmailSave sub procedure so that it doesn't remove tmpAction, but that might have unpredictable side effects. A better approach is to create a field similar to tmpAction that we can use as a trigger to stop our MoveToSentMail sub procedure:
- Open the Memo form.
- Choose View - Action Pane.
- Select the Send and File action.
- After "FIELD tmpAction := "SendAndFile";" add FIELD tmpSkip := @If(tmpAction = "SendAndFile";"1";"0");
The entire code segment appears as follows:
FIELD tmpSkip := @DeleteField;
FIELD tmpAction := @If(DefaultMailSaveOptions = "1"; "Mailing"; @DeleteField);
FIELD MailOptions := @DeleteField;
@If(@Command([MailSend]); @True; @Return(0));
FIELD tmpAction := "SendAndFile";
FIELD tmpSkip := @If(tmpAction = "SendAndFile";"1";"0");
@If(@PostedCommand([FileSave]); @True; @Return(0));
@If(@PostedCommand([Folder]); @True; @Return(@False));
@PostedCommand([FileCloseWindow])
Note: The @If statement following the second FIELD tmpSkip is added as a precautionary measure. You could also write FIELD tmpSkip := "1";
The new field receives a value of "1" when tmpAction equals SendAndFile, and "0" in all other cases. Now we can use this new field in the MoveToSentMail sub procedure. When the value equals "1", we know the message was already filed in a folder so we can exit. If the value doesn't equal "1", our sub procedure continues. The additional code appears as follows:
Sub MoveToSentMail
If uidoc.InPreviewPane Then Exit Sub
If Not uidoc.EditMode Then Exit Sub
If note.SaveOptions(0) = "0" Or note.MailSaveOptions(0) = "0" Then Exit Sub
If Not note.HasItem("PostedDate") Then Exit Sub
If note.tmpSkip(0) = "1" Then Exit Sub
Dim view As NotesView
Dim sentdoc As NotesDocument
Set view = db.GetView("(($Sent))")
Set sentdoc = View.GetLastDocument
Print "Moving copy of message to Sent Mail Folder."
Call sentdoc.PutInFolder( "Sent Mail" )
Print "Message move complete."
End Sub
Notice where the new code was added. We don't need to check whether a message was filed in a folder using the "Send and File" action button until we're certain this document was sent and saved. If the first four conditions are true, then we need to check whether this message was already filed.
With the changes shown above, the current document is put in the Sent Mail folder if it wasn't previously filed using the "Send and File" action button. If tmpSkip does equal 1, the document is not put in the Sent Mail folder, because the Send and File action allows users to file the document on their own.
Finally, we can test the changes on the Memo form, and see that everything worked as planned. The last step is to make the same change to the "Send and File" action on every other form and test everything again. At last, the solution works completely.
In the end, I had to make more changes to the mail database than I had planned. If I apply these changes to the mail template and spread them throughout a Notes organization, I'm making a real commitment to future maintenance of this custom template. Whenever a new release of Notes comes out, I'll have to upgrade a test machine, apply my changes to the new template, and thoroughly test those changes before I can upgrade my production environment. For some administrators, the benefit may be worth the added work. You'll have to decide for yourself.
Where to go from here
The Sent Mail folder is one way to assist users with handling their sent messages. However, the Sent Mail folder can also be the foundation for a set of custom mail management agents. Imagine taking a proactive stance on mail database size management. With the Sent Mail folder in place, an administrator could purge the contents of the folder based on a set of pre-defined message aging rules. For example, you could tell the user community that any messages left in the Sent Mail folder for more than 30 days will be automatically deleted. If they want to keep certain sent messages, they need to move those messages to another folder. To support this aging rule, you'd need to create a simple agent that searched for documents in the Sent Mail folder that were older than 30 days and remove them. Of course that's one way to extend the usefulness of the Sent Mail folder. Your administrative needs will undoubtedly provide more ideas and opportunities to extend the power of Notes.
|