 |

Planning content for your Web site
by
Barbara
Burch


Level: Beginner
Works with: Designer 4.6
Updated: 05/01/1998

Inside this article:
Organizing content into views
How the views work
Using an agent for automated reviews
How the agent works

Related links:
Content Plans download
Domino Designer Help
The ABC's of using the ACL
Make users love your Web site

Get the PDF:
 (170Kb) (170Kb)


|  |
[Editor's note: This article is the next in our series exposing how the Notes.net site is run. This time, learn how we use a Notes database to plan the content for our site, manage technical reviews of the content, and collaborate with related Lotus sites (Lotus.com and Developer Central).]
Introduction
It used to be that a Web site could get pretty far just on its good looks. Today's users, however, are not as easily dazzled by a clever design -- it's what's inside the design that counts. It's good content, rather than good looks, that answers a user's need for information. And it's the content that causes a user to bookmark your site in the hopes of returning for more.
Your job, as a Web professional, is to stay one step ahead of these savvy users, and to keep the content of your site fresh. With a Domino Web site, keeping the content fresh is made easy because you have a powerful tool already at your disposal -- the Notes database!
This article will introduce you to the advantages of using a Notes database to plan, create, and review the content for your site. To do this, we'll look at the database we use for planning content on Notes.net. You'll first learn how we use different views for managing the content, and for collaborating with two related Lotus sites, Lotus.com and Developer Central. Then, you'll see the agent we use for automated technical reviews of the content. Our database is available for downloading, and you can customize it to fit your own needs.
The Notes database: A natural for planning content
OK, you could keep your Web site fresh by adding a few links, maybe a pretty picture or two, or a couple of marketing tidbits. However, as pointed out by Lotus Vice President of Worldwide Corporate Communications Bryan Simmons, creating a meaningful Web presence takes a little more thought, and a little bit of planning.
Using a Notes database to plan, create, and review your Web content has the following advantages:
- You can plan multiple pieces of content at once. Each piece can have a different content author, and can be at a different stage in the content cycle (from article ideas, to content in progress, to archived content). In addition, you can get an overall picture of the scheduled content by using a Notes calendar view.
- Since you're working within Notes (instead of some other authoring tool), you can use styles and format the content according to how you want it to appear on the Web (that is, if you are using Domino). Using Release 4.6, you can preview how the content appears when served by Domino. In addition, the Notes object store allows you to store all related files, including database files, graphics, multimedia, and so on.
- The workflow environment means that you can easily automate the technical review process. An agent can send an e-mail notification to multiple reviewers with doclinks to the content you want reviewed.
- The Notes database promotes collaboration, because multiple sites can use the same database. This means that content creators can avoid creating duplicate content, and can easily find ways to link to similar types of content on the other sites.
- You can control access via the database ACL -- for example, allowing content authors to only edit their own documents. To encourage participation, you can give Reader access to the rest of the company.
- You can replicate the database, so anyone involved with the content can work remotely. You can also replicate the content when you're ready to publish it.
- The database is an archive of all the content (in addition to the live database that actually publishes the content on the Web), including any additional files and all technical review comments.
One thing to note is that here at Notes.net, we keep our content development separate from our publication database. We initially wanted to plan our content, write it, and automatically publish it from the same database -- and there are no limitations within Domino or Notes for doing it this way. However, the additional design elements needed to manage the content workflow in a Web-based application can increase the size of the database (and, of course, hard drive space is a precious commodity on production servers). Also, the added design elements make the writer's job of managing content harder, while it's also harder for designers to update and debug the application. There are more security issues, because the database resides on your Web server. And with a single database, it's much easier to accidentally publish an article before it is ready (human error can never be completely eliminated by automation).
Organizing content into views
Now that you know the benefits of using a database, let's look at how our content development database works. To get an overall look at the database, a good place to start is with the views. As shown in the following screen, we use different views for managing each step of our Notes.net production cycle. The key views are: Article Ideas (categorized by priority), Articles in progress (where much of the work on the article takes place), Articles ready, and Published articles.
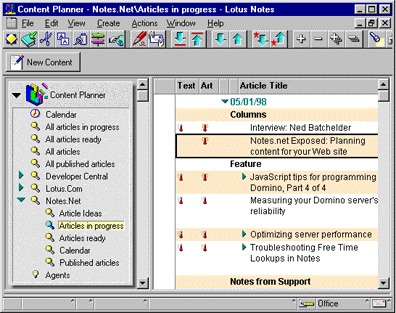
Notice that the database has separate, cascaded views for the Developer Central, Lotus.com, and Notes.net sites, and an overall set of views so the sites can collaborate with one another. For example, we can check to see if the other sites have any other server performance-related articles in progress. This is where the overall Calendar view comes in handy, because it displays all articles planned for the three sites in a by-month view.
Another thing you may notice is that we use column icons in the "Articles in progress" view so that we can see the status of each piece of content. We use thermometer icons, with the mercury progressively filling up the thermometer as the text status and art status changes. (To display the icons, we selected the column property "Display values as icons," and then assigned a column formula that used numbers to correspond to the different icons we wanted to display. For more information on how to use column icons, see Domino Designer Help.)
Now, let's look at how a Notes.net article might progress through these views.
How the views work: The life of a Notes.net article
When we have a new idea for an article (like the ideas that you send us), we create a placeholder for that content in our database by choosing Create - NewContent. As shown below, the new content document includes a variety fields. For a new article idea, we just fill in as many fields as we can.
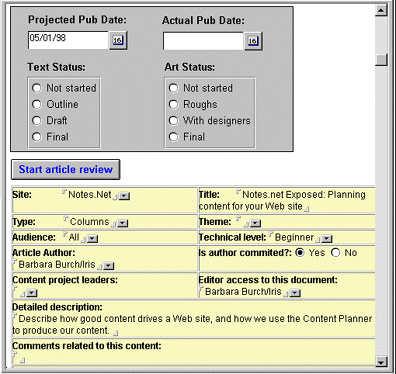
The fields in the upper, gray box of the document determine the scheduling and status of the article -- and, more importantly, which view the article appears in. For new articles that we don't want to "officially" put on our schedule, we leave all the fields in the gray box empty. This causes the article to appear in our "Article ideas" view, where we can categorize the idea by clicking Set Priority and selecting Hot, Medium, or Mild.
In the sample document shown above, we have entered a projected date for publishing this article on the site. This puts the document into our "Articles in progress" view, which is a view designed to show us articles categorized by the date we're planning on running them. In addition, the documents then appear in our Calendar view. (The Calendar view allows us to re-schedule articles by just dragging and dropping the calendar entries.)
Also, in the lower yellow box of the document, notice the "Editor access to this document" field. This is an Authors field that automatically contains the name of the person who created the document. Because the default access to the database is Author, users can only edit the documents that they create, and those documents in which their name appears in this "Editor" field. People who have Editor, Designer, or Manager access can edit any document, whether or not their name appears in the field. (For more information on Authors fields, see the Iris Today article "The ABC's of using the ACL.")
The lower part of the content document (not shown above) contains an editable text field for the content, and a separate field for attaching any graphics files or other related files. At any time while the article's in progress, we can click the "Start article review" button to send the content to a technical reviewer. We'll explain this further in the next section.
As work progresses on the article, we select the appropriate status in the Text Status and Art Status fields. The corresponding column icons that we mentioned earlier then appear in the view. For example, the thermometer icon fills up as the text status moves from an outline, to a draft, to the final version. When the article's ready to be published on the site, we select Final for both the Text and Art Status, and save the document. This puts the document into our "Articles ready" view, which is a view designed to show us only those documents ready for publication.
After we copy and publish the content in our "live" Web database, we enter the actual publishing date on the content document. This moves the article into the "Published articles" view for archiving purposes. Since the Web is where our final content lives, we have a Final URL field into which we paste the URL for the content. Then we encrypt the final article content (in the FinalContent field). This way, only users with our Planner encryption key can see the content, and all other users must use the Final URL. (For more information about encrypting fields, see Domino Designer Help.)
Using an agent for automated reviews
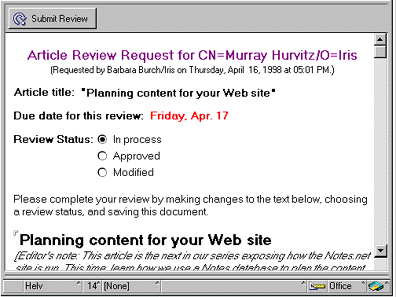
No matter how efficient this production cycle, our main focus is on the content -- planning interesting, high quality, and technically accurate articles. To ensure this level of quality, we put our articles through a technical review. At any time while the article's in progress, we can easily send the article out for review by clicking "Start article review." The following dialog box then appears:

This dialog box gathers the information necessary for sending each reviewer a mail message with a doclink back to a review document. We can select multiple reviewers in the "Send to" field, enter the subject for the message in the Subject field, and enter a due date and any additional comments for the body of the message. When we click OK, the agent sends each reviewer the following message:
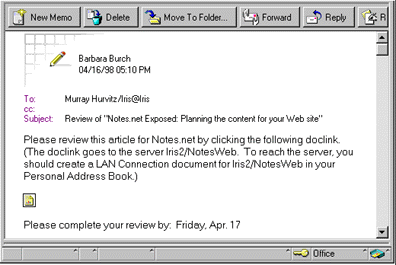
When the reviewer (in this case, Murray) clicks the doclink in the mail message, he sees the following review document. Each review document is actually a response document to the original content document. Notes saves the reviewer's modifications and approval as responses to the original document.
How the agent works
Using Notes and a little LotusScript, setting up this automation was a snap. The review agent is really not an agent at all -- it's a script attached to the Click event of the "Start article review" button. (However, you could easily put the script into an agent and call it from the button.)
The first part of the script displays the Content Review dialog box, and gathers values for the Reviewers, Subject, DueDate, and Comments fields. These fields also appear as hidden fields on the content form, so that we can have placeholders for the data. Then, we can look at the form and easily see all the data that is being stored (sort of like a declaration). This information is very helpful if we want to design other elements that access the document, such as another agent or a response document that inherits values. (The Reviewers field is an Authors field, so the reviewers can edit the document.)
Sub Click(Source As Button)
Dim Ret As Integer
Dim ReviewersList As Variant
If (Not uidoc.Isnewdoc) Then
If uidoc.EditMode <> True Then uidoc.EditMode = True
Call uidoc.FieldSetText("Reviewers","")
Call uidoc.FieldSetText("Subject","")
Call uidoc.FieldSetText("DueDate","")
Call uidoc.FieldSetText("Comments","")
Call uiwksp.DialogBox("ReviewList", True, True, True, False, False, False, "Content Review")
Call uidoc.Save
This next part of the code creates a separate response document for each of the reviewers. First, the code sets values for displaying information about the review at the top of the response document, and for the database views. Then, it creates the response document with the information gathered from the dialog box, and copies the article from the FinalContent field in the original document. (This way, the writer can keep tweaking the content while waiting for the reviewer to modify the separate document.)
ReviewersList = doc.GetItemValue("Reviewers")
If ReviewersList(0) <> "" Then
Forall ReviewerName In ReviewersList
Set respdoc = New NotesDocument(db)
Call respdoc.ReplaceItemValue("Form", "Review")
Set editorItem = New NotesItem(respdoc, "Reviewer", ReviewerName, AUTHORS)
Call respdoc.ReplaceItemValue("Requestedby", userName.Abbreviated)
Call respdoc.ReplaceItemValue("Title", doc.Title(0))
Call respdoc.ReplaceItemValue("Theme", doc.Theme(0))
Call respdoc.ReplaceItemValue("Type", doc.Type(0))
Call respdoc.ReplaceItemValue("Audience", doc.Audience(0))
Call respdoc.ReplaceItemValue("ReviewStatus", "In process")
Set ritem = doc.GetFirstItem("Description")
Call ritem.CopyItemToDocument(respdoc, "Description")
Set ritem = doc.GetFirstItem("FinalContent")
Call ritem.CopyItemToDocument(respdoc, "FinalContent")
Call respdoc.MakeResponse(doc)
Call respdoc.Save(True, True)
Call uiwksp.ViewRefresh
This final part of the code creates the mail message, which the agent automatically sends to the reviewers. Remember that each reviewer gets a separate message with a separate doclink. The code uses the subject gathered from the dialog box, and then builds the body of the message, including the doclink and information from the DueDate and Comments fields.
Set docMemo = New NotesDocument(db)
docMemo.Form = "Memo"
docMemo.Subject = doc.Subject(0)
Set ritemMemo = New NotesRichTextItem(docMemo, "Body")
Call ritemMemo.AppendText("Please review this article for Notes.net by clicking the following doclink. (The doclink goes to the server Iris2/NotesWeb. To reach the server, you should create a LAN Connection document for Iris2/NotesWeb in your Personal Address Book.) ")
Call ritemMemo.AddNewLine(2)
Call ritemMemo.AppendDocLink(respdoc, doc.Title(0))
Call ritemMemo.AddNewLine(2)
Call ritemMemo.AppendText("Please complete your review by: ")
Call ritemMemo.AppendText(doc.GetItemValue("DueDate")(0))
Call ritemMemo.AddNewLine(2)
Call ritemMemo.AppendText(doc.GetItemValue("Comments")(0))
Call docMemo.Send(False, ReviewerName )
End Forall
End If
Else
Messagebox("You must save this document before you start the content review")
End If
End Sub
Taking the next step
These features are just a few ideas for how you can use a Notes database for planning, creating, and reviewing your Web site content. Since you can customize Notes databases, you can tailor this database to better fit your situation. You may want to use more workflow features for a more extensive review and approval process. Or, you may decide to do your planning within the same database that you use for publishing. One enhancement we're going to make is to create an agent that automatically sends reminders to reviewers who miss the due date for a review.
But any tweaks to the database shouldn't overshadow the importance of the content. Today's Web users aren't fooled by a site that just has good looks going for it. As stated by Jesse Berst from the ZDNet AnchorDesk, it's good content that will make users love your Web site. By using a Notes database to plan your content, you should be able to strike a balance between the two.
|