This article describes how to import applets into Notes or link to applets on the Internet. You can use the new features to select and resize applets, set applet parameters, and define Notes formulas that evaluate to parameter values at run-time. Java applets within Notes can be displayed either within a Web browser or the Notes client.
The Java programming language was designed and is being used as a sophisticated development environment for producing stand-alone Java applications. Still, most people probably think of Java applets when they think of Java. The deployment of Java applets on the Internet is the most visible example of Java programming today. The new 4.6 release now makes it possible to insert Java applets directly in Notes forms and documents from the user interface via the Create menu.
Java applets can be inserted in two ways:
- An applet can be imported into a form or document
- An applet may be referenced via an URL to the location on a Web server where the applet is located
The inserted applet (or applet reference) can be configured using a combination of an Applet InfoBox and the formula pane. The result of inserting an applet into a form or document is an applet that appears in the document (or Web page) at the correct location, with the correct size.
While applets must be created within an external Java development tool (for instance, Microsoft's Visual J++, Symantec's Visual Cafe or Lotus' BeanMachine), Domino will now serve up any Java 1.0x or Java 1.1 compliant applet within a Web browser (for instance, Microsoft's Internet Explorer or Netscape's Communicator) or directly within the Notes client. The ability to display applets across networks, whether Web-centric or Notes-centric, offers unique leverage to developers.
This article covers the following topics:
- Java Applets and HTML
- Java Applet Classes, Resources and Packages
- Adding a Java Applet to a Page
- Inserting an Applet That Uses Multiple Files
- Inserting an Applet That Uses Archives
- Linking To An Applet On The Web
- Using Applets Within Notes
- Adding the Finishing Touches
- Troubleshooting
- Limitations and Restrictions
Java applets and HTML
Keep in mind that while we show HTML code below, the HTML is generated automatically for you by the Domino server. You can define all applet parameters and attributes directly within the Notes client through the use of the formula pane and the Applet InfoBox.
The simplest possible Java applet consists of two pieces: an HTML applet tag embedded in an HTML file and an executable Java class file located in the same directory as the HTML file that describes it. The HTML file might look like this structurally:
<HTML>
<HEAD>
<TITLE>Some HTML Document</TITLE>
</HEAD>
<BODY>
<APPLET CODE="SomeApplet.class" WIDTH=100 HEIGHT=140>
This is text that will appear instead of the applet for non-Java enabled browsers.
</APPLET>
Between here and the enclosing BODY tag can be text, graphics and other objects, just as in any other HTML page.
</BODY>
</HTML>
We know that the applet class file is located in the same HTML directory as the HTML file because the APPLET tag's "code" attribute names the file directly and there is no CODEBASE attribute.
Identifying directories containing Java classes
Because most Java applets contain many classes, and you may want to share classes between applets, it is usually inconvenient to put both the HTML page and the Java class files in the same directory. You can place the class files in a different directory by extending the applet tag to include a CODEBASE attribute that identifies the directory containing the class files. A sample APPLET tag for this kind of HTML file follows:
<APPLET CODEBASE="projects/applets"
CODE= "SomeApplet.class" WIDTH=100 HEIGHT=140>
</APPLET>
The APPLET's base class ("SomeApplet.class") can now be located relative to its codebase directory.
Describing additional applet parameters
Applets may optionally require parameters in order to run properly. A fully described applet within an HTML file, with associated attributes and parameters, will adhere to this logical format:
<APPLET
CODEBASE = some location relative to which files will be stored
ARCHIVE = one or more archives that contain classes or other resources (we will discuss the use of archives later in this article)
CODE = the name of the applet's base class
ALT = text to be displayed if the browser is Java-enabled but can't display the applet
NAME = names the applet instance, so applets on the same page can communicate. Not supported in the Notes 4.6 client.
WIDTH = width of applet in pixels
HEIGHT = height of applet in pixels
ALIGN = applet alignment (left, right, top, middle, and so on). Not supported in the Notes 4.6 client.
VSPACE = number of pixels above the applet. Not supported in the Notes 4.6 client.
HSPACE = number of pixels on each side of the applet. Not supported in the Notes 4.6 client.
>
<PARAM NAME = appletAttribute1 VALUE = value>
<PARAM NAME = appletAttribute2 VALUE = value> ......
</APPLET>
While the Notes client does not support the applet attributes noted above, the Domino server will serve up the correct HTML for all applet attributes for use in Web browsers.
The most important issue for Notes developers is to be sure that the same parameters defined for an applet are also described to Notes. For instance, we will discuss a simple Blink applet that has two parameters: lbl, and speed. These parameters must be identified to Notes so they "match" the applet's own internally coded parameters at run-time.
Java classes, resources and packages
Understanding how Java classes, resources and packages inter-relate will make it easier to use the new Designer features, since Notes follows existing Java conventions and (still-evolving) Java standards.
Java classes and how they are loaded
The execution of a Java applet begins with a "base" class, which may (though it need not) require other Java classes that provide needed services. Such services might include loading and displaying graphical images and sound files as well as drawing UI components such as buttons and scroll bars.
The applet's class files can be located in the same directory as the "base" class. This may be sufficient for simple applets. For more complicated applets that use many classes, the class files are typically placed in a directory hierarchy. This directory hierarchy is also reflected in the compiled Java code (through the use of packages which are described below). The Java code written by the applet developer can make certain assumptions about where the various class files are located because of the directory hierarchy.
From the perspective of a Web browser, a Java applet is simply a specific instance of a Java base class and its additional class files. When you specify a Java applet in an HTML file, you use the applet attributes CODE and CODEBASE to specify the name of the applet's base class and the top-most directory where the additional class files can be located. The directory hierarchy created by the Java applet developer is assumed to exist under this top-most directory.
When you import a Java applet into a Notes document, you specify all of the class files that the applet will need. The class files must exist on the file system in the same directory structure created by the applet developer. Once imported, these class files are stored as special file attachments to the Notes document. The directory structure is maintained by the way the attachments are named. This is relevant because you must:
- Make sure that the applet's class files reside in their proper directories.
- Make sure that all of the applet's class files are imported into the Notes document.
Java resources
Beyond class files, most Java applets, even the simplest ones, usually require some resources such as image or sound files. Java does not have a mechanism for incorporating resources directly into the "object" file. Rather, resources are maintained as separate files (for instance, as a GIF file).
In Java 1.0x, resources are stored on a Web server as separate files. To use a resource, an applet usually references the URL of the resource or uses a method whose implementation constructs a URL that links to the resource.
URLs can be absolute (for example, http://mydomain.com/main/picture1.jpg). This URL directly identifies the location of the needed .JPG file.
A URL can also be defined relative to the document location (you can use the getDocumentBase function in the applet to retrieve the location of the document containing the applet) or relative to the applet code (use the getCodeBase function in the applet to get the location of the applet's code base). Here, "http://mydomain.com/main" might be the value returned from getCodeBase.
Keep in mind that resources may be something other than a simple image or sound file. A resource can be another HTML page, data, or some other object.
Java packages
As mentioned earlier, applets are commonly composed of more than one class file. Groups of class files are usually included in a Java package. The package will include class files with a common function such as handling I/O or database connectivity. The package will reflect the directory hierarchy imposed by the Java developer.
To improve performance, both Netscape and Microsoft introduced ways of storing Java packages in a single file. After receiving a request to execute code in a particular class, the Java class loader in the browser checks to see if the class is in the "package file." If the class in not in the package file, the loader constructs a URL based on the applet's CODEBASE attribute, and looks there.
Netscape's Communicator browser uses Zip files as the storage mechanism for Java packages. Microsoft Internet Explorer browser uses CAB (Cabinet) files.
Java 1.1 standardized the package file format. In Java 1.1, JAR (Java Archive) files are used. The Domino server can serve up the correct HTML for all three types of package files. The Notes client supports the ZIP and JAR formats.
Adding a Java applet to a page
You can add a Java applet to a Notes form or to a rich text field in a Notes document. These applets can be imported from the local file system, or you can link to an applet that already exists on a Web server. There are many sources for obtaining applets directly off the Web (for example, try http://www.gamelan.com). The Blink and TicTacToe applets discussed here come with the Java Development Kit (JDK), which can be obtained from Sun's Java Web site.
Importing a simple applet from the file system
In this example, we will insert an applet called Blink.class into a Notes document. The Blink applet consists of a single file that can be imported from the file system. Follow these steps to import it into Notes:
- To insert an applet into a Notes form or document, choose Create - Java Applet. You'll then see the "Create Java Applet" dialog shown below.
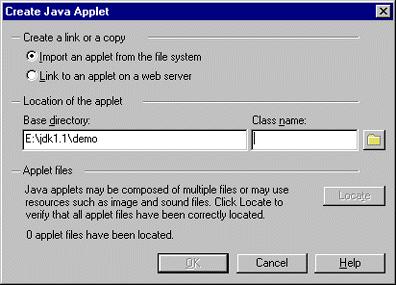
You must specify the base directory that contains the files that implement the applet you want to import. All files that implement the applet must either be in this directory or in one of its subdirectories.
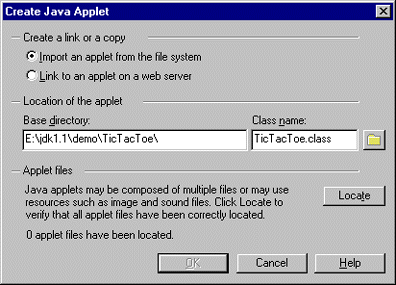
You must also specify the name of the base class that implements the Java applet you want to import. There is no default. The browse (folder) button can be used to fill in the Base directory and Class name fields.
- Click the browse button (the small folder icon to the right of the class name field) to display the Browse dialog:
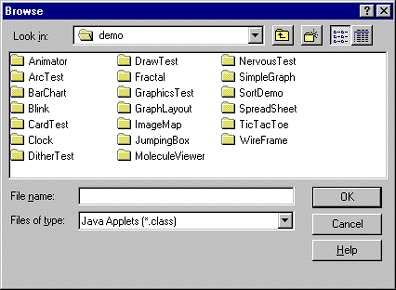
- Use the Browse dialog to locate and select the Blink.class file.
You can use the Browse dialog to select a file that contains the base class of the applet you want to import. Once you have selected a file and clicked OK, Notes will insert the file name you selected into the Class name field, and insert the directory containing that file in the Base directory field.
After selecting the Blink.class file and clicking OK, you are returned to the Create Java Applet dialog:
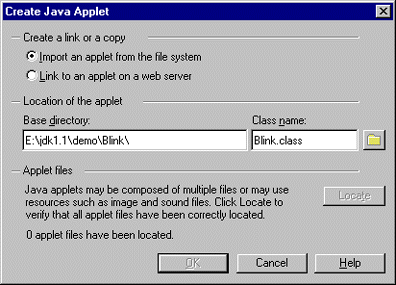
The OK button is now enabled, and a file has been selected for import. The number of files that will be imported for the applet is shown in the dialog. In this case, "1 applet file has been located."
- Since there is only one class for the Blink applet, click OK to import the Blink.class file into the Notes form or document and start the applet running. When the applet is first run after having been inserted, the formula pane will be displayed automatically:
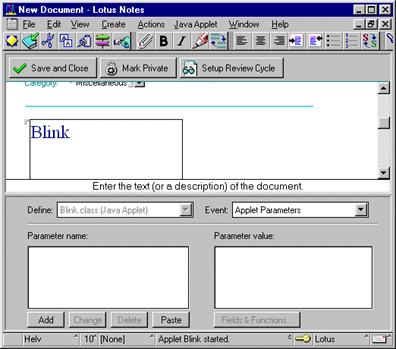
Notice the following:
-- The applet's base class name is displayed in the Define box.
-- The default value in the Event box is Applet Parameters.
Specifying applet parameters
The formula pane for the applet is used to enter the parameter names and values that are passed to the applet when it is started. Not all applets expect parameters. Often, as with the Blink applet, default values are assigned to the parameters. You can invoke the formula pane on demand by first selecting the applet and choosing Java Applet - Java Applet Parameters.
In the formula pane, the left-hand box (Parameter name) lists the parameters associated with the applet. You can add, edit or remove parameters by using the Add, Change, or Delete buttons. The Add button creates a new parameter (without setting its value) and adds it to the list. The Change button changes the name of a parameter. The Delete button deletes the selected parameter.
The right-hand box (Parameter value) is used to set the value of the currently selected parameter name. When you select a parameter, the value in the right-hand box switches to show the value of the selected parameter (if there is one). The value can be edited directly in the window.
The Blink applet takes two optional parameters: "lbl" (the text to be displayed) and "speed" (the rate at which the text should blink).
To add the "lbl" parameter, click the Add button. The "Add Parameter" dialog appears:

Type "lbl" in the "Parameter name" field and click OK.
The screen below shows that "lbl" has been added to the list of parameters in the left-hand box. The caret has now been placed in the right-hand box. Type in the text "Hello from Java!". Be sure to use double quotes around this value.
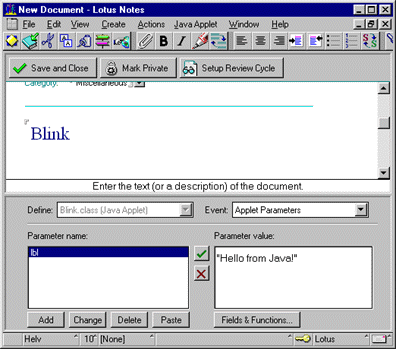
When you type in the value for the lbl parameter, a green check button and a red "X" button appear. When you finish typing in the value for the "lbl" parameter (here, "Hello from Java!"), click the green check box. This restarts the applet and passes the "lbl" parameter and its value to the applet.
Notice that the applet is now blinking the text Hello from Java!
You can also add the speed parameter. The value for the speed parameter is a number. The larger the number, the faster the text blinks. Remember, you must enclose the value with double quotes.
Using the Paste button to add multiple parameters
The Paste button on the same pane offers an easy way to specify multiple parameters and values all at once. When the Paste button is clicked, Notes takes the contents of the system clipboard and attempts to parse it into parameters and values.
As an example, the JDK demo applets come with HTML files paired with sample applets. To paste the parameters for the Blink applet:
- Open the HTML file for the Blink applet using a simple text editor (such as WordPad).
- Copy the entire contents of the file to the clipboard (select all of the text and choose Edit - Copy).
- Return to Notes and click the Paste button in the formula pane. The HTML text that was copied is parsed, and the applet parameters and values are added to the applet.
Using Notes formulas for parameter values
The value for any given parameter is a Notes formula. While you can enter any text string surrounded with double quotes as a value, you can also use the Notes formula language to specify more complex parameter values. For instance, you could use the @UserName function as the value for the lbl parameter. The formula will be evaluated when the applet is started and the result passed as the value for the parameter to the applet.
All formulas used to specify parameter values must evaluate to a text string, since the VALUE property for an applet parameter is always of type STRING. Remember that you can use the @Text function to convert the results of any Notes formula to a text value if necessary.
Formulas must conform to the workstation execution control list (ECL). Also, formulas that have side effects are not allowed (you cannot change the contents of a field on the document or change a Notes environment setting using @SetEnvironment).
A field name may also be used as the parameter value. For example, if you inserted the Blink applet in a mail memo, you could use the field name "SendTo" as the value of the parameter. In this case, you would not surround SendTo in double quotes, or the Blink applet would literally display the word "SendTo". If you do not surround SendTo in double quotes, the contents of the SendTo field are passed to the applet as the parameter value.
If you need to enter internal quotes or backslashes, use the standard Notes formula language conventions (for example, "moo//cow roar//tiger").
Inserting an applet that uses multiple files
Most applets are more complex than the Blink applet, relying on multiple class files or resource files. The Locate button on the Create Java Applet dialog is used to specify additional files needed when you are importing an applet from the file system.
The TicTacToe demo applet provided with the JDK is an example of an applet that uses multiple files. It still has only one class file, but it also uses several audio files and two GIF images.
Inserting the TicTacToe applet
To insert the TicTacToe applet in a Notes document or form, choose Create - Java Applet. The Create Java Applet dialog appears.
As already mentioned, you must enter the path where the applet files are located in the Base directory field, and the name of the applet's base class in the Class name field. You can use the browse button to select the file containing the applet's base class. The Base directory and Class name fields will be filled in for you. Specifically:
- Browse to the applet's base directory and pick the base class name for this applet ("TicTacToe.class"). The Create Java Applet dialog should look similar to this:
- Click the Locate button to display the Locate Java Applet Files dialog:
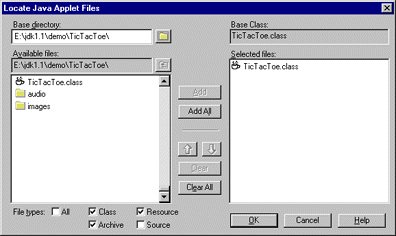
Notice the following:
-- The Base directory field contains the Base directory you specified in the Create Java Applet dialog
-- The Base Class contains the Class name you specified in the Create Java Applet dialog.
The Locate Java Applet Files dialog is used to select the files that will be imported from the file system when the applet is created. This dialog can be thought of as an advanced file browse dialog.
The Base directory field is used to specify the top-most directory relative to which ALL of the files for the applet you are creating can be found. That is, all of the files for the applet must be located in this directory or in a subdirectory below it.
The default value for the Base directory field is the value you specified in the corresponding field in the Create Java Applet dialog. You are allowed to change the value of this field. Any changes you make to this field will be returned to the Create Java Applet dialog when you click OK. You can click the browse (folder) button to browse to a different directory. When you click the browse button, a dialog appears which allows you to choose a different Base directory.
The Available files field displays the name of the current directory you are searching. The list below displays the files and subdirectories that are located in the current directory. Subdirectories are displayed with a small closed folder icon to the left of the subdirectory name. Double-clicking on a subdirectory will change the current directory to the subdirectory you clicked on. Changing the current directory changes the list of Available files. The button with the folder and up arrow is used to go up one directory level.
Below the list box for Available files are a series of checkboxes labeled All, Class, Resource, Archive, and Source. These checkboxes are used to filter which kinds of files (in the current directory) are displayed in the Available files listbox.
The list box on the right side of the dialog (Selected files) shows which files are to be imported for this applet. When you click the "Add" button, all selected files in the Available files listbox are added to the Selected files listbox. The "Add All" button is used to add all the files in the Available Files list box to the Selected Files listbox, whether they are selected or not.
Only files within the current directory are added to the Selected Files listbox. No directory recursion is performed. To add files in a subdirectory, you must first open that subdirectory by double-clicking on the subdirectory name. Then you can add the files in that subdirectory.
Remove any unneeded files from the Selected files listbox by using the Clear and Clear All buttons. Clicking Clear removes any selected entries from the Selected Files listbox. Clear All removes all of the entries from the "Selected Files" listbox.
Change the order of the entries in the Selected Files listbox, if necessary, by using the up and down arrow buttons. Clicking the up arrow button will move the selected entries in the Selected Files listbox up by one. Clicking the down arrow button will move them down by one. The order of the files can be important when using multiple archive files.
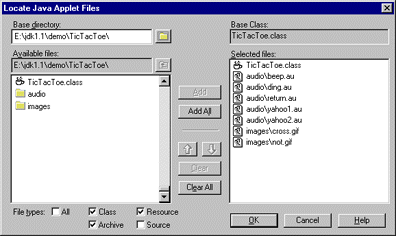
- Select the appropriate files that make up the TicTacToe applet. When you are finished, the Locate Java Applet Files dialog should look like this:
- Click OK to return to the Create Java Applet Dialog:
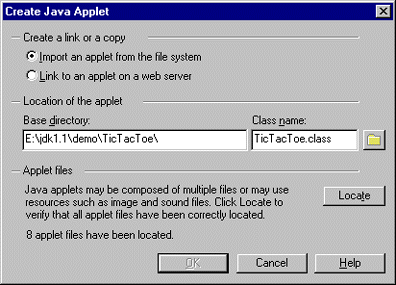
Notice that the dialog indicates the number of files that were added to the Selected files listbox in the Locate Java Applet Files dialog. In this case, 8 files were selected.
- Click OK. The files you selected are imported from the file system, and the applet is created and started. The TicTacToe applet does not require any parameters, so it runs properly as soon as it is imported.
Inserting an applet that uses archives
Archives are used to hold all of the files that make up an applet in a single file. There are three common types of archive files used for Java applets: JAR files, ZIP files and CAB files. CAB (Cabinet) files are used by Microsoft's Internet Explorer browser. Although the Notes client does not support CAB files, you can still import CAB files with your Java applet. It simply means that the Notes client will not run the applet if the files are only located in a CAB file.
You can create a JAR file for the TicTacToe applet by using the jar utility provided in the JDK. For example, from a system command prompt, you could change into the top-most directory for the TicTacToe applet and issue the following command:
jar cvf TicTacToe.jar *.class audio\*.au images\*.gif
This will create a JAR file called TicTacToe.jar and add all of the files for the TicTacToe applet to it.
There are several advantages to using an archive. First, the archive is downloaded to the client before the applet runs. Once the applet is running, no further network connections are needed to access the files stored in the archive. Second, the archive is compressed, which also reduces download time. Third, using an archive simplifies the import of an applet into Notes. In this example, only the single JAR file need be imported into your Notes form or document. To do this:
- Choose Create - Java Applet to bring up the Create Java Applet dialog.
- Use the browse button to browse for and select the TicTacToe.jar file you just created. After you select the jar file and click OK, the value in the Class name field is set to the TicTacToe.class, not TicTacToe.jar. Notes will always change the extent of the file you selected to .class before inserting it into the Class name field. If the name that appears in the Class name field is not the correct name of the applet's base class, you should change it to the correct value.
Note that the name of the archive file containing the applet does not need to be the same as the applet's base class. You could have named your jar file myTTT.jar instead of TicTacToe.jar and the applet would still run correctly. The important thing to remember is that the Class name field must contain the name of the applet's base class.
HTML for archive files generated by Domino
Remember that the order of files and archives is important if a class is contained in more than one file or archive. The Java class loader searches for classes in the order the files/archives appear in the Locate Java applet dialog box. You can also check this order by clicking on the folder tab in the applet's InfoBox. Once the applet has been imported, the order of the files can be changed by using the Reorganize dialog which is described later.
Domino handles applets that include ZIP files in the same way that it handles JAR files. You can specify a ZIP file the same way you specify a JAR file (but remember, not all Web browsers support ZIP files).
If you need to use CAB files, just add them to the applet's list of files the same way you add ZIP or JAR files. Domino will generate the correct HTML when sending applets that use CAB files to Web browsers. Note that you can include both CAB and ZIP files (for example, the files that make up older applets were often packaged as both CAB and ZIP files) in the list of files. The Notes client and the Netscape browsers will ignore the CAB files, and Microsoft browsers will ignore the ZIP files.
Linking to an applet on the Web
To this point, we have been describing the steps involved to import an applet from your local file system. However, many useful applets may already exist on your Web server or be available for linking to on the Internet itself.
To link to an applet on a Web server:
- Choose Create - Java applet. Then, select "Link to an applet on a Web server" from the Create Java Applet dialog.
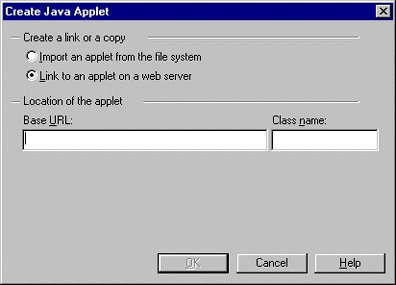
- Enter the Base URL of the applet (for instance, "http://java.sun.com/applets/UnderConstruction/1.0.2/" links to a sample applet on Sun that shows the infamous Duke hitting a jackhammer on an "under construction" scene).
- Enter the Class name (for instance, "JackhammerDuke.class")
This will create the applet link (the files themselves in this case reside on the server where they are referenced and are not imported). It will also display the formula pane just as in the case for importing an applet from the local file system. You can now add parameter names and values as we described above.
Using applets within Notes
Once applets have been imported into a form or document, there are a number of ways you can manipulate them. You can:
- Select applets
- Cut, copy and paste them between documents and forms
- Resize them
- Add needed files or reorganize files
Selecting applets
When a Java applet is running, the applet processes mouse-click events. For this reason, you cannot select a running applet simply by clicking on it. To make applet selection easier, you can stop the applet's execution when editing a form or document:
- Choose View - Show, and de-select "Java Applets Running". This stops the execution of all applets within the document. A gray box corresponding to the size allocated for the applet is displayed.
- Once the applet has been stopped, select it by clicking on the gray box.
- Re-select the checkbox for "Java Applets Running" to restart the applet(s). You can also restart the applet by double-clicking on the gray box.
- You can also select an applet when you're in edit mode without stopping its execution. You do this by using the cursor arrow keys to move the document caret onto the applet. When the applet is selected, a thin black line is drawn around the applet and the Java Applet menu appears in the menu bar.
Cutting, copying and pasting applets
You can cut, or copy and paste applets when viewing or editing a form or document:
- Select the applet.
- Choose Edit - Cut, or Edit - Copy.
- Open another document and paste the copied applet into a form or a rich text field.
When you paste an applet, all of the files associated with the applet are pasted as well as the applet's parameters and attributes.
Because of the way Notes stores the files associated with an applet (they are stored as special file attachments), you cannot store multiple copies of the same applet file in the same Notes document. Though this may sound limiting at first, it does provide the benefit of reducing the amount of disk space needed to store multiple copies of the same applet. For example, if you placed four copies of the TicTacToe applet in the same document, only one set of files are stored for that applet.
If you are copying an applet into a document that already contains that applet, Notes will display a dialog warning you and asking whether or not you want to overwrite the existing applet's files. This warning dialog will also appear if you have two different applets in a Notes document that share a common applet file. An example of this dialog is shown below.

Clicking "Yes" will cause the existing file to be overwritten with the one you are pasting. Clicking "No" will not overwrite the existing file (the existing file will be left alone). Clicking "No to All" prevents any further duplicate files from being overwritten. Clicking Cancel is used to stop copying files. If you do click Cancel, the applet file is still copied, but no more of the applet's associated files are copied.
Resizing applets
When you import an applet into Notes, the default size of the applet is 200 x 200 pixels. You can resize an applet while editing a form or document:
- Stop and select the applet.
- Drag its resize handle to be larger or smaller, as desired.
- Restart the applet.
When you restart the applet, the applet will appear with its new size.
You may also resize an applet using its InfoBox. To display the applet's InfoBox:
- Select the applet.
- Choose Java Applet - Java Applet Properties. (If the applet's execution has been stopped, you can also click the right mouse button on the applet to display a floating applet menu that is the same as the Java Applet menu.) The InfoBox for the applet is displayed.
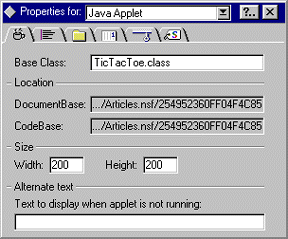
- Change the values for Width and Height to change the size of the applet.
It is perfectly valid to specify an applet that has no size (that is, one of its dimensions is set to zero). Note that 0x0 applets are often used if the applet is entirely audio. When editing a document or form that contains an applet smaller than 5x5 pixels in size, Notes displays a 4x4 pixel solid dark gray box so you can see where the applet is (and select it).
Adding and refreshing applet files
If it turns out that you forgot to include needed files for an applet or, more likely, have updated the applet and need to reimport some or all of its files, Notes provides an easy method for doing this.
- Select the applet.
- Choose Java Applet - Refresh. The Refresh Java Applet Files dialog appears.
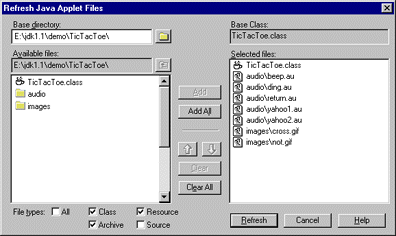
Add one or more (or all) of the files in the left panel to the files for import (in the right panel). Use the up or down buttons to reorder the newly added files. Newly added files will be imported after any existing files, regardless of order. To change the order of any existing files, use the Reorganize dialog described below.
You can remove selected files (those in the right panel) by clicking the "Clear" button. You can remove all of the files in the right panel by clicking the "Clear All" button. Note that clearing files from the right panel simply means that those files will not be reimported. It does not mean that they will be deleted. Use the Reorganize dialog (described below) to delete files from the applet. When you are done, select "Refresh" to reimport the applet files.
Reorganizing and deleting applet files
If you already have all the files imported into an applet, but need to reorganize them or need to delete some of them:
- Select the applet.
- Choose Java Applet - Reorganize.
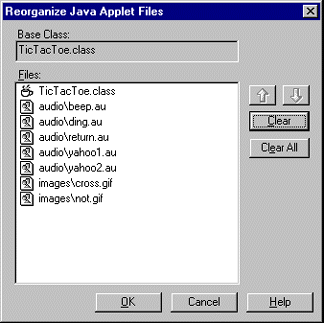
- Select a file in the dialog and move it to its correct place with the up or down arrows. If you wish to delete a file that is no longer needed by the applet, clear it from the list by clicking the Clear button. You can clear all of the files by clicking the Clear All button. Note that clearing a file means that the file will be deleted from the Notes document when you click OK. This is different from the behavior of the Clear/Clear All buttons in the Refresh dialog (see above).
- Clicking OK will reorder the files and delete any files you cleared from the list.
Exporting files
You can easily export all files imported for an applet:
- Select the applet.
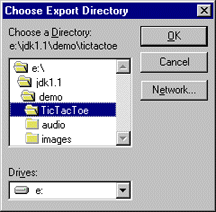
- Choose Java Applet - Export.
- Select a directory on your computer into which to place the files.
Restarting applets
Most of the changes that you make to applet properties will automatically stop and restart the applet. When editing a form or document, click F9 to restart the applet manually; this will stop the applet and then restart it for you immediately.
Adding the finishing touches
Specifying alternate text
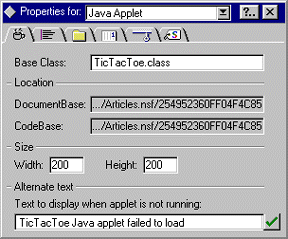
The ALT attribute is used to specify text that a browser should display if the applet fails to load. Applet load failure can occur for a number of reasons not the least of which is incorrect Java code. You can specify alternate text (the value for the ALT attribute) for an applet by using the applet InfoBox.
- Bring up the applet InfoBox by selecting the applet and either right-clicking the mouse to bring up the Java Applets menu or by choosing Java Applet - Java Properties.
- Enter your text in the Alternate text field.
Specifying other applet attributes
There may be instances where you need to specify additional applet attributes. For example, the Notes client does not currently support the ALIGN attribute, though some browsers do. You may wish to specify an ALIGN attribute for use by browsers. You may also want to add applet attributes that are specific to your browser.
To specify additional applet attributes, use the formula pane:
- Select the applet as described above.
- Invoke the formula pane by choosing Java Applet - Java Applet Parameters.
- Use the Event box to select HTML Attributes.
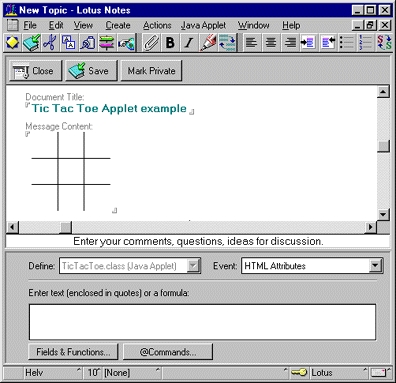
Use the formula window to enter any additional applet attributes. As with applet parameters, you are entering a Notes formula for the attributes. Therefore, any plain text must be surrounded with double quotes.
For example:
"ALIGN=LEFT"
or
"NAME=MyTicTacToeApplet"
You specify multiple attributes by separating them with a space. For example:
"ALIGN=LEFT NAME=MyTicTacToeApplet"
You can also enter a Notes formula to specify additional applet attributes. For example:
"ALIGN=LEFT NAME="+@UserName+" DATE="+@Text(@Today)
Note that the HTML generated by the Domino server will place these attributes right before the close applet tag. For example:
<APPLET WIDTH=200 HEIGHT=200
CODEBASE="/My+Applet+Testing.nsf/817...e9f/e08...e55b/$FILE"
CODE="TicTacToe.class"
ALT="This applet is not running."
ALIGN=LEFT NAME=Anonymous DATE=08/26/97>
</APPLET>
Specifying alternate HTML
Some browsers do not support Java applets (that is, they do not understand the <APPLET> </APPLET> tags). You can specify HTML that should be rendered by these kinds of browsers in lieu of your Java applet. Again, this is done through the formula pane.
- Select the applet.
- Invoke the formula pane by choosing Java Applet - Java Applet Parameters.
- Use the Event box to select Alternate HTML.
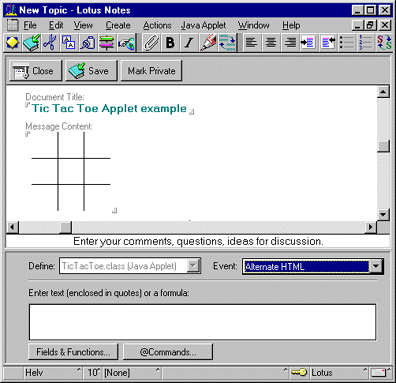
Use the formula window to enter any additional applet attributes. You can specify the attributes using plain text. The text can also contain HTML tags. For example:
"Your browser does <b>not</b> support Java applets."
Make sure the text is surrounded with double quotes. You can also enter a Notes formula to specify additional applet attributes. Remember, the Notes formula must evaluate to a text string. For example:
"Your browser does not support Java applets. Contact "+@Author+" for assistance."
Note that the HTML generated by the Domino server will place the Alternate HTML between the <APPLET> and the </APPLET> tags. For example:
<APPLET WIDTH=100 HEIGHT=100 CODEBASE="/My+Applet+Testing.nsf/817...e9f/789...266/$FILE"
CODE="TicTacToe.class"
ALT="TicTacToe Java applet failed to load">
Your browser does not support Java applets. Contact Test User/Iris for assistance.</APPLET>
Troubleshooting
Occasionally, applets you insert into Notes will not run the first time. Sometimes this is because you forgot to import a file, or you misspelled the base class name of the applet. (Java is case-sensitive, so you must be careful to type the names correctly).
Using the Java Debug Console
If the applet cannot be loaded, a dotted rectangle the size of the applet is drawn and the Alt-Text (alternate text) for the applet is displayed, if you defined it in the InfoBox.
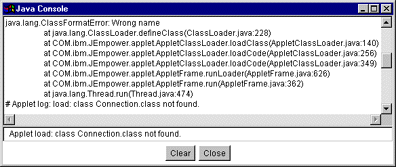
System-supplied information explaining why the applet could not be run will be displayed in the status area and in the Java Debug Console. To open the Java Debug Console, choose File - Tools - Show Java Debug Console.
Any exceptions that the applet receives (including "file not found" exceptions and security exceptions from the Java class loader) will be displayed in the Java console. We show a typical example:
Viewing the list of applet files in an imported applet
You can see a list of all of the files currently associated with an applet that was imported from the file system by using the applet InfoBox. Select the third tab (the one with the folder icon on it).
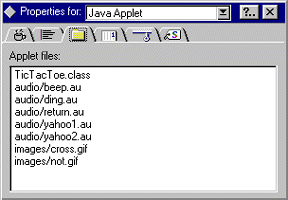
Note that the Applet files list will be empty if the applet is a link. Also note that using the Reorganize dialog to change the order of the applet files will cause the order of files displayed in this list to change.
Changing the Base URL for linked applets
When you create a link to an applet on a Web server, you must specify the Base URL where the applet's files are located. The Base URL is the URL that will be used for the CODEBASE attribute for the applet. Earlier we used the JackhammerDuke.class example for a Java applet link. The Base URL for this applet was:
http://java.sun.com/applets/UnderConstruction/1.0.2
When creating an applet link, it is possible that you mis-typed the Base URL. Or, perhaps after creating the applet link, the applet's location on the Web server has changed. When this happens, your applet link will fail to run. You can fix this problem by changing the Codebase for the applet link. The Codebase for the applet is modified through the applet InfoBox.
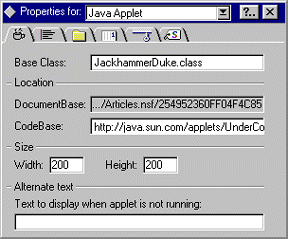
Change the value for CodeBase to the correct value for the applet link. In this case, the CodeBase is specified by you and therefore can be edited. The DocumentBase, on the other hand, is generated by the Notes client or Domino server and cannot be edited.
If the applet was imported from the file system, the CodeBase is also generated by the Notes client or the Domino Server and you are not allowed to modify it. Also, because URLs generated by the Notes client differ from those generated by the Domino server, they are displayed using an ellipses for readability.
Applets in the context of Notes documents
A common problem with applets running in Notes documents is that resource files (image and audio files) may not be found. This may be due to the fact that the applet uses the getDocumentBase call to locate those files. Because of the way applets are stored within Notes documents, care must be taken when coding (and when specifying parameters that refer to certain resource files) so that the applet is able to find the resource files it needs.
The getDocumentBase method returns the base URL of the document in which the applet is located. (Essentially, what this method returns is the full document URL minus the document file name). For example, if an applet is running in a document at
http://www.someplace.com/test/example.html
the getDocumentBase method would return a URL specifying
http://www.someplace.com/test
Some applets use this method to construct a URL for files they wish to access (e.g., getImage(getDocumentBase(), "image.gif")). Using the above URL as an example, the applet would be looking for the image file at the URL
http://www.someplace.com/test/image.gif
Note, however, that the Domino URL for a document does not simply refer to a file; instead, it is a command for the Domino server to generate the HTML representing a document.
When the getDocumentBase method is used on such an URL, you will not get the results you expect. Suppose, for example, you have inserted an applet into a document whose Domino URL is
http://www.someplace.com/database.nsf/817...E9F/862..12E?OpenDocument
In this case, using the getDocumentBase method in conjunction with the getImage call as shown above would return
http://www.someplace.com/database.nsf/817...E9F/862..12E?OpenDocumentimage.gif
Because the image is an attachment in the document and thus needs the "$FILE" to qualify the name, the requested image will not be found by the applet.
In contrast to getDocumentBase, the getCodeBase method returns the base URL from which the applet was loaded.
When Domino generates the HTML for an applet that has been inserted into a Notes document, it generates a full URL for the CODEBASE attribute in a form that allows the applet to find its files. For example, given the example above, the getCodeBase method would return
http://www.someplace.com/database.nsf/817...E9F/862..12E/862..12E/$FILE
When used in conjunction with getImage calls, this will give you exactly what you need. For example
getImage(getCodeBase(), "image.gif")
yields the following URL when the applet is served by Domino
http://www.someplace.com/database.nsf/817...E9F/862..12E/$FILE/image.gif
This results in a URL that allows the applet to successfully find the file.
In summary, then, when coding an applet for use in a Notes document, you should use getCodeBase instead of getDocumentBase whenever your applet needs to access resource files.
Specifying URLs in parameters
In some cases, besides importing resource files, you may need to define applet parameters which refer to resource files, or to directories in which certain sets of resource files may be found.
For example, the applet may take a parameter which gives a filename to be used as background image. Or, the applet may take a parameter specifying the directory in which the audio files needed may be found.
As outlined above, you should code your applet so that these parameters are relative to the codebase rather than to the document base.
There are some instances, however, where you are not building the applet yourself. You may be linking to an Internet applet, or have obtained a set of .class files without the source code. If the applet uses getDocumentBase instead of getCodeBase to find resource files, the applet will not find the files.
Take, for example, the "animator" applet included as one of the JDK 1.1 demo programs. When you load the applet for the first time in Notes, if you specify the value "images/Beans" for the "imagesource" parameter, it may display an error like this:
Animator: Couldn't load image notes:///images/Beans/T1.gif
Animator: Couldn't load image notes:///images/Beans/T2.gif
This is because Animator.java contains the following Java code to retrieve the image
String param = getParam("IMAGESOURCE");
imageSource = (param == null) ? getDocumentBase() : new URL(getDocumentBase(), param + "/");
The simplest fix is to change the getDocumentBase call to a getCodeBase call and then recompile. Of course, you need the source code in order to do this.
Alternatively, you can use the keyword "$notes_codebase" when specifying the parameter. For example, instead of using "images/Beans" when specifying the "imagesource" parameter, you would use "$notes_codebase/images/Beans" as the parameter value.
Notes (and Domino) will convert any occurrences of the $notes_codebase string in a parameter into the codebase for the applet. The parameter value "$notes_codebase/images/Beans" is therefore converted by Notes to something like:
notes:///Applets.nsf/862..12E/$FILE/images/Beans
and by Domino, to something like:
http://www.someplace.com/817...E9F/862...12E/$FILE/images/Beans
Since this effectively means that you are providing a full URL when specifying the parameter value, the getDocumentBase method in the applet is overridden, and the applet will be able to find the file.
Alternatively, you can use the keyword "$notes_codebase" when specifying the parameter. For example, instead of using "images/Beans" when specifying the "imagesource" parameter, you would use "$notes_codebase/images/Beans" as the parameter value. Notes (and Domino) will convert any occurrences of the $notes_codebase string in a parameter into the codebase for the applet. The parameter value "$notes_codebase/images/Beans" is therefore converted by Notes to something like:
notes:///Applets.nsf/862..12E/$FILE/images/Beans
and by Domino, to something like:
http://www.someplace.com/Applets.nsf/817...E9F/862...12E/$FILE/images/Beans
Since this effectively means that you are providing a full URL when specifying the parameter value, the getDocumentBase method in the applet is overridden, and the applet will be able to find the file.
Limitations and restrictions
Domino 4.6 represents another stage in the evolution of Notes to provide complete Internet and Java support. Because Internet standards and Java itself are in flux, there are a few compatibility issues and other limitations you should be aware of as you develop Web applications.
Implementation restrictions between 4.5 and 4.6
Applets created with a Notes 4.6 client will not work in 4.5. Applets created with a Notes 4.5 client will work in 4.6. However, if the parameters of the applet are modified in 4.6, it will be saved as a 4.6-style applet and will cease to work in 4.5.
Security limitations
Applets cannot directly access the Notes Java classes at this time (although Java agents can). This has been done to prevent hostile applets from modifying or destroying information stored in Notes databases. This limitation will probably be lifted in the future.
Color palette limitations
This version of Notes does not use a Web color palette, but its own Notes palette. Consequently, you may experience color problems when designing or executing for 256-color mode. Even though the applet may properly use Web color-balanced images, there may be color fidelity loss when displaying these images.
Printing applets
An applet cannot be printed as displayed. When you print a document that contains an applet, a light gray box of the correct size is printed in lieu of the applet.
CONTRIBUTORS
Matt Siess has been with Iris for 3 1/2 years working on various parts of the Notes user interface, including graphics and color palette support and, most recently, support for Java applets.
Frank Pavelski began working at Iris in 1993 in the Notes Environment Manager group. In addition to implementing the user interface described in this article, Frank maintains the file import/export, spell checker, smart icon/status bar and other custom controls in Notes. In his spare time, Frank enjoys skiing, fishing, and hiking in Vermont.
Copyright 1997 Iris Associates, Inc. All rights reserved.