
 |
by
Kerry
Woodward


Level: Beginner
Works with: Lotus Learning Management System
Updated: 04/01/2003
Inside this article:
Users module
Course Catalog module
Course Management module
Resources module
Reports module
Settings module
Related links:
Deploying content in the Lotus Learning Management System
Understanding the architecture of the Lotus Learning Management System
A preview of the Lotus Learning Management System
Lessons learned: Fernando Salazar and the LMS architecture
A quick course in LearningSpace - Virtual Classroom
Learn something new: LearningSpace - Virtual Classroom
Get the PDF:
 (1410 KB) (1410 KB)

|
 |
The IBM Lotus Learning Management System (LMS) allows you to plan, create, deliver, and manage training throughout an organization. Whether training occurs in a traditional classroom, in an online instructor-led session, or in a self-paced Web course, LMS provides a single place to manage courses and students. This article introduces you to features that are of interest to system and course administrators. It is intended for readers who are new to LMS, as well as those who have used LearningSpace, a previous online learning product developed by Lotus. (If you're unfamiliar with LMS, you may find it helpful to consult the LMS documentation to better understand some of the features and terms described in this article.)
Are you ready for the tour? Let's go!
LMS modules
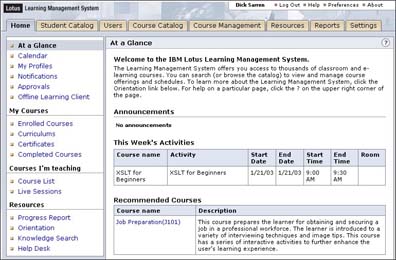
When users launch LMS, they see a series of tabbed pages called modules. The LMS user interface is divided into eight modules, each with its own area of focus. The Home module is the first tab in the series and can be seen by all users.
Which other modules a user sees depends on the permissions and roles assigned to that user by an administrator. The following table lists and briefly describes each module:
| Module | Description |
| Home module | Students, instructors, and administrators use this module to view course lists, schedules, progress reports, and messages. Students see different features from instructors and administrators. |
| Student Catalog module | This is where students browse through course listings and enroll in courses. |
| Users module | Administrators use this module to roster users, so they can log in to the system and have their work tracked. Here administrators also give users the roles and permissions that limit what they can see and do in the system. Anyone involved in the training process is a user, including students, instructors, training administrators, server administrators, course developers, registrars, support technicians, and managers. In order to be rostered, a user must be represented in an LDAP directory connected to LMS. |
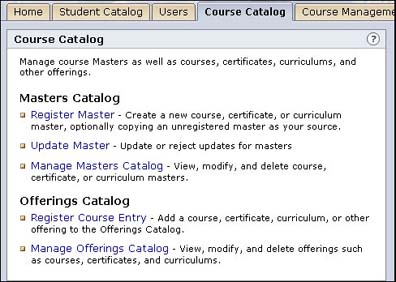
| Course Catalog module | This is the area where courses are introduced into the system and prepared for delivery to students. The Masters Catalog shows the templates ("masters") on which new course offerings, curriculums, or certificates are based. The Offerings Catalog shows all the courses, curriculums, and certificates available to students. |
| Course Management module | Here registrars manage course enrollment. Instructors or managers view class lists and student results. They also manage which courses are assigned to user and system profiles. Administrators may use this module for troubleshooting or system monitoring. |
| Resources module | This module helps course developers and coordinators organize instructors, places, and equipment needed for creating course offerings that are listed in the Student Catalog. |
| Reports module | Course developers and administrators use this module to see summaries of courses, resources, and system settings. Instructors and managers use this module to see enrollment lists and student progress reports. |
| Settings module | This module is used by administrators for assigning and managing all system and server settings, including email, search, logging, notifications, and connections to servers. Two main servers—LMS Server and Delivery Server—work in tandem to provide a user interface and to deliver courses to students. Collaboration Servers are auxiliary servers (for example, Lotus Domino servers) that let people communicate with each other within LMS. |
As a system or course administrator, you rarely need to work with the Home or Student Catalog modules, so we won't describe them in detail in this article. For more information about the Home and Student Catalog modules, consult the LMS documentation. Most of your work is focused in the Users, Course Catalog, Course Management, Reports, Resources, and Settings modules. Let's take a look at what you can do in these modules.
Users module
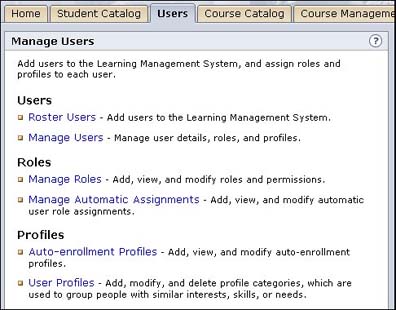
The Users module contains three sections: Users, Roles, and Profiles.
Users
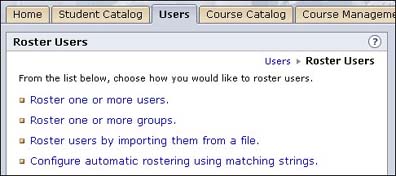
Rostering is the process of adding users to the system. From the Users module page, click Roster Users to see the options you have for adding users.
Each form of rostering uses the names in the LDAP directory as the basis for rostering users. If a user isn't in the directory or is in the directory but not rostered in LMS, he or she remains an anonymous user who can't log in or have any work tracked in the system. Rostered users need roles that determine their permissions and profiles, which are used for course enrollment.
Roles
Permissions determine which parts of the user interface a user sees. To streamline the process of assigning permissions to users, LMS uses sets of permissions called roles. When you add users to the system, you match them to a role that represents the amount of freedom they should have in the user interface. Users with multiple roles receive the total of all permissions allowed by those roles.
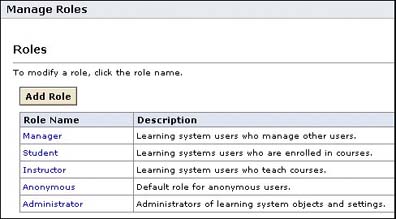
Before you add users to the system, you'll want to plan and create the roles your organization needs. LMS comes with five default roles that correspond to the types of users who work in the system: Administrator, Manager, Instructor, Student, and Anonymous. If these roles work for your organization, you can keep them and either leave the permissions intact or edit them. You can also create additional roles that make sense for your organization.
To review or add to the list of roles, open the Manage Roles section of the Users module. From here, you can either add a role to the list or click a role name to view or set its permissions.
Profiles
Profiles provide a way to categorize users to make course enrollment easier. LMS doesn't come with default profiles, but it's a good idea to plan and set up profiles before you add users and courses to the system. Start by planning which types of profiles you need and then decide how to group them by category. Each profile is part of a category, so create categories before you can create the profiles.
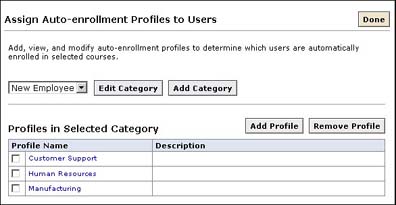
Auto-enrollment profiles allow you to enroll all students with the same profile in a course through the Course Management module. These profiles can reflect certificate programs or curriculums, levels of expertise, or fields of study. Click Auto-enrollment Profiles on the Users module page to create rules for automatically enrolling students in courses.
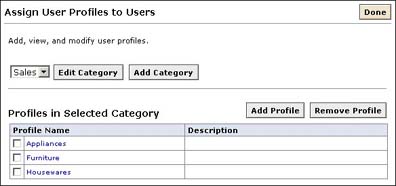
User profiles are selected by students and produce lists of Recommended Courses based on their profiles. These may represent skill sets or areas of interest. Click User Profiles from the Users module page to add user profiles and categories.
Assigning roles and profiles to users
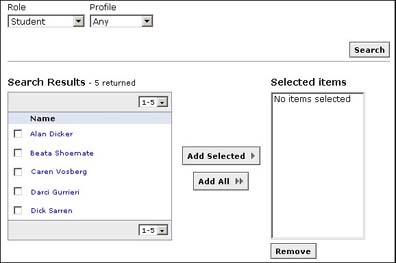
To complete the user management process, you now assign roles and profiles to rostered users. Do this by clicking Manage Users in the Users module and searching for the users you want to work with. You can then assign roles and profiles to all the users selected in the search.
Course Catalog module
The Course Catalog is the module you use to set up courses that become part of the Student Catalog.
Let's talk a little about masters and offerings to help you understand how to work in this module. A course offering is a single course, created from a course master, that has been scheduled and is ready for student participation. A course master is a course design that contains structure, navigation properties, and pointers to course content files. Course masters are developed separately in the LMS authoring tool, in another learning development tool, or by third-party vendors who supply finished courseware. All courses in the system are built from course masters.
A curriculum offering is a group of courses that cover related areas of knowledge. You create these from a curriculum master. A certificate offering, created from a certificate master, is a group of courses required for completion of a certification program. You can create curriculum and certificate masters after course masters are available.
New masters
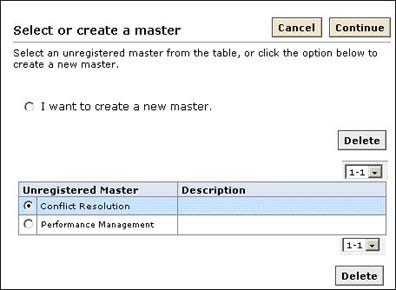
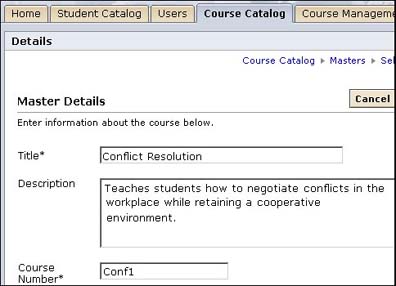
A course developer or administrator introduces a course master into the system by importing it from the authoring tool or the LMS command line import utility (CLIMP). Such masters are shown as unregistered masters in the Masters catalog. To create a registered master from an imported course master, click Register Master in the Course Catalog module, select Course Master, select an unregistered master, and click Continue to fill in the details for the new master.
Each course master you create has properties. Some of these are imported from the original course package; others are set in the Details page for a new course master.
New course offerings
After you've registered a new master, you and other course developers can create course offerings from the master. From the Course Catalog, click Register Course Entry, select Course, and choose a master. The Course Details page inherits properties from the master, many of which can be changed, and contains properties that are specific to the course offering. Properties for specific course offerings include which Delivery Server to use for the course, who the instructors are, whether or not the course can be downloaded to an Offline Learning Client, and whether or not approvals are required for a student to take the course.
Course Management module
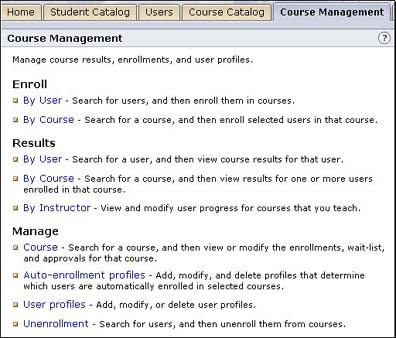
The Course Management module contains three sections: Enroll, Results, and Manage.
Enroll
You can enroll students in individual course offerings or in courses that are part of a curriculum or certificate they need to complete. The Enroll section of this module contains two out of five possible ways to enroll students in offerings.
- By User lets you search for and select students first, then enroll them in a course, curriculum, or certificate offering.
- By Course lets you search for a course, curriculum, or certificate offering first, then select the students to enroll in it.
The Manage section of this module offers two other ways to enroll students—through auto-enrollment profiles connected to courses or by enrolling additional users in a course that you're managing. The final way users can be enrolled in a course is by enrolling themselves, if self-enrollment is allowed for the offering.
Results
You can check on student progress and results in the Results section of this module in one of these ways:
- By User lets you search for and select students first, then see their results in a course, curriculum, or certificate offering.
- By Course lets you search for a course, curriculum, or certificate offering first, then select whose results you want to see.
- By Instructor lets you search for results by the instructors assigned to a course offering.
Manage
The Manage section contains course, profile, and unenrollment functions.
- Course
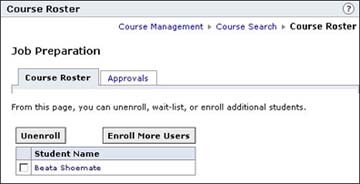
This function allows you to view or modify the enrollments, wait list, and approvals for a given course.
- Auto-enrollment profiles
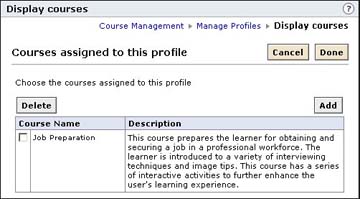
This allows you to set up auto-enrollment profiles. If you set up auto-enrollment profiles in the Users module, you can use this feature to assign courses to a profile. All students with that profile are enrolled in the associated courses automatically.
- User profiles
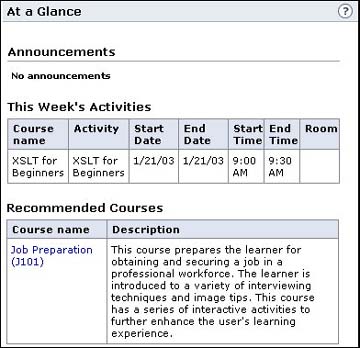
If you set up user profiles in the Users module, you can use this feature to add recommended courses to a user profile. A student who chooses that user profile in the My Profiles portion of the Home page receives a list of recommended courses on the At a Glance page that shows the courses you associated with that user profile.
- Manage - Unenrollment
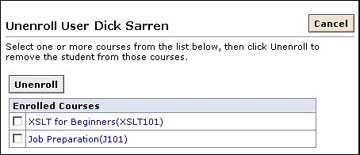
This function allows you to search for students and to remove them from the enrollment for a course, curriculum, or certificate offering.
Resources module
The Resources module contains four sections for managing the resources that are associated with course offerings. The sections are Locations, Rooms, Vendors, and Instructors.
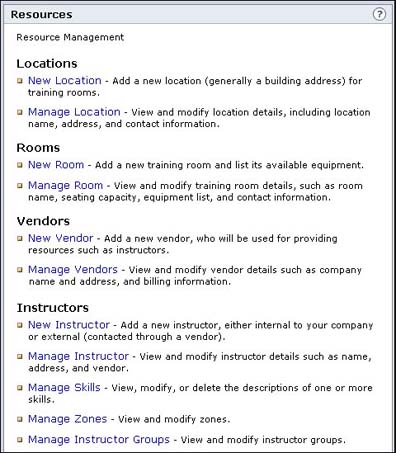
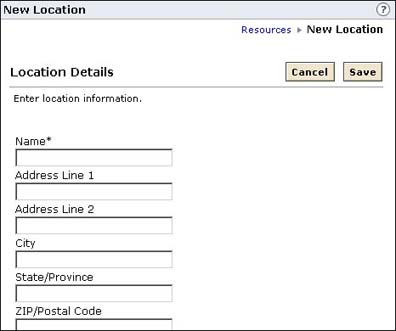
Locations
The Locations section allows you to add location resources, which are needed when you create a room resource. Information includes a descriptive name, the building address, directions for getting there, and the person to contact for more information. After you've added locations, you can use Manage Location to search for and edit locations already in the system.
Rooms
In the Rooms section, you add room resources that are associated with locations. You are prompted to add a descriptive name, a location, and the type of room (Classroom, Conference, Auditorium, or Lab). In addition, you supply a room capacity, the number of computers, equipment supplied with the room, a phone number, a time, and the person to contact to reserve the room. After you've added rooms, you can use Manage Room to search for and edit rooms already in the system.
Vendors
The Vendors section allows you to add vendor information, which is needed when you set up instructor resources. For each vendor, you supply a vendor name, address, contact information, and company billing information. After you've added vendors, you can use Manage Vendor to search for and edit vendor resources already in the system.
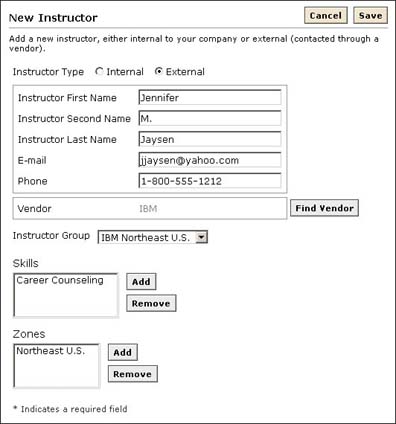
Instructors
When you create course offerings, you add the instructor who will teach the course. The Instructors section of the Resource module provides the tools for adding instructors to the system and includes categories for sorting instructors by vendor, skill, zone (geographical area), and group. After you've added instructors, you can use Manage Instructor to search for and edit instructors already in the system.
Set up vendors, skills, zones, and groups first before adding instructors because you need that information when you add an instructor to the system. Internal instructors need to be rostered users in LMS.
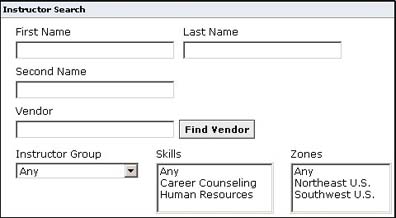
When you create a new course offering in the Course Catalog module, you have the opportunity to assign instructors to the course. Clicking Find Instructor in the Instructors section of the Course Details page allows you to search by vendor, instructor group, skills, or zones.
Reports module
Any information stored in the system can be presented as a report, which you can run on demand or schedule to run at a predetermined time and frequency. LMS comes with the reports most often needed by administrators, instructors, and others involved in monitoring training at an organization. You can also create your own custom reports and add them to the system. As is the case with all other features, the ability to run reports is governed by the role assigned to the user, which defines the permissions assigned to the user.
To run a report, use Run a Report in the Reports module. You are prompted to select the category and report you want to run, provide any parameters necessary for the report (such as the name of a student or a course), and choose whether to schedule the report or run it immediately. To view or edit the dates or frequency of scheduled reports, click Manage Scheduled Reports. Select a report and then edit its schedule.

Types of reports
Reports that come with LMS fall into these categories:
- Catalog Reports
Provide information about course offerings, as defined in the Course Catalog module.
- Enrollment Reports
Summarize student enrollment statistics.
- Progress Reports
Provide instructors and managers with details about students' results and progress tracked by LMS.
- Resource Reports
Generate statistics about resources that are defined in the Resources module.
- Miscellaneous Reports
Supply system settings information, login summaries, and information about scheduled reports. They also provide lists of permissions and profiles assigned to specific users.
Settings module
After you install and configure LMS, you use the Settings module to finish connecting all servers that play a role in the system and to set up administrative logging and notification features.
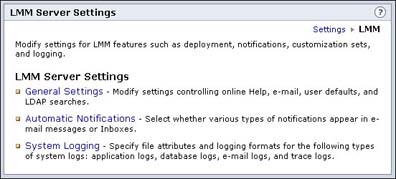
LMM Server Settings
The LMM Server Settings page has three sections for assigning settings to the LMS Server. The General Settings page allows you to provide the URL of the Help system, the email address of the Help desk, the location of the Offline Learning Client software, and the URLs of the SMTP servers that will handle the mail system. In the Automatic Notifications page, you select which types of system changes warrant email notifications to administrators. Use the System Logging page to define log names, sizes, and information to be included in the logs.
Delivery Server Settings
This server is so named because it delivers courses from the Content Server, where course files are stored. The Delivery Server also provides course navigation features and course tools, tracks student progress, and sends tracking data to the LMS Server.
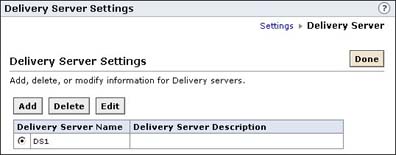
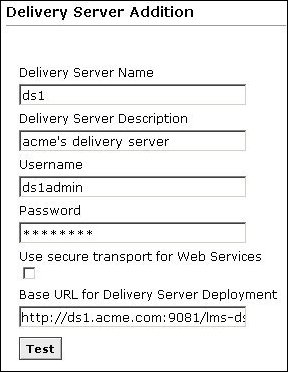
When you add a Delivery Server to the system, you must specify the Delivery Server name, user name, and password exactly as they appear in the ds-settings.xml file in the serverlocator section. The XML file is populated with settings chosen during the install process. Include the port number in the Base URL if the server is configured to use something other than the default port.
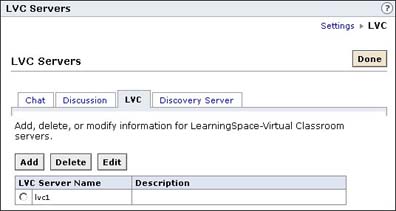
Collaboration Server Settings
There are four types of Collaboration Servers that you can integrate with LMS:
- Chat Server
This server provides the ability to have online conversations with an instructor or with other students taking the same course. It runs on Sametime 3.0.
- Discussion Server
This server stores all discussion databases that are associated with LMS courses. It runs on Lotus Domino 5.0.10 and higher.
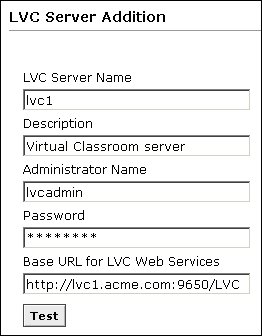
- LearningSpace - Virtual Classroom (LVC) Server
This server hosts Virtual Classroom sessions, scheduled for a certain date and time and led by an instructor.
- Discovery Server
This server delivers documents that are relevant to Knowledge Searches carried out in the Home module or while taking a course.
Each server has its own settings page to enable it to connect to LMS.
Would you like to learn more?
In this article, we introduced the Lotus Learning Management System interface, presenting a module-by-module tour. We discussed the function and purpose of each module, describing how each module works from an administrator's point of view. You now should have a good basic understanding of LMS, a complex Web-based system that involves back-end relational databases and multiple servers, each playing a specific role in the system.
But this article is just the beginning—there's a great deal more to learn about LMS. If you'd like to learn more about what's going on "under the hood," see the LDD Today article, "Understanding the architecture of the Lotus Learning Management System," which will give you a system-level perspective about the features you've learned about here.
ABOUT THE AUTHOR
Kerry Woodward is a technical writer in the IBM Lotus Software Division. She has worked on documentation for Notes and Domino, LearningSpace, and the Learning Management System since joining Lotus in 1990. |
|