
 |

by Sally Blanning DeJean
and David DeJean


Level: Advanced
Works with: Notes and Domino 6
Updated: 12/02/2002
Inside this article:
New classes, methods, and properties
Example 1: Using LotusScript to build a rich text table
Example 2: Removing rows and renumbering a rich text table
Example 3: Creating a section
Example 4: Extracting information from doclinks
Related links:
LotusScript: Rich text objects sample code
LotusScript: The NotesAdministrationProcess class in Notes/Domino 6
LotusScript: More XML classes in Notes/Domino 6
LotusScript: XML classes in Notes/Domino 6
LotusScript: The NotesAdministrationProcess class in Notes/Domino 6
LotusScript: Programming views in Notes/Domino 6
Domino Designer 6 Technical Overview
Domino Designer 6 help
Simplifying your LotusScript with the Evaluate statement
Using the object-oriented features of LotusScript
Get the PDF:
 (210 KB) (210 KB)

|
 |
Notes/Domino 6 makes important additions to the LotusScript language in several areas. This article looks at the new classes for Rich Text objects and provides some useful code examples for navigating through a Rich Text field, programming tables and sections, and setting colors. This is the first in a series of articles that will take a close look at the new LotusScript classes and enhancements to the LotusScript language in Notes/Domino 6.
If you open up the Domino Designer Release 6 Help file, you’ll see that the ‘What’s New in this Release” section on LotusScript lists 61 items, more than for any other area of Designer.
What are the most important changes? That will depend on your point of view. If you’re an administrator, you’ll undoubtedly say it’s the new NotesAdministrationProcess class. If you use Domino as the glue that holds together data from very different data stores in your enterprise, then you’ll see your future in the new classes for importing and exporting XML data.
But if you’re a straight-ahead Domino developer building applications for end users working in Notes or Web clients, it’s got to be the new classes for rich text fields. Before Notes/Domino 6, a rich text field was basically a closed box to a developer. You could append. You could fiddle with text style. But the only way to really manipulate the contents of a rich text field was paradoxically to abstract it into plain text. Notes/Domino 6 provides new LotusScript classes, methods, and properties that let you parse a rich text field and operate on the various objects it contains.
What will you use these new tools for? Probably almost everything. Just at first glance, it's obvious that the new rich text capabilities will make major changes in at least three areas:
- Extract meaningful data from rich text fields
RichTextNavigator and RichTextRange let you use rich text fields as an alternative to "laundry list" applications, the kind that capture a few data points about an unlimited number of similar items (the office supplies order form used later in this article is one very simple example) by putting hundreds of fields on a form. You can collect data in a single rich text field and use the new RichTextNavigator and RichTextRange classes to parse the elements and extract data.
- Add and manage new elements programmatically
New classes let you create and edit doclinks and sections as well as tables and other rich text elements. You can use simple agents to add a row to a table or a section to a field, populate it with data collected from the user or another file, compute totals, and perform maintenance.
- Control the editorial style of the database
Domino has always been a great document management platform, and the new classes will make it an even better one. Notes/Domino 6 enhancements to LotusScript give you much more precise control over NotesRichTextStyle. Another new class, NotesColorObject, can be used with the rich text classes to extend the style settings to include color. You can programmatically enforce editorial appearance and transform the style of databases.
This article, the first in a series, examines the new rich text classes. We use several examples to illustrate how you can use these new classes. This article is intended for Notes/Domino application developers with LotusScript experience.
New classes, methods, and properties
There are two foundation classes for these capabilities. One is the NotesRichTextNavigator class. The other is the NotesRichTextRange class. The two of them work together.
NotesRichTextNavigator, as its name implies, assists you in navigating the contents of a rich text item or an element within an item like a table cell or a doclink. A navigator object works by representing a collection of all the elements of a particular type within the item—all the tables or all the doclinks or all the text paragraphs—and setting location pointers within the collection using methods, such as FindFirstElement, GetNextElement, GetNthElement, and more.
There is no hierarchy of subelements within a rich text field: Navigating table cells is completely separate from navigating tables, for example. If you want to limit the scope or control the location of operations, you must create a NotesRichTextRange object. If you have a rich text field that contains several tables and you want to change to contents of the cells in only one of them, you must create a range object with boundaries that begin and end with the table and then invoke the Navigator property of the range for table cells. Range properties, such as TextRun and TextParagraph, allow you to precisely navigate, read, and edit what used to be inaccessible amorphous rich text. Methods let you set beginning and end points and change the style of the text in the range, replace it, remove it, and find-and-replace, among other things.
In addition, the NotesRichTextItem class has been amplified with a dozen new methods to make it a suitable launching pad for these new classes: AppendTable, CreateNavigator, CreateRange, and others that begin and end ranges and sections and insertion points. Others give you access to information—GetNotesFont and GetUnformattedText, for instance.
Other new classes represent element types and objects: NotesRichTextTable, NotesRichTextDoclink, and NotesRichTextSection.
Download the examples
We’ve created a handful of code examples to show how these new capabilities are used. You can download a Notes database that includes them all from the Sandbox.
When you work with these example agents, keep in mind that Notes/Domino 6 does not refresh rich text items on the fly. So while you can write agents that reshape the content of rich text fields, if you start with an open document, you must close and reopen it to see the changes.
These example agents were written to run in a Notes client, but you could easily adapt them to run on a Domino server and to launch from a WebQuerySave event or any of the many other mechanisms for running agents.
Example 1: Using LotusScript to build a rich text table
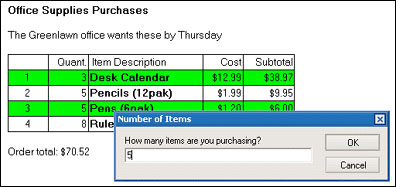
The first code example uses several of the new classes to build and manipulate a table in a rich text field. You can see the code of this agent, which is named 1. Order an Item in the examples database. You may want to keep it open. The guided tour of the code that follows covers only the highlights and omits some of the lines of code. To see the agent run, in the examples database open the document named Office Supplies Order and create a new table in the blank document by choosing Actions - 1. Order an Item, then close and reopen the document.
Order an Item is a simple order-entry application that lets a user select an item from a picklist and enter a quantity. It performs a lookup to get the item price, then creates a new row in a table to hold the quantity ordered, item description, unit price, and a subtotal of quantity times unit price. With a cell to hold a row number, the table is five columns across by unlimited rows deep.
In a conventional Domino application, a 20-item order would create a table with 100 separate fields. In the following example, there are three fields—a user-editable rich text field to hold identifying information and comments, a computed rich text field to hold the table, and a computed field to hold the total of the order. The UI for this example is minimal:
The Order an Item agent includes Dim statements that create three new types of objects:
Dim rtnavBody As NotesRichTextNavigator
Dim rtt As NotesRichTextTable
Dim rtrange As NotesRichTextRange
After collecting the input from the user and performing the lookup, the code creates an object to represent the rich text field named body. Then it creates a rich text navigator for this object:
Set body = doc.GetFirstItem("Body")
Set rtnavBody = body.CreateNavigator
It checks for a table in the body field with an if-then statement that uses the navigator to find the first element of type table (in this example, there is only one table in the field). The FindFirstElement method returns a Boolean used by the if-then:
If rtnavBody.FindFirstElement(RTELEM_TYPE_TABLE) Then
If a table is found, then that means the order already contains at least one item, so the code's job is simple. It begins an insertion process. It uses the navigator's GetElement method to create a table object named rtt, then the table's AddRow method to add an empty row with cell properties like those of the row above it, ready to receive the values entered by the user:
Set rtt = rtnavBody.GetElement
Call rtt.AddRow()
If no table exists in the body field, the agent code within the Else condition creates one. It does this in several steps. First, it creates a rich text style object for each column of the table. Then it appends a table five columns wide and one row deep for the column headings using these styles to set cell width and alignment. Next, it populates the row with the text of the headings. Finally, it adds an empty row to the table and the conditional ends.
One of the new features of Notes/Domino 6 makes it easier to work with styles by allowing you to create an array of styles. The Create an Item agent takes advantage of this:
Dim styles(1 To 5) As NotesRichTextParagraphStyle
If the style settings are identical for each of the five columns, the agent can populate the array in a simple loop. In this agent, the columns are not the same—alignment and width vary from column to column. So the style object for each column is specified individually. The variable i set at the start of each object is just a shortcut that makes it easier to cut and paste the lines of code to create multiple objects. The style object for the first column looks like this:
i = 1
'Column 1 holds the row number
Set styles(i) = session.CreateRichTextParagraphStyle
styles(i).LeftMargin = RULER_ONE_INCH
styles(i).FirstLineLeftMargin = 0
'Set width of cell
styles(i).RightMargin = RULER_ONE_INCH*0.5
'Set alignment of cell contents
styles(i).Alignment = ALIGN_CENTER
After all five styles are created, the agent creates the table as one row of five columns with the styles applied:
Call body.AppendTable(1,5,,,styles)
Call doc.Save(True, True)
The parameters of the AppendTable statement specify the number of rows and columns and the name of the style object to be applied. (The two empty parameters are not needed in this example. The first specifies the name of the array that holds the labels for the tabs. If you include a value here, Notes creates a tabbed table; if you leave it blank, Notes creates a regular table. You can find an example of the code to create this array in an agent named Create a Tabbed Table in the examples database. The second parameter specifies a left margin value. The default is one inch.)
The document-save statement is required because you do not have access to a newly appended table. You must save the document before you navigate to the table.
The next step is to write the column headings into the cells of the first table row. The navigator rtnavBody is used again, this time to represent the collection of table cell elements in the field and to find the second cell, which heads the column that holds the quantity of each item in the order. An insertion is begun at the location in the rich text item pointed to by the navigator, the text of the heading is appended to the cell contents, and the insert ended:
Call rtnavBody.FindNthElement(RTELEM_TYPE_TABLECELL,2)
Call body.BeginInsert(rtnavBody)
Call body.AppendText(" Quant.")
Call body.EndInsert
When all the headings have been entered, the navigator is used to find the table, and the object rtt is created to represent it. The agent appends an empty row to the table and the conditional ends:
Call rtnavBody.FindFirstElement(RTELEM_TYPE_TABLE)
Set rtt = rtnavBody.GetElement Call rtt.AddRow()
Call doc.save(True,True)
End If
Now the table is initialized and ready to receive the data for the new item. The agent uses the properties RowCount and ColumnCount and some arithmetic to determine the total number of cells in the table (the variable rcc%) and to calculate the cell number where it will begin inserting the item data. The variable cl% is assigned the number of the first cell in the last row of the five-column table by subtracting 4 from rcc%:
rc% = rtt.RowCount
cc% =rtt.ColumnCount
rcc% =rc%*cc%
cl% = rcc%-4
The agent uses the navigator's FindNthElement method to point to the cell represented by cl%, the first cell in the last row. An Insert operation is started at the location of rtnavBody, and an AppendText operation writes the row number (rc%-1, to allow for the fact that the headings row isn't numbered) into the first cell in the row, then the Insert is ended:
Call rtnavBody.FindNthElement(RTELEM_TYPE_TABLECELL,cl%)
Call body.BeginInsert(rtnavBody)
Call body.AppendText(rc%-1)
Call body.EndInsert
The navigator is called again to point to the cells that hold the quantity, description, and unit price in succession. The values entered by the user or looked up in the picklist operation are written into the table.
The item description is a bit more complex because the text is styled—a RichTextStyle object is created, set to bold, and written into the cell, then the text of the description is added. An "end bold" style is written, and the insertion is ended:
Call rtnavBody.FindNextElement(RTELEM_TYPE_TABLECELL)
Call body.BeginInsert(rtnavBody)
Set richStyle = session.CreateRichTextStyle
richStyle.Bold = True
Call body.AppendStyle(richStyle)
Call body.AppendText(des$)
richStyle.Bold = False
Call body.AppendStyle(richStyle)
Call body.EndInsert
The next cell to the right holds the item's unit cost, which should display as currency, so the AppendText method includes a Format:
Call body.AppendText(Format(us,"currency"))
Finally, the number of items is multiplied by the item price, and the subtotal for the item is entered in the last cell in the row, formatted as currency:
total@ = noitem*us
Call rtnavBody.FindNextElement(RTELEM_TYPE_TABLECELL)
Call body.BeginInsert(rtnavBody)
Call body.AppendText(Format(total@,"currency"))
Call body.EndInsert
The next section of the agent uses the new NotesColorObject class to apply alternating colors to the rows of the table. The SetColor and SetAlternateColor methods of the NotesRichTextTable class make this easy, but you must create the two color objects and assign the colors you want to them:
rtt.Style = TABLESTYLE_ALTERNATINGROWS
Dim colorObject As NotesColorObject
Dim colorObject2 As NotesColorObject
Set colorObject = session.CreateColorObject
Set colorObject2 = session.CreateColorObject
colorObject2.NotesColor = COLOR_GREEN
colorObject.NotesColor = COLOR_WHITE
Call rtt.SetColor(colorObject2)
Call rtt.SetAlternateColor(colorObject)
(“COLOR_GREEN” and “COLOR_WHITE” are two of the 16 NotesColor constants available in LotusScript. For the complete list, plus examples of code that creates custom colors using RGB and HSL color values, see Creating a Section later in this article.)
Finally, the agent then calculates a grand total of all the items, looping through the last cell in each row beginning with the second and adding its subtotal amount to the total.
The first step is to create a rich text range that represents the entire body field. A for/next loop moves the navigator through the table and the NotesRichTextRange method SetBegin is used to set a pointer in the range that delimits the assignment of text found in the table cell to a variable named cellno. The data type of cellno is a double, and the line “On Error Resume Next” provides some error checking. If the cell contains something other than a number, it’s skipped.
The contents of each subtotal cell is a text string that begins with a dollar sign, and cellno# and cellnoall# are of type double, so a conversion is required as the subtotal is assigned to the cellno# variable. A Strright operation drops the dollar sign, and the result is converted to type double:
Set rtrange = body.createrange
Dim i As Integer
For i = 10 To rcc% Step 5
Call rtnavBody.FindNthElement(RTELEM_TYPE_TABLECELL, i)
Call rtrange.SetBegin(rtnavBody)
On Error Resume Next
cellno# = Cdbl(Strright(rtrangeCell.TextRun,"$"))
On Error Goto 0
cellnoall# = cellno# +cellnoall#
Next
Finally the total held in cellnoall# is assigned to a field in the document named total, and the document is saved:
doc.total = cellnoall#
Call doc.save(True,True)
End Sub
Protecting the table's contents
If you open the document that contains the order table in edit mode, you'll see that the user can edit the UserNotes field that contains the default value Enter comments here, but the table itself can't be edited. A look at the form used for this document, called Office Supplies Order in the examples database, shows why—the form contains not just one rich text field, but two. The first one, for user comments, is editable. The second, which contains the table, is set to Computed in its properties:
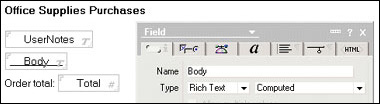
This setting protects the contents of the table cells. If the table were in an editable field, there would be nothing to prevent users from editing cell contents and inserting data that would break the agents.
Example 2: Removing rows and renumbering a rich text table
The navigation in the first example is simple for two reasons; we assumed there was only one table in the field, and the agent didn't need to know what was inside the individual table cells. A find-and-replace operation to renumber the rows in the table is more complex. It has to navigate the field to find a table, navigate the table element to find the correct cells, and navigate the contents of the selected cell to do the find-and-replace. (The code for this example is the second agent in the examples database, 2. Remove a Row and Renumber. You can see how the agent works by running this agent on the table you created in Example 1 above.)
The agent begins by prompting the user for the number of the row to remove:
Do
norow = ""
norow = Inputbox("Delete Row?","Which row do you wish to delete?")
norow = norow+1
If norow = 1 Then
Messagebox "You cannot remove the column headings",,"That's a no-no"
End If
Loop While norow = 1
Norow = norow+1 adjusts for the fact that the line numbers seen by the users begin in the second row of the table, not the first. The Do While loop around the Messagebox statement checks to see whether the user is attempting to remove the column headings and puts up an error message.
Removing the row is made easy by the rich text table method RemoveRow:
Set rtnavBody = body.CreateNavigator
Call rtnavBody.FindFirstElement(RTELEM_TYPE_TABLE)
Set rtt = rtnavBody.GetElement
Call rtt.removerow(1,norow)
After the agent calculates the total number of cells in the table, it renumbers the rows, looping through the first cell in each row and replacing its contents with the current value of i, the variable used to count the rows. K is the cell number of the next cell to be operated on. K is initially set to 6, the number of the first cell in the first numbered row:
Dim i As Integer
Dim K As Integer
K = 6
The loop increments i, which represents the row number, and the navigator rtnavBody is pointed at the table cell numbered by K. (In the For statement rc%, the total number of rows in the table, is reduced by one to adjust for the unnumbered first row. K is initially set to 6 for the same reason.) Within each cell, another navigator is constructed to locate the contents of the cell. In this example, it's just a row number, so it's treated as the simplest type of rich text object, a text run. The FindAndReplace method of RichTextRange makes it easy to swap the new row number for the current contents of the cell:
For i = 1 To (rc%-1) Step 1
Call rtnavBody.FindNthElement(RTELEM_TYPE_TABLECELL,K)
Set rtrangeCell = body.CreateRange
Call rtrangeCell.SetBegin(rtnavTable)
celltext$ = rtrangeCell.TextRun
Call rtrangeCell.SetEnd(rtnavTable)
Call rtrangeCell.FindandReplace(celltext$,i)
K = K + 5
Next
The grand total is recalculated by the same code that's used in the Order an Item agent:
Set rtt = rtnavTotal.GetElement
Set rtrangeCell = body.CreateRange
For i = 10 To rcc% Step 5
Call rtnavBody.FindNthElement(RTELEM_TYPE_TABLECELL, i)
Call rtrangeCell.SetBegin(rtnavBodyl)
On Error Resume Next
cellno# = Cdbl(Strright(rtrangeCell.TextRun,"$"))
On Error Goto 0
cellnoall# = cellno# +cellnoall#
Next
doc.total = cellnoall#
Call doc.Save(True,True)
The code for this Remove a Row and Renumber agent reuses the variable name rtnavBody, first to find the table, then to find cells. The range rtrangeCell once again identifies the contents of the target cell.
Example 3: Creating a section
Tables and text aren't the only rich text elements you can control with the new LotusScript classes. The next two examples are identified in the database as 3. Create a New Section and 4. Extract Doclink Info. You can exercise Create a New Section by opening the blank document named Create a New Section in the database and then running the agent from the Actions menu.
The Create a New Section agent uses the new classes NotesRichTextSection and NotesStream, which represents a stream of data.
The agent starts by prompting the user for several properties of the new section—the text for the section title and the font size and color to display it in, and the path and name of a file to include as the content of the section:
fs = uiw.Prompt(Prompt_OKCANCELEDIT,"Section Font Size","What size font do you wish to use in the section headings?","")
col$ = uiw.Prompt(Prompt_OKCANCELEDIT,"Section Color","What color do you want for the section?","")
title$ = uiw.Prompt(Prompt_OKCANCELEDIT,"Section Title","What is the title for this section?","")
filename$ = uiw.Prompt(Prompt_OKCANCELEDIT,"Filename to put in section","What is the path to the file to be inserted in this section?","")
(The example uses a file as the source of the data stream and requires a filename. If no valid path and filename is supplied, the agent exits. This is done only to demonstrate the new stream function. You don't need to stream in the contents of a file to create a new section.)
The code that assigns the color of the heading text and section bar is simplified to permit only four possible selections: Red, Green, Blue, and a default, Black:
If col$ = "Red" Then
colorObject.NotesColor = COLOR_RED
Elseif col$ = "Green" Then
colorObject.NotesColor = COLOR_GREEN
Elseif col$ = "Blue" Then
colorObject.NotesColor = COLOR_BLUE
Else
colorObject.NotesColor = COLOR_BLACK
End If
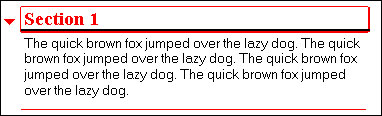
This color is displayed in the section's title and the section bar. Note that "section bar" is a catch-all name rather than a specific element within the section. It is not the underline that appears under the section head when the section has focus. Rather "section bar color" refers to the twistie triangle and the borders of the section, if any. The following screen shows an expanded section with borders that have focus—notice the black underline under the title. The color of the twistie, the border, the title text, and the rule that marks the end of the section all have been set by the Modify a Section agent:
(While you can set the color of a section's border this way, you cannot use the NotesSection class to add or remove a section's borders—this must be done manually by editing the section's properties.)
The heading style is set by the properties of richStyle, an object of the NotesRichTextStyle class:
Set richStyle = session.CreateRichTextStyle
richStyle.Bold = True
richStyle.NotesFont = FONT_ROMAN
richStyle.NotesColor = colorObject.NotesColor
richStyle.FontSize = fs
Then the new section is appended at the end of the field named body:
Call body.BeginSection(title$,richStyle,colorObject,False)
The arguments to the BeginSection method specify the title text, the title style, the color of the title and section bar, and the state of the section the next time the document is opened. False means the section will be collapsed.
The contents, if any have been specified, are read into the new section using the NotesStream class:
If Not stream.Open(filename$) Then
End If
Call body.AppendText(stream.ReadText)
And then the section is ended and the document saved:
Call body.EndSection
Call doc.save(True,True)
End Sub
While this example merely appends the new section at the end of the rich text file, you can locate the section anywhere within the field's contents, using a range and navigator and BeginInsert the same way the Remove a Row agent did to set a pointer for the FindAndReplace operation.
With the new NotesRichTextSection class and new methods and properties of NotesRichText, you could write agents and scripted events that use the color and size of section headings, or even rewrite their titles, to indicate their status as a document progresses through a workflow process.
Setting More than 16 Colors
Notes defines 241 colors represented by the integer values 0-240. The first 16 of these (numbered 0-15) are also represented by LotusScript constants; COLOR_RED and similar color names in the code above are examples of these constants. The following table shows the complete list:
| |
| Value | Color name |
| 0 | COLOR_BLACK |
| 1 | COLOR_WHITE |
| 2 | COLOR_RED |
| 3 | COLOR_GREEN |
| 4 | COLOR_BLUE |
| 5 | COLOR_MAGENTA |
| 6 | COLOR_YELLOW |
| 7 | COLOR_CYAN |
| 8 | COLOR_DARK_RED |
| 9 | COLOR_DARK_GREEN |
| 10 | COLOR_DARK_BLUE |
| 11 | COLOR_DARK_MAGENTA |
| 12 | COLOR_DARK_YELLOW |
| 13 | COLOR_DARK_CYAN |
| 14 | COLOR_GRAY |
| 15 | COLOR_LIGHT_GRAY |
These 16 constants are a subset of the 241 colors that are defined in Domino as NotesColor values. The colors beyond "COLOR_LIGHT_GRAY" are specified by number. You can specify this broader range of colors by using either the NotesColor value in the range 16-240, or one of two methods that break a color down into a set of three numeric descriptors—RGB (for red-green-blue) values, 0 to 255, and HSL (for hue-saturation-luminance) values, 0 to 240.
Domino automatically translates between these color spaces and the set of 241 NotesColors. When you use the SetRGB or SetHSL methods, Domino returns the NotesColor value. No matter how you set the color—whether by constant name, NotesColor, RGB, or HSL. The NotesColor, RGB, and HSL values are available as properties of the NotesColorObject.
Because Domino returns the NotesColor value automatically when you use SetRGB or SetHSL, you can capture it to a variable and use it to set the color of elements. To set the bar color of a section to a custom RGB color in the previous example, for instance, you would first set the RGB values and create a variable (MyColor in the following code) to hold the integer that is the NotesColor. Where the example formerly assigned Black as the default color, it now assigns the custom color MyColor:
MyColor = colorObject.SetRGB(204, 102, 51)
If col$ = "Red" Then
colorObject.NotesColor = COLOR_RED
Elseif col$ = "Green" Then
colorObject.NotesColor = COLOR_GREEN
Elseif col$ = "Blue" Then
colorObject.NotesColor = COLOR_BLUE
Else
colorObject.NotesColor = MyColor
End If
You could also set the color directly:
colorObject.NotesColor = colorObject.SetRGB(204, 102, 51)
And of course, you can compute the color values by substituting integer variables for the numeric values:
colorObject.NotesColor = colorObject.SetRGB(RedVal%, GreenVal%, BlueVal%)
If you've designed applications for the Web, you may be more familiar with RGB color values in hexadecimal notation and the Web-safe color palette. The Web-safe colors are based on values that don't dither—that is, display reticulation effects—when viewed on computer monitors that display a limited number of colors. The RGB color CCFF99 hex, for example, is a light green that stays a pure color even on monitors that are set to display only 256 colors. Because the SetRGB method works with decimal values rather than hex codes, you would write LotusScript to use the SetRGB method to create this color like this:
colorObject.NotesColor = colorObject.SetRGB(204, 255,153)
Here's a translation table for hex and decimal color values:
| |
| Hexadecimal | Decimal |
| 00 | 000 |
| 33 | 051 |
| 66 | 102 |
| 99 | 153 |
| CC | 204 |
| FF | 255 |
Example 4: Extracting information from doclinks
The doclink is another rich text element that is frequently used in workflow-based document-creation applications like employee evaluations, contact reporting, and order-ticket or case-reporting systems. A NotesRichTextDocLink class new in Notes/Domino 6 provides access to many properties of the doclink:
- DbReplicaID
- DisplayComment
- DocUNID
- HotSpotText
- HotSpotTextStyle
- ServerHint
- ViewUNID
Methods are limited to two: Remove and SetHotSpotTextStyle.
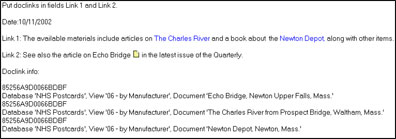
The agent named 4. Extract Doclink Info in the examples database loops through all the fields in a target document. Try out the agent by opening the document named Extract Doclink Info in the examples database. Create some doclinks in the two rich text fields. The example below uses both hotspot links, indicated by the blue text in the field Link 1, and a pasted doclink, indicated by the icon in Link 2:
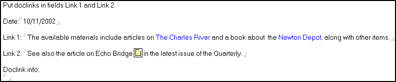
Save the document and run the Extract Doclink Info agent. After you close and reopen the document, you see information from the doclinks and hotspot links—the database replica ID and database, view, and document names collected into a text field:
The agent works by examining all the fields in the target document and, when it finds a rich text field, looping through all the doclinks in the field, collecting the database replica IDs and comments from each link into a variable named allrepids$. When all the fields have been checked, the agent writes the data to a field in the form named dlinfo and exits.
The agent begins by reading the fields in the form used to create the document and setting up a loop that uses the count of these fields as its upper bound to traverse the items in the target document:
Set form = db.GetForm("DLF")
allfields = form.Fields
For j = 0 To Ubound(allfields)
Set item = doc.GetFirstItem(allfields(j))
It checks each document item to see if it is of type RICH TEXT. If it is, it looks for doclinks within the item. If it finds any, it creates an object to represent the link:
If item.type = RICHTEXT Then
Set rti = doc.GetFirstItem(allfields(j))
Set rtnav = rti.CreateNavigator
Set rtrange =rti.createrange
If rtnav.FindFirstElement(RTELEM_TYPE_DOCLINK) Then
Set rtlink = rtnav.GetFirstElement(RTELEM_TYPE_DOCLINK)
The agent parses the doclink object for the database replica ID and other information. The code that does the heavy lifting for this is a simple Do loop:
Do Until rtlink Is Nothing
Call rtrange.SetBegin(rtnav)
replicaid$ = rtlink.dbreplicaid
comment$ = rtlink.DisplayComment
allrepids$ =allrepids$ &Chr(13) & replicaid$ &Chr(13)& comment$
Set rtlink = rtnavBody.GetNextElement(RTELEM_TYPE_DOCLINK)
Loop
If you were interested in setting rather than getting properties of the link, you can do that, too. You can edit the text of a hotspot doclink the same way we set the cell contents of the office supplies table in the first example—navigate to the doclink, set a range for it, and use TextRun to retrieve the text. (If the doclink is represented by a pasted icon, of course, there's no text to edit.) You can also use the RichTextDocLink methods Remove and SetHotSpotTextStyle. This new class makes it easier than it's ever been to get data out of a doclink. And the HotSpotText and HotSpotTextStyle properties are two more ways to programmatically control the editorial style of the database.
Conclusion
These examples are relatively brief, but they demonstrate the use of most of the new rich text classes. In particular, they show the importance of the NotesRichTextNavigator class for traversing the contents of a rich text item. Navigators, working with the NotesRichTextRange class for setting pointers within an item, provide sequential access to all items of the same type within the field. Some of these types are clearly defined objects—tables, sections, doclinks, OLE objects. Others aren’t so easy to identify—Paragraph, TextRun, table cell—but even here the NotesRichTextRange Navigator property gives you access to find and manipulate paragraphs or even amorphous runs of text within a paragraph. Together these new classes give you the programming constructs for disassembling rich text into workable pieces for the first time.
ABOUT THE AUTHORS
Sally Blanning DeJean and David DeJean have been working with and writing about Lotus Notes and Domino for as long as they've existed. They were co-authors of the very first book about Notes, Lotus Notes at Work. Sally, a CLP Principal, has written other books about Notes and is a full-time Notes/Domino developer. David, a CLP, has been an editor and writer for several computer publications. He is a partner in DeJean & Clemens, a firm that develops Notes and Internet applications and technical and marketing communications. |
|