
 |

by
Paul
Godby


Level: Intermediate
Works with: QuickPlace
Updated: 07/01/2003
Inside this article:
Creating the Web page for entering commands
Fomatting command input
Creating the confirmation window
Creating a Java servlet for executing commands
Related links:
Sample code in Sandbox
New features in QuickPlace 3.0
Extending QuickPlace workflow
QuickPlace and DOLS integration
QuickPlace 3.0 documentation
Java 2 Platform, Standard Edition (J2SE) download page
Java Servlet Technology page
Get the PDF:
 (159 KB) (159 KB)

|
 |
QuickPlace 3.0 introduces new administration features not previously available in earlier releases. Among these is a new server task called QPTool, which lets you interact directly with the server to execute specific commands. QPTool allows you to change user names, reset passwords, archive Places, generate reports, and perform a myriad of other useful tasks. While the capabilities of QPTool are powerful, working with the tool itself can present a learning curve because it requires using flags and command arguments. Furthermore, the server task needs to be executed directly on the QuickPlace server, and not all administrators have the ability to access their servers directly.
Wouldn't it be great if you could use a graphical interface for QPTool to interact with the QuickPlace server remotely? If you think so, read on. This article explains how to use HTML, JavaScript, and a little Java servlet programming to create a graphical user interface that can execute QPTool commands remotely. Following this article, you will create an HTML page to receive your input. Then use JavaScript to build a QPTool command based on the given input. Your code will create a confirmation window displaying the current QPTool command. If you confirm the current command, the command is passed to your Java servlet. The Java servlet then builds a command line to execute QPTool.
The QuickPlace 3.0 Administrator's Guide contains a chapter titled "Using QPTool Commands." This chapter includes a list of all the available QPTool commands. For every possible QPTool command, a simple table is given that describes all the flags available for that particular function. This article only discusses the password function. However, our instructions allow you to customize your graphical user interface and to add the remaining QPTool functions.
This article assumes that you're familiar with QuickPlace and its features and that you have experience programming with HTML, JavaScript, and Java.
Creating the custom interface
Before you begin coding, set up a test environment. For the system described in this article, we used two machines. On the first, we installed Domino 5.0.10, followed by the official Domino critical fixpack. We then installed QuickPlace 3.0. (For more information on installing and configuring QuickPlace, refer to the QuickPlace 3.0 documentation.) The second machine in our test environment was for development. We installed the official Sun Java Development Kit (jdk v1.2.2) and Sun Java Servlet Development Kit (jsdk v2.2).
The graphical user interface for your application is created using HTML and JavaScript. For the sake of clarity, we will keep the coding as simple as possible. (You can download all code samples used in this article from the Sandbox.)
The goal is to build a QPTool command that you can submit to a Java servlet on a QuickPlace server for execution. With that in mind, let's examine the following QPTool command example:
password –u "Test User" –pw password –p testplace
This is a sample command for the password function. Without getting into too much detail, a QuickPlace administrator can initiate this command to change the password for user Test User to password in a Place called testplace. The graphical user interface can assemble this command for the QuickPlace administrator.
Creating the Web page for entering commands
Let's begin by building a Web page to input commands to QPTool. Start by creating a new HTML file called qpToolWebAdmin.html. Create a table for the password command that indicates the options available for this particular function. For each option that may require user input, add a text box to the code, and for any option that can be toggled on/off, add a checkbox.
Before you actually begin coding, think ahead to your JavaScript functions. They need to have access to the input located in your HTML table. For this reason, the input is encased inside an HTML form for easier access by your JavaScript functions. Also, pay special attention to the naming conventions used for the input. Notice that the name of our inputs correspond to the QPTool flag they are describing. For example, consider the following HTML code that creates a text input area for the QPTool password command user name flag:
-u <I>name</I> <BR><INPUT TYPE='text' NAME='u'>
As you can see, the flag for the user name input is "-u." Our naming convention simply names our text input area "u" to correspond to the flag. This makes it easier for your JavaScript functions to build your QPTool command. This will become clearer later in this article.
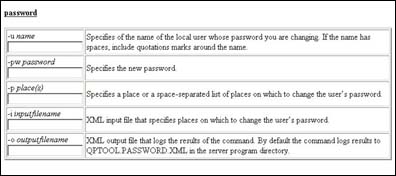
Add the following code to qpToolWebAdmin.html. We are creating an HTML table for the QPTool password command using the aforementioned naming convention for the input. Save the file when finished.
<HTML>
<HEAD>
<TITLE>QPTool Web Administrator</TITLE>
</HEAD>
<BODY>
<P><B><U>password</U></B><P>
<FORM NAME='qpForm'>
<INPUT TYPE='hidden' NAME='qpFunction' VALUE='password'>
<TABLE BORDER=2 WIDTH='100%'>
<TR>
<TD>-u <I>name</I> <BR><INPUT TYPE='text' NAME='u'></TD>
<TD>Specifies the name of the local user whose password you are changing. If the name has spaces, include quotations marks around the name.</TD>
</TR>
<TR>
<TD>-pw <I>password</I> <BR><INPUT TYPE='text' NAME='pw'></TD>
<TD>Specifies the new password.</TD>
</TR>
<TR>
<TD>-p <I>place(s)</I> <BR><INPUT TYPE='text' NAME='p'></TD>
<TD>Specifies a Place or a space-separated list of Places in which to change the user’s password.</TD>
</TR>
<TR>
<TD>-i <I>inputfilename</I> <BR><INPUT TYPE='text' NAME='i'></TD>
<TD>XML input file that specifies Places in which to change the user’s password.</TD>
</TR>
<TR>
<TD>-o <I>outputfilename</I> <BR><INPUT TYPE='text' NAME='o'></TD>
<TD>XML output file that logs the results of the command. By default, the command logs results to QPTOOL.PASSWORD.XML in the server program directory.</TD>
</TR>
</TABLE>
</FORM>
</BODY>
</HTML>
Open qpToolWebAdmin.html in a Web browser. You should see the following Web page:
Formatting command input
Now that you have a Web-based graphical user interface to receive your input, you need to assemble this input into a command format acceptable to the QPTool server task. We use a simple JavaScript function to navigate through all the possible HTML inputs in our table. If an entry exists for the input, add it to your command. Remember the input naming convention mentioned in the previous section? It will make the process of building the command much easier.
Before you build your command, you need a mechanism to start the process. A simple submission button for your Web page should do the trick. Add the following code to the section of qpToolWebAdmin.html underneath the table. This code creates a submission button for your Web page that calls the createCommandline() function when the button is clicked:
</TABLE>
</FORM>
<P><CENTER>
<INPUT TYPE='button' VALUE='Submit' onClick='createCommandline()'>
</BODY>
The input Web page now includes the following button:
Now that you have a button for invoking the function, you need to write the createCommandline() JavaScript function. The purpose of this function is to check all of the input in the HTML form on your Web page. If you enter text for a text input, or check a checkbox input, you need to add that particular flag to your QPTool command. The easiest way to accomplish this is to loop through all the possible inputs, check to see if a value exists for each input, and add to your command as you go.
Add the following code to the <HEAD> section of qpToolWebAdmin.html inside a set of <SCRIPT> tags:
<HEAD>
<TITLE>QPTool Web Administrator</TITLE>
<SCRIPT>
function createCommandline()
{
form = document.qpForm;
commandline = form.qpFunction.value;
for (i=0; i < form.elements.length; i++)
{
element = form.elements[i];
if (element.type == "text" && element.value != "")
commandline += " -" + element.name + " " + element.value;
else if (element.type == "checkbox" && element.checked == true)
commandline += " -" + element.name;
}
createServletRequest(commandline);
}
</SCRIPT>
</HEAD>
Creating the confirmation window
A common method of invoking Java servlets is to use an HTML form with its ACTION parameter pointing to the URL of the servlet. When the form is submitted, the servlet can automatically access any of the inputs located on the HTML form.
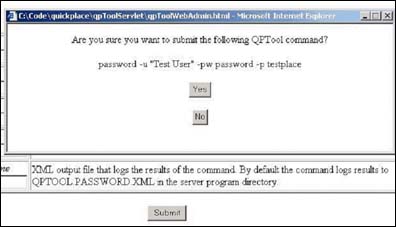
Notice the JavaScript function from the previous section calls another function named createServletRequest(). The purpose of the createServletRequest() function is to create a new confirmation window containing our servlet request. The function writes an HTML form in your child window with the current command as a hidden input. When you submit the form, your command is submitted to the servlet!
Add the following code to the <HEAD> section of qpToolWebAdmin.html between the <SCRIPT> tags. Notice the URL associated with the Form Action? This URL indicates where the Java servlet can be found. You will create the Java servlet later in this article. For now, replace server.company.com with the hostname of your QuickPlace server:
function createServletRequest(command)
{
newWindow = window.open("","QPTool_request","menubar=no,width=600,height=200");
page = "<HTML><BODY><CENTER>";
page += "<FORM ACTION='http://server.company.com/servlet/qpToolServlet'>"
page += "<INPUT TYPE='hidden' NAME='command' VALUE='" + command + "'>";
page += "<P>Are you sure you want to submit the following QPTool command?<P>";
page += command;
page += "<P><INPUT TYPE='submit' VALUE='Yes'>";
page += "<P><INPUT TYPE='button' VALUE='No' onClick='javascript:window.close()'>";
page += "</FORM>";
page += "</BODY></HTML>";
newWindow.document.write(page);
newWindow.document.close();
}
Open qpToolWebAdmin.html in a Web browser. Fill in the text areas with some test data and press the Submit button. You should be presented with a child window that looks like the following:
That's it! You have created a graphical user interface that builds and submits the command for the QPTool password function to a Java servlet. To finish your application, you need to write a small Java servlet to execute the submitted command using QPTool.
Creating a Java servlet for executing commands
In our example, we want our Java servlet code to be as small as possible. The servlet accepts the command parameter, which was submitted via an HTML form in our Web-based interface, and executes QPTool using this command. After QPTool has executed, the Java servlet returns a message indicating it has received and executed the command.
Configuring the QuickPlace server
Before you can write your servlet, you need to make sure that your QuickPlace server is configured properly to run servlets. Use the Domino Servlet Manager for your application. To enable the Domino Servlet Manager:
- Open the Server document for your QuickPlace server.
- Navigate to the Internet Protocols - Domino Web Engine tab.
- Go to the Java Servlets section. In the Java servlet support field, select the Domino Servlet Manager.
- Save and close the Server document. (You may need to restart the HTTP server task for this change to take effect.)
The Domino Servlet Manager references a file called servlets.properties. This file is located in your Domino data directory. If it's not there, create it. You will modify this file for your application.
Your servlet should be available at all times, so you want your servlet to start when the Domino Servlet Manager starts. Furthermore, it's important to note that not all Domino/QuickPlace servers are installed in the default path. This means the QPTool executable your servlet is interacting with could be in an unexpected location. An easy way to solve this problem is to make the path to the QPTool executable an initialization parameter to our servlet. You can accomplish both of these goals by modifying servlets.properties. To do this, open servlets.properties in a text editor and add the following lines, replacing the cmd parameter value with the full path to the QPTool executable on your QuickPlace server. (Note that Java considers the "\" character an escape character in a string. If you want your servlet to get the full, slash-delimited path to the QPTool executable, you need to use double slashes in your parameter. Also note that if you use Notepad to edit the file, it adds the extension TXT to the file name, making it servlets.properties.txt. Remove the TXT extension, otherwise the file will not work.)
# Servlet Initialization arguments
servlet.qpToolServlet.initArgs=cmd=c:\\lotus\\domino\\nqptool.exe
# Load the following servlets when the Domino Servlet Manager starts
servlets.startup=qpToolServlet
Coding the servlet
The easiest way to write a Java servlet is to extend the HttpServlet class. You will be implementing two functions for your servlet:
- The init() function is used to initialize the servlet. Because our servlet executes the QPTool utility (and not all QuickPlace installations are installed in the default path), we decided to make the path to the QPTool executable an initialization parameter. The init() function gets this parameter from servlets.properties.
- The doGet() function is called whenever your servlet receives a request. In our application, this occurs whenever you submit a QPTool command via our custom Web-based interface. The information contained in the request is available to this function. The doGet() function builds a command line by combining the path to the QPTool executable with the QPTool command submitted by our interface. The function then attempts to execute the command line. If the operation is successful, the servlet notifies you that the request was received and executed.
Create a new file called qpToolServlet.java and enter the following code. Compile the code and place the resulting class file in the Domino\Data\Domino\servlet directory located on the QuickPlace server. If the directory is not present, create it:
import java.io.*;
import javax.servlet.*;
import javax.servlet.http.*;
public class qpToolServlet extends HttpServlet
{
private String m_executable = "";
public void init(ServletConfig config)
throws ServletException
{
super.init(config);
m_executable = config.getInitParameter("cmd");
}
public void doGet(HttpServletRequest request, HttpServletResponse response)
throws ServletException, IOException
(
response.setContentType("text/html");
PrintWriter output = response.getWriter();
try
{
String commandline = m_executable + " " + request.getParameter("command");
String s = "cmd.exe /c " + commandline;
Process p = Runtime.getRuntime().exec(s);
output.println("<HTML>Thanks. Your QPTool command was processed.</HTML>");
}
catch (Exception e)
{
e.printStackTrace();
output.println("<HTML>An error occurred while executing QPTool.</HTML>");
}
}
Start your QuickPlace server and test your new application.
Summary
That's it—you have created a custom Web-based graphical user interface for QPTool. You also created the servlet to execute the QPTool server task remotely. Now that we have demonstrated the theory with a small sample application, you can customize your application (or simply add the other QPTool functions to this one). Remember—be creative!
ABOUT THE AUTHOR
Paul Godby works for Lotus Worldwide Technical Sales in Lexington, KY, as a member of the Sametime/QuickPlace SWAT team. |
|