
 |

by
Bob
Balfe


Level: Intermediate
Works with: Notes/Domino
Updated: 05/01/2003
Inside this article:
Creating the custom form
Coding the server addin
Deploying the addin
Related links:
Sample code in the Sandbox
LotusScript: The NotesAdministrationProcess Class in Notes/Domino 6
Domino 6 Technical Overview
Domino Designer 6 Technical Overview
Domino 6 documentation
Domino Designer documentation
Get the PDF:
 (512 KB) (512 KB)

|
 |
The Domino administration process (AdminP) is a server-side mechanism for automating administrative tasks in the background on a specified schedule. Domino’s AdminP supports everything from user renames to file replications. AdminP also has another very powerful but not as well known feature that allows administrators to create their own administration processes and requests. This open interface is how third parties can create their own administration process request handlers and simply “plug” them in to perform administrative functions not supported by AdminP (for example, changing ACLs on all mail files on every server).
This article explains how to create a custom AdminP request handler. We show the code necessary to create the server addin and explain what it does. (You can download the complete code from the Sandbox.) And we show how to deploy the addin. This article assumes you're an experienced Domino programmer.
How the custom request handler works
AdminP is a binary program installed with Domino. This type of binary is called a server addin. (In fact, every process running under the Domino server is essentially a server addin.) The administration process is designed to use the Administration Requests (Admin4.nsf) database on the server to see what work it has to do on that server. Periodically, AdminP runs through all the documents in the Administration Requests database; if a document requires attention at that particular time, AdminP processes the document and marks it as complete by creating a Log document to show what AdminP did. What we will do is create a custom server addin that utilizes the Administration Requests database.
AdminP makes this relatively easy. Unlike most server addins, yours will be notified through the Domino message queue by the AdminP process. AdminP takes care of looking for your request, creating the request response, and telling you when to process the request. A structure is passed to your addin via the message queue. It contains two NOTEIDs, one for the request and one for the response to the request. The only things you have to do are poll your message queue, process the request, and then wait for another message.
The structure AdminP passes to you is called AdminPAddInMessage:
typedef struct {
NOTEID RequestNoteId; /* the note id of the Admin Request note */
NOTEID ResponseNoteId; /* the note id of the Admin Log note */
} AdminPAddInMessage;
Our custom AdminP request handler is a file distribution mechanism that allows the administrator to fill in a custom Administration Requests form (which we will create), attach a file or files to a rich text field on the document, select which servers to deploy the files to, and finally tell our custom process where to place them on the server. Although this may be a simple task that could be done in many different ways, it demonstrates the concept of creating a custom third-party administration process.
Creating the custom form
In Domino Designer, open the Administration Requests database on your administration server (or open a local copy that you can experiment with; we recommend using a test administration server before actually deploying any non-tested code). Create a form and name it FileDistributionProcess.
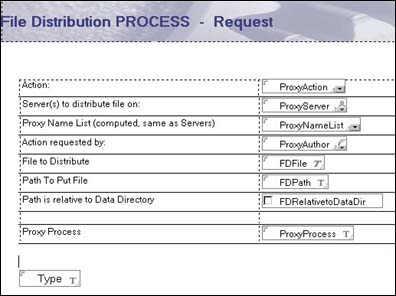
The fields in this form are as follows:
| Field | Description |
| ProxyAction | A number that identifies this administrative action |
| ProxyServer | The servers that receive the file |
| ProxyAuthor | Computed when composed with the administrator's name |
| ProxyNameList | Computed, the same as ProxyServer |
| FDFile | A rich text field that contains the file |
| FDPath | Text field for the path relative to the data directory on the server |
| FDRelativeDataDir | Check box if you want the path to be relative to the server data directory |
| ProxyProcess | Tells the Administration Requests database that our filedist process handles this request |
| Type | Hidden and defaulted to AdminRequest |
The first four fields listed in the preceding table are required for the document to show up properly in the Administration Requests views. Even though we fill these fields in, you will notice a few view problems when looking at your custom requests. As of Domino 6, the largest administration request was number 169. You should make your requests well above this number so that there is no confusion. Third-party ProxyActions should be greater than 5000.
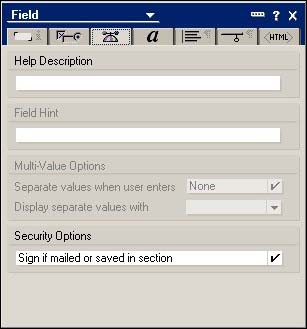
AdminP requires the document and its fields to be signed. So for each field make sure the security option "Sign if mailed or saved in section” is checked in the Field Properties box:
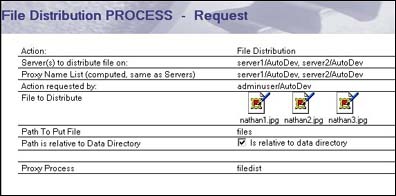
Here is an example of a completed form:
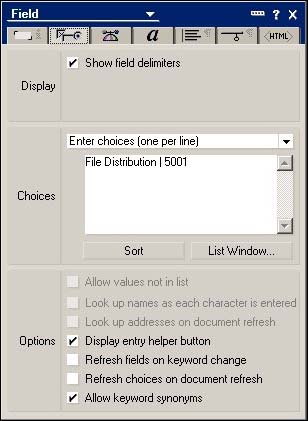
ProxyAction is a simple dialog list field, computed when composed and defaulted to 5001. When displayed, this field shows the value File Distribution. The following screen is an example:
Optionally, if you want to modify the Administration Requests views to properly show your custom requests, you can edit the Action column and show File Distribution for a value of 5001. So instead of getting a view that looks like this:

your view could look like this:

Coding the server addin
Now for the fun part. For simplicity sake, we use MSDEV 6.0 to code this addin. If you want to explore creating the same addin for other platforms, the source code should be 100 percent compatible.
Start by creating a new project in MSDEV. Make it a console application because that is what our server addin is most closely associated with. We use the Lotus C API to write this addin. (You can use the Lotus C++ API, but make sure the proper dependant DLLs are distributed.) Start by looking at the sample addin that comes with the C API in the \server\addin directory. The sample addin is a great starting point, so feel free to copy it and start from there.
Next, set up the project to point to where you install (or unzip) the Lotus C API. The first thing you need to do is point to the \include directory under the Project Settings menu option. The following screen shows our sample project settings:

Notice that we added the C API include directory to the Additional include directories field. You also need to add W32 to the Preprocessor definitions field. This tells the Domino header files the platform on which you are compiling.
On the Link tab, add the C API library and the object files that contain the correct entry points (notes0.obj, notesai0.obj, and notes.lib) to the Object/library modules field. Then under the Input Category, add the path to where the library can be found by MSDEV in the field Additional Library Path. In our example, we entered C: \apis\notesapi\lib\mswin32. Now you can begin coding!
If you created a Simple MSDEV project, then you probably have a function that looks like this:
int main( int argc, char * argv[])
Domino uses its own entry point into the EXE to ensure cross-platform consistency and a common entry point into its addins. You need to replace main with AddInMain:
STATUS LNPUBLIC AddInMain ( HMODULE hModule, int argc, char *argv[])
For our includes, we have some core Domino includes with the standard string and IO functions:
include <stdio.h>
#include <string.h>
/* Lotus C API for Domino and Notes include files */
#include <global.h>
#include <stdnames.h>
#include <addin.h>
#include <nsfdb.h>
#include <nsfnote.h>
#include <osmisc.h>
#include <osmem.h>
#include <ods.h>
#include <ostime.h>
#include <osfile.h>
#include <mq.h>
#include <AdminP.h>
Let’s prototype our function at the top of the listing. This function does all the work. Notice it takes in a pointer to a structure of type AdminPAddInMessage; this is the structure of the message coming from AdminP via the message queue:
STATUS ProcessRequests(AdminPAddInMessage* msg);
We are also going to steal much of the sample addin for this case, but let’s look at each line and see what it means. The first things in our AddInMain function we need to declare are our variables to be used in the local function:
STATUS LNPUBLIC AddInMain ( HMODULE hModule, int argc, char *argv[])
{
/* Local data. */
STATUS error; /* return code from API calls */
HANDLE hOldStatusLine; /* handle to initial default status line*/
HANDLE hStatusLineDesc; /* handle to new default status line */
HMODULE hMod; /* add-in task's module handle */
MQHANDLE hMQ; /* Handle to the Message Queue */
The variables and their explanations are pretty simple (and the C API sample is also well documented), so we don't need to go into great detail for the AddInMain function.
So far so good. The only thing the main function of the addin has to do is poll its own message queue for messages sent to it by AdminP and process the NOTEIDs sent to it. First, set up the normal Addin type information, the Status line and the initialization status:
AddInQueryDefaults (&hMod, &hOldStatusLine);
AddInDeleteStatusLine (hOldStatusLine);
hStatusLineDesc = AddInCreateStatusLine("File Distributor" );
AddInSetDefaults (hMod, hStatusLineDesc);
AddInSetStatusText( "Initializing" );
/* Initialization is complete */
AddInLogMessageText( "File Distribution: Initialization complete." , NOERROR);
AddInSetStatusText( "Idle" ); /* 'Idle' replaces 'Initializing' */
Now for the main loop: Because we rely on the message queue for processing, we need to open the message queue and keep probing it until we are told to quit. For clarity, in the following code message queue calls, the call to our main function that actually extracts the files to the local machine appear in bold:
/* Open the message queue with our process name */
MQOpen (OUR_PROCESS, MQ_OPEN_CREATE, &hMQ);
/* Loop until we are told to quit */
while (!AddInIdle())
{
WORD wRetLen = 0;
AdminPAddInMessage AdminPMsg;
memset(&AdminPMsg, 0, sizeof(AdminPAddInMessage));
OSPreemptOccasionally();
/* Call MQGet to get the next message with a 200 ms timeout */
MQGet (hMQ, (char*)&AdminPMsg, sizeof(AdminPAddInMessage), 0, 200, &wRetLen);
if (wRetLen == sizeof(AdminPAddInMessage))
{
/* Call our Internal Code to do the file Distribution */
if (error = ProcessRequests(&AdminPMsg))
AddInLogMessageText( "Error Processing Request." , error);
AddInSetStatusText( "Idle" );
}
} /* End of main task loop. */
AddInSetStatusText( "Terminating" );
AddInLogMessageText( "File Distribution: Termination complete." , NOERROR);
if (hMQ)
/* End of add-in task. We must "return" here rather than "exit". */
return (NOERROR);
}
We won’t go into the details of the entire ProcessRequests function, but what we will do is explain how to update the Request and Response with the appropriate status. If the file is extracted properly, then we need to fill in the ProxyDbList with something to let the view know the request was completed successfully. We put the last successful file that was extracted in this field:
NSFItemSetText(hLog, AdminP_LOG_DB_LIST_ITEM, pFullPath, strlen(pFullPath));
If there is an error processing the request, then log the error in the ProxyStatus field on the response document. In the code, notice that we use the #define AdminP_LOG_STATUS_ITEM for this. To make sure the view shows a fail icon, we need to populate the ErrorFlag field with a 1:
sprintf(szMsg, "Unable to extract file %s" , pFullPath);
NSFItemSetText(hLog, AdminP_LOG_STATUS_ITEM, szMsg, strlen(szMsg));
NSFItemSetText(hLog, AdminP_LOG_SHOW_ERROR, "1" , sizeof( "1" )-1);
Finally, we simply update the request and response notes, close them, close Administration Requests, and return to the main addin function.
Deploying the addin
Now you need to deploy the addin on each server on which you want to use it and deploy files. Copy the filedist.exe to the servers binary directory. This is the same place where nserver.exe is located on Domino running on Windows. You can also add a setting to the ServerTasks variable in Notes.ini, for example:
ServerTasks=Update,Replica,Router,AMgr,AdminP,CalConn,Sched,LDAP, filedist
If you email to or create the request in the Administration Requests database, you can from the server console (or the remote console) enter tell AdminP process all to process all requests. If the requests are processed correctly, you see the normal completed log, for instance:
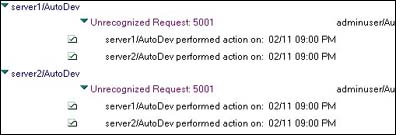
And of course if there is an error, you can expect something like this:

Summary
Here is a quick checklist of what we covered:
- Creating a form for your custom AdminP request.
- Ensuring each field is signed.
- Creating a Win32 console project:
- Setting all of the include and library paths
- Linking in the notes.lib, notes0.obj, and notesai0.obj
- Defining W32 so the Domino headers know your platform
- Coding the addin using the Domino message queue.
- Copying the new addin to the server.
- Launching the addin manually or adding it to the ServerTasks line in Notes.ini.
You’re done; your addin is ready to go! You can now begin filling out File Distribution forms in the Administration Requests database and watch the files get put on all specified servers. Remember, your Administration Requests database is also a mail-in database, so any agent, application, or database can programmatically create those requests. Good luck!
ABOUT THE AUTHOR
Bob Balfe is a Senior Software Engineer for IBM and is the project leader for the internal automated testing tool called DNA (Domino and Notes Automation). Bob is also a developer on the Domino Administration team. |
|