Imagine that you've created a masterpiece application that acts as a front-end to your business for both internal and external users. It consists of several different Domino databases, plus links to affiliated organizations:
- What's New
- Products
- Services
- Corporate Info
- Employee Phone List
- Project Tracking Applications
- Document Library
- Community Discussions
- Related Links
In each of these main areas, you might have subcategories, such as a list of products or document types. It quickly becomes a challenge to present all of the possibilities to the user in a coherent way. This is the challenge of defining an information network for the Web.
That's where the new R5 Outline Designer comes in. It helps you organize your application and present it to the user in a structured way. As you will read, the new Outline design element in Domino Designer gives you complete control over not only what displays to the user, but also how it displays. Like other new features in Domino Designer R5, you can express an Outline in HTML or as a Java applet when it runs in a browser. In the Notes client, it provides additional functionality, like the ability to drag documents to folders. (For more information on Domino Designer R5 features, see the article "Domino Designer R5 Technical Overview.")
Note: To see Outlines in action, download the Domino Designer R5: Outline Sample Application. You must use the database with the gold version of Notes R5 and Designer R5. To learn more about the application, open the database in Designer and read the About document.
What is an Outline?
Conceptually, an outline forms the outer shape or contour of an object, as in a sketch for a painting. For writers, an outline represents the plan or structure of a work, with the details provided in each section of the outline. For example, the outline for this article is the following:
- Introduction
- What is an Outline?
- Outline basics
- Some examples
- Conclusion
You can understand what's in the article right away by looking at the outline. Then, you can decide whether it's worth delving into the details, or move on.
A Web site or application should be no different, but often the underlying structure of the site is lost in a bad user interface (UI). A good UI reveals the top-level possibilities of the site so that the user can decide where to go. An outline on the Web goes further in that it also allows the user to freely navigate to different parts of the site in one or two clicks. An example would be the Lotus corporate site, www.lotus.com. It provides a very structured view of the site along the left side. This structure (which is actually a Domino view) is always there and provides an anchor for the rest of the site content. It doesn't give you every link in the site, but it does give you an entry into the most important parts of it. Clicking on one of the top levels opens up another level, so you can easily go to Products, then Domino Server, to find out information about Domino.
The Outline in Domino Designer R5 is a design element that combines the best aspects of Notes and Domino with the best of the Web. It takes everything that you can do with views, folders, and navigators, and everything that you can do with HTML links, and brings them together in one design element. This makes it easier to create, manage, and update a set of related links in the application. For example, you could easily design the navigational structure of the Lotus site using the Outline. You can define the site structure, consisting of links to many different applications located around the world, in one place. Adding a link to the site is simply a matter of defining a new Outline entry.
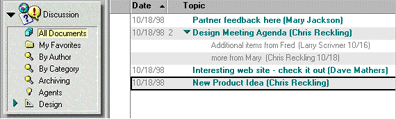
To illustrate this next generation of navigation, let's look at a current R4.6 discussion application. The following screen shows a typical discussion forum. Along the left side is the navigation pane with a list of the views and folders in the discussion, such as All Documents or By Category. Clicking on something in the left pane causes the view to appear in the right frame -- pretty standard behavior.
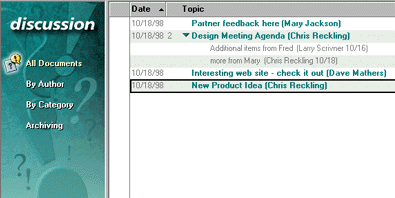
Now, if you want to change the default icon that appears next to the view, change the text label for the view, or add a background color, you would use a navigator. A navigator gives you the flexibility to add graphics to your design presentation, but it also has the limitation of being static. If you want to provide a hierarchical list of views, for example, then you have to use multiple navigators, each with a slightly different look. The following screen shows a navigator for our typical discussion forum.
The Outline feature allows you to combine the ease-of-use of the view list with the graphic flexibility of the navigator. Outlines provide a list of links to a variety of sources, such as views, forms, or actions. The label is separate from the link, which gives you flexibility in naming it, and you can add graphics to the Outline in a number of ways, which makes the labels look good. What used to take four navigators now only takes one Outline, saving space in the database and making maintenance easier.
Another goal of the Outline is to provide new users a way to start planning their sites. For instance, you start by deciding what the most important areas of your site are, and then add Outline Entries to define the site structure. Later on, you can fill in the actual areas of the site by completing all of the details of a fully functioning Web site -- like adding forms, views, pages, graphics, and other media to the site.
Outlines are similar to other Web design tools that create site structure views (NetObjects Fusion) or site diagrams (Microsoft FrontPage), in that they provide a high-level view of the Web site and let you change the relationship of the site elements in this view. Outlines are different than these other tools in that they allow you to link to objects other than pages -- you can link to forms, views, databases, and framesets. They go beyond what a standard Web site map or other such navigational aides provide by dynamically generating, which means that you can program their runtime behavior, as you'll see below. Finally, Domino Designer gives you a lot more flexibility in designing multiple site structures. You can have more than one Outline in a database.
Outline basics
There are three basic steps to creating and using an Outline:
- Design the Outline structure using the Outline Designer. You provide a label for the Outline Entry and a link to the page to display when the entry is clicked.
- Use the Outline by embedding it on a page or form. This is where you set the Outline style and text properties.
- (Optional) Include the page with the Outline in a frameset.
The next sections take you through these steps in detail.
Designing your Outline with the Outline Designer
The Outline Designer appears in the Design pane of Domino Designer along with the rest of the available design elements. To create an Outline, click on Outline in the Design List, and then click the New Outline button. An Outline consists of Outline Entries, with each entry representing a link to something -- a page, form, view, folder, document, frameset, or URL are all valid link destinations. Click the New Outline Entry button to add an entry. In addition to links, Outlines also support running actions, programmed using the formula language. If you want to base your Outline on the existing views and folders in the database, you can select the Generate Default Outline button to prepopulate the Outline. The following screen shows the different Outline Entries that make up our sample Outline:
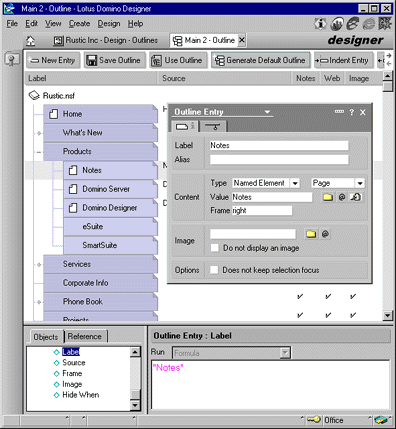
Notice that when you add a new entry to the Outline, you can set properties for its label, source, frame target, and image. These values may either be hard-coded or computed, depending on the application. For now, let's just take a look at what each property does:
Label - The label is the text that the user sees, such as the view or page name.
Source - The source value is the link or action. A link can be one of three types:
- A URL, which is a standard Web URL, such as http://www.lotus.com
- A link, which is a standard Notes link pasted from the clipboard
- A named element, which is a design element referred to by its name, such as Home Page. Part of the Source information is the target frame, which lets you specify which frame the link should appear in.
Image - The image value is the icon that appears to the left of the Label text. So now, instead of being limited to the folder and view icons supplied by the Notes client, you can specify any image you want. Images reside in the Image Resources design element, and can be referred to by name, alias, or even be computed, for maximum customizability and reusability. (For more information on Image Resources, see the "Image Resources sidebar.")
Hide/When - The Outline entry supports hide/when formulas, so you can decide programmatically whether to show someone the entry, for example, based on their access rights, user name, time of day, or other criteria.
There are a couple of shortcuts to creating an Outline entry. You can copy a link to a design element or document to the Clipboard and paste it into the Outline. To do this, view the design element or document you want to link to, then select Edit - Copy as Link - Named Element (or doclink). Now that the link is on the Clipboard, you can either paste it directly into the Outline Designer, which creates the Outline entry for you, or paste it into an existing entry by setting the source type to "Link" and clicking the Paste button in the properties box. A second shortcut to creating entries is by simply copying and pasting entries directly, either from within the same Outline or from a different Outline. Select the entry you want to copy, choose Edit - Copy, then select Edit - Paste.
Also in the screen above, notice that you can indent Outline entries, which lets you define the relationships among the entries in a hierarchical fashion. For example, under Products, we can list all products. To define this relationship, we simply indent the entry using the button on the action bar or by using the Tab key. Again, this helps you to organize your information so that a user can find what they need, but not be overwhelmed by the number of choices given at any one time.
Using the Outline and giving it some style
In order to use the Outline in your application, you must add it to a form, page, or document. This is an important concept -- only the structure of the Outline is handled by the Outline Designer. However, you can separately define the style of the Outline for each embedded instance of it. The separation of structure and style allows you to use the Outline in multiple places in the application and apply different styles to it. You might want a text-only version of the Outline at the bottom of certain documents, but a fancier graphic representation for the main site. Or, you could provide high and low bandwidth versions of the same application simply by using a differently styled Outline. It also lets you modify the Outline structure in one place and have the changes flow to each of its embedded instances, making application maintenance easier. For example, if you added a new section to the site, you would modify the Outline design. Everywhere that you used the Outline, it would inherit the design change automatically -- just like when using subforms in R4.x.
Whether or not you choose to embed the Outline on a form or page depends on how you want to use it. Embed the Outline on a form if you want to create a page template for a number of different pages that you will create. For example, in a discussion database, you could use the Outline to always present to the user a way to easily navigate to other views, create a new document, move to the next document, and so on. The Outline would be embedded on the Main Topic form and all documents created with that form would have the Outline on them. Embed the Outline in a page if you want to use it as part of a frameset or when you need to style it differently for each page. (For example, text-only in one case, or displayed as buttons in another case.)
In our example, let's add the Outline to a page, so we can use it as a navigation bar in a frameset. First, in the Outline Designer, click the handy Use Outline button. This creates a new page and adds an embedded Outline to it. If you are working with an existing page, choose Create - Embedded Element - Outline to add the Outline to the page. In this case, you need to provide the name of the Outline that you wish to use, since more than one Outline can be defined per database.
There are a number of properties that you can set to control how the Outline looks and acts when it runs in the client. The embedded Outline has four main areas that can be manipulated with the properties box: the background, title area, top-level area, and sub-level area, as shown in the following diagram:

You change four major types of properties for these different areas, which are presented in the following tabs. (The other tabs on the properties box apply to the paragraph in which the Outline is embedded, and are part of the standard text properties for alignment, margins, and hide/when properties.)
As shown in the following screen, the Basics tab of the Embedded Outline lets you control the size of the Outline and certain global behaviors, for example, whether to show the scrollbar, display the Outline vertically or horizontally, or whether to use the Java applet or HTML for the browser. Using the applet produces an Outline on the Web that mimics all of the functionality you have in the Notes client, with the exception of the drag-and-drop capabilities.
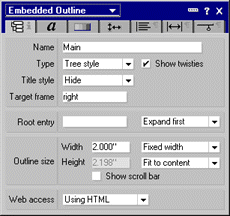
One key setting on the Basics tab is the Outline Type, which can be either Tree or Flat style. Tree style shows the hierarchy you set up all at once with twisties to expand the hierarchy, while Flat shows only one level at a time. Use this in conjunction with the Title style setting. Choosing Simple or Hierarchical with Flat Style replaces the database title with the name of the level that you have clicked on. This gives the user a way to traverse back up the tree to the top level again, by clicking on the Title text. Each time you click to navigate to another sub-level, the Outline replaces the database title with the name of the level you came from.
One key setting on the Basics tab is the Outline Type, which can be either Tree or Flat style. Tree style shows the hierarchy you set up all at once with twisties to expand the hierarchy, while Flat shows only one level at a time. In the Title style setting, choosing Simple or Hide. Simple displays the title of the database and Hide hides it.
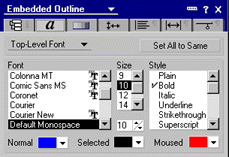
The following screen shows the Fonts tab, which allows you to set the font and style of the Outline title (if shown), top-level, and sub-level areas. You can also specify different colors for when the mouse is over the text and when the text is selected.
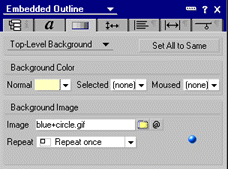
The following screen shows the Backgrounds tab, which controls colors and images that appear as part of the Outline for the background, title, top-level, and sub-level areas. You can specify a color and/or an image. If you select an image, it can be tiled in various ways over the entire area or just shown once. Images are stored in the Image Resource design element.
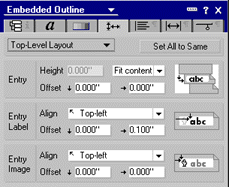
Finally, the following screen shows the Alignment tab, which sets all of the positioning attributes in the Embedded Outline for the title, top-level, and sub-level areas. You can align text and images precisely and also decide the absolute height for each of the areas. For instance, you could specify the Title area to be exactly ½ inch high and center the Title text in that area.
Using the page with Outline in a frameset
Once you have your Outline on a page, you can add it to a frameset. In our example, we used a simple two-frame design for the sake of clarity. Simply create a new frameset, specify two frames and use the frame properties box to add the frame content. For instance, the page with the Outline on it would go on the left side. After saving the frameset, you'll need to set the database launch properties to launch the frameset, instead of the last view. Then, when you open the database in Notes, it will open to the frameset you just created.
Some examples
Let's take a look at a few different styles of Outlines. For simplicity's sake, we'll embed the Outline in a page that's part of a two-pane frameset. We'll use the same Outline that we created in the Outline Designer above, and style it in various ways.
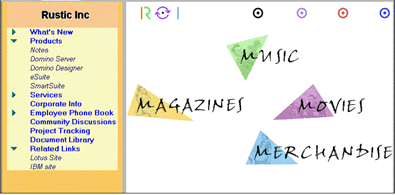
The following screen shows a simple Outline with the basic site structure:
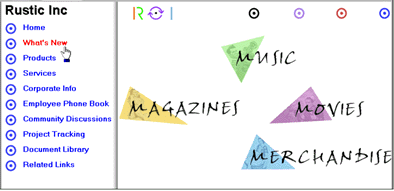
Now, let's use some of the Outline properties. The following screen shows the same Outline with the Title showing (Rustic Inc) and different colored backgrounds for the different areas:
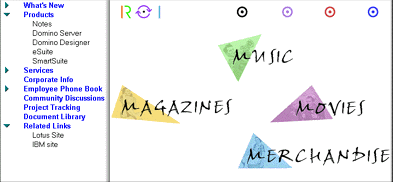
Here, we've changed the Outline Type to Flat Style with a Hierarchical Title (so the twisties no longer display). In addition, we've added some images to act as buttons for the top and sub-levels.
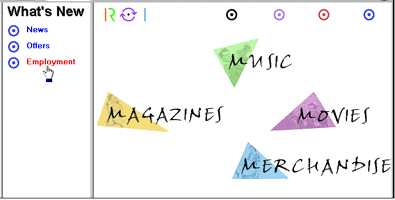
The following screen shows the same Outline after we've clicked the "What's New" top-level title. Notice that "What's New" now appears as the Outline title, and the different sub-levels now display.
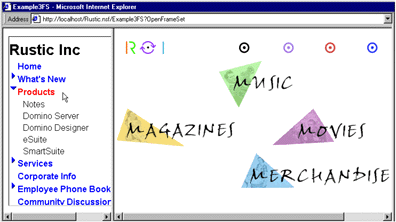
Finally, this screen shows how the same Outline appears when using the applet on the Web:
Conclusion
As promised in our article outline at the beginning, here is the conclusion of the article. The Outline Designer is another powerful tool to add to your bag of tricks for creating and defining the structure of your application or your entire site. It goes beyond basic static navigation bars by adding the features that you are used to in Domino applications -- the ability to customize and program applications dynamically at runtime. Once the Outline is defined, you can use it in multiple places on the site, each with a different look and feel. I think that you'll find the Outline to be very useful in designing the next generation of Web sites.
BIOGRAPHY
Chris Reckling is the Product Manager for Domino Designer. Previously, he worked on Notes Designer R4.6 and Lotus BeanMachine. Chris has been with Lotus for over 8 years. He has a Bachelor of Music degree from Berklee College of Music and still likes to play both jazz guitar and acoustic bass, when not wrestling with his two boys!