 | 
by
Barbara
Landino


Level: Beginner
Works with: All
Updated: 06/16/1997

Inside this article:
Eliminating the dial-in middleman
Before you leave the office

Related links:
Replication Tuning for Mobile users

Get the PDF:
 (265Kb) (265Kb)

|  |
The frequent flyer or telecommuter needs fast, accurate dial-in connections to work off-site on the latest replica or to maintain scheduled replication. The hope is to dial-in anywhere, anytime without having to enter phone numbers manually. Even the occasional worker-at-home wants to avoid a wrong number message. You can take advantage of Notes connection capabilities by setting up a dial-in process for your situation.
For the sake of convenience, you want to be able to connect on the first try. However, there is a more critical reason to have the correct dial-in setup. Notes uses the same phone information if you are dialing in for scheduled replication in the background. If you are connected, and the phone numbers to servers are correct, scheduled replication kicks off by itself, an invisible drone assuring you of the latest data. (Typically, only one phone call need be placed if you are running Notes 4.0 or greater. Servers running these versions support passthru connections to other Notes servers.) If the number is wrong, the connection fails, and your scheduled replication is stalled.
This article explains dial-in setups that meet a variety of conditions. The setup process described is for connection from a Notes workstation to a Notes server over an XPC dial-in. Your organization may also have RAS or other third-party software that connects you to a network. If these are available to you, the dial-in process will be different and is not explained here.
Notes makes the call
The setup process is a bit like the ant and the grasshopper fable -- a little effort ahead of time yields dial-in survival on the road. Notes knows how to dial and builds the correct phone number from information in the Location document -- where you are calling from -- and Connection document -- where you are calling to.
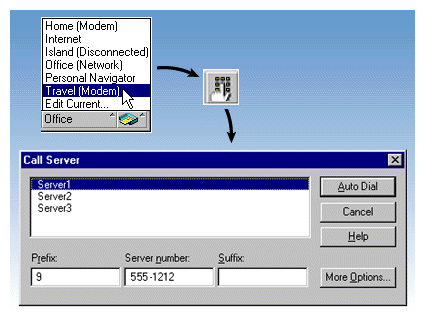
The dial-in procedure is accomplished with a minimal number of clicks.
- Choose your mobile location from the taskbar location list.
- Click the SmartIcon.
- Select a server from the Call Server popup and choose the Auto Dial button.

On the chance that the dial-in did not connect, you can override the phone number manually in the Server number field. These numbers are not saved. If the server simply did not answer or was busy, you can try an alternate server.
Eliminating the dial-in middleman
Notes offers three levels of dial-in. For each higher level, you rely more on Notes and less on human intervention. First, there is manual dial-in. You may be questioning whether the setup process is worth the effort for someone who only dials in occasionally. To answer the question, ask if you can count on the dial-in middleman to enter the correct phone number. With manual dial-in, you are the middleman. As long as you enter the number correctly, and the server is answering, you will get a connection. If you are just reading your mail and not working in a database, you can get by with manual dial-in. Will you remember the number or must you check the number each time?
The next level is semi-automatic dial-in. In this case the dial-in middleman is your system administrator and typically, a reliable person. As a new user, you may have had default Travel (Modem), Home (Modem) and Office locations that your administrator set up in a user profile. You will see these locations in the taskbar and they will suffice for most situations. If there is a connection problem, an override on the fly can fix it. Of course, if you must override repeatedly, you should check the numbers in the connection and location documents. Once again, you may have problems with scheduled replication when calls do not connect.
The most seamless method is automatic dial-in where Notes eliminates the middleman and does the work for you. Simply create the server connection documents and Location documents and lose the potential for missed replication and travel-weary frustration. All that may be required is some fine-tuning of your existing Location documents plus the addition of a few Location documents unique to you.
Before you leave the office
Once you have decided to set up automatic dial-ins, you have some prerequisite tasks.
- Decide what databases you will need and think about how to replicate them. You will always want your mail and any working databases. You can specify selective replication, choosing to replicate only parts of a database. You can also choose truncated replicas that pass limited kilobytes of data. Replicate the databases at the last possible moment before you leave the office. (For an in-depth discussion of mobile replication and related issues, revisit Doug Conmy's Replication Tuning for Mobile users article from a previous issue of Iris Today.
- Do some planning and number gathering. Think about where you might be and what numbers you'll need. In addition to the phone numbers, you need to know outside access codes, calling card access, credit and calling card numbers, area and country codes. Think about how to get outside access from a hotel room, which can be one of the most frustrating situations.
- Make sure your modem is installed, assigned to a port, and working. Refer to your modem documentation.
- Know what ports are available on your system. Refer to your system or laptop documentation, as each system has its own requirements and provides the information in different ways. For example, if you are using Windows NT or Windows 95, check the Start - Settings - Control Panel - Modems to see the ports that are assigned to any installed modems. Laptops frequently use Com2. Notes always recognizes its own modem and dial-in settings and ignores other operating system settings. For example, if your outside access code is set for 8 in Windows Dial-in Networking, but is set for 9 in Notes, Notes only recognizes the 9 to construct the phone number.
- You should include a passthru server name in the Location document. This will be the default server Notes will call if you do not have a connection document for a specific server.
You have three tasks to complete the setup:
- Set up and enable ports in Notes.
- Set up your Location documents.
- Set up your server connection documents.
Setting up ports
This task was probably done for you by your system administrator at installation. But check that the ports you assign for modems are enabled.
- Choose File - Tools - User Preferences.
- Choose Ports.
- At Communication Ports, select a com port.
- Check Port Enabled.
- Specify the modem settings by checking Port Options (The button name changes dynamically with the selected port. On choosing Com2, the button changes to Com 2 Options). Finish selecting the modem settings, such as flow control, ltimeout , and baud rate. Then choose OK to close each of the dialog boxes.
Setting up Location documents
Set up Location documents next so you have a list of valid locations to choose from when you create the server Connection document. In general, use the Location document to add the extra numbers -- outside access, calling cards, credit card access and the like -- to the standard phone number. (For problematic connections, a separate connection document may be the solution. Some of these are described in the section "Exceptions for connections" later in this article. )
Use obvious names, such as Hotel, Hotel Chain names, or cities to which you travel frequently. There is no reason to limit the number of your location documents. If you have an erratic travel itinerary, you can simply add to the locations for each new place you travel. On the other hand, you may prefer one generic location document that prompts you for the time, date, and phone every time you choose the location.
To set up a Location document:
- Choose File - Mobile - Locations.
- Choose Add Location.
- In the Basics section, choose Dialup Modem as the Location type and enter a name. If you frequently cross time zones, area codes or have different dialing prefixes and will be using the same location, then you should choose Yes for the "Prompt for time/date/phone" option.

- In the Ports section, select the com ports.
- In the Phone Dialing section include all the location dial-in codes: a prefix for outside access, an international prefix or country code, your long distance prefix, and calling card access numbers and credit card number suffixes. You will have to experiment to see if your entries produce the correct number sequence. Just click on Dialing Rules to see your current entry in the Dialing Rules dialog box (a fraternal twin of the Call Server popup).
- Complete the remaining fields according to your preferences.
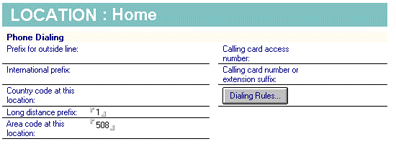
The following illustrations show (only) the Phone Dialing section of sample Location documents. The Location: Home document sets up a location off-site, in the same local calling zone. Notes will take the server number and ignore the area code and long distance code. The other fields are required from this location.

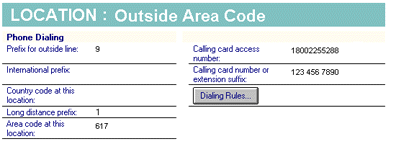
The Location: Outside Area Code document sets up a location off-site in a different calling zone. When this location is active, Notes will know to use the server's area code, found in the Connection document, and will access the phone service provider and charge the call to the credit card.

Notes uses the server phone number from the following Connection document for Server1 to determine the correct phone number to dial from the Home and Outside Area Code locations in the previous illustrations.

Setting up server connections
Set up a connection document for each server. One connection per server is generally sufficient. To set up the connection document:
- Choose File - Mobile - Server Phone Numbers.
- Choose View - Server - Connections.
- If the server you want to connect to is listed, double-click on the name to examine the settings and edit as necessary.
- In the Connection document, choose Dialup Modem as the connection type and specify No in the Always use area code field.
- Enter the phone number. If you have an unusual connection situation, consider creating a connection document for a single troublesome location or connection.
The following diagram illustrates a connection to a server in which the dialing involves electronic voice responses to an access number and credit card number entry. Commas (two seconds each) were added to match the delay of the electronic voice and hash marks perform as modem control characters. This will be the most challenging type of connection document, so the reward of seamless automated dial-in is well worth the setup time.

Complete the connection information in the Advanced Options section and choose your preferences.
- In the Only from Location(s) field, select only the locations where you will be calling to the server or use the asterisk ( * )to include all locations. If a particular location does not have a modem, the connection document and the ( * ) are ignored.
- In the Only for User field, enter a user name (yours, for example), if more than one user has access to the workstation or laptop. If you have multiple logons, choose the asterisk ( * ) so the connection document recognizes you under any of your logons. This is the default and most users would not need to change this unless you shared a laptop with someone.
- In the Select a modem port field, use the asterisk ( * ) to allow any listed XPC port that is available to be used. In general there would only be one port for each location, but it makes the connection more reliable if the user renames a port or uses different ports in different locations. In either case, the asterisk ( * ), which allows any port, would enable the connection process to continue. Close and save the document.
Exceptions for Connections
In general, the Location document is the place for extra dial-in data. But some conditions are handled more quickly by including the information in the connection document.
- Individual connections for troublesome locations or odd access situations. In the Connection document, you have the opportunity to set up Connection documents with a server phone number that includes all the phone information. This may be the smoothest solution for dialing in to foreign locations with credit card and access prefixes and suffixes. For example, if you stayed at the same Paris hotel, you could set up a Paris Hotel location and a server Connection document specifying only the Paris Hotel location. If you expected to call the same server from other locations, you would also include a Connection document that included all locations except Paris Hotel.
- Multiple server phone numbers. If the server has multiple phone numbers, enter them in the phone number field separated by a semicolon (;). The server name appears separately in the Call Server popup for each phone number.
- 800 numbers. If the server has an 800 number, you can create a separate connection document and enter the entire number in the phone number field. This may be an advantage if you travel outside the United States and Canada, as 800 numbers are not recognized elsewhere.
You also have the option of executing scripts on connection to the server. Sophisticated users who have unique requirements can execute programs with the connection. However, most people can do most of their work without them.
Helpful hints
Auto dialing is the smoothest method and most error-free method of connecting remotely to a server. The actual time spent filling in connection and location documents is minimal. You will congratulate yourself the next time you are on the road and establish a seamless connection.
You may find the following tips helpful:
- Disable call waiting to avoid unanticipated termination of the connection. Enter the code, usually *70, in the prefix field of the Location document.
- To cancel a call in progress, use CTRL + BREAK. To cancel a call for scheduled replication, click the Stop button on the Replicator to terminate the call.
- Stack your replicas. The Local replica is the default for remote locations and should be on top.
- You will have the greatest flexibility by providing the Country code, Area Code and Local Phone Number for all servers.
- Change numbers on the fly, if necessary, from the Call Server popup.
- Make sure you switch to a mobile location before you auto-dial. The message "No ports capable of calling are in use..." generally indicates the wrong location. You can use File - Tools- User Preferences - Basics and select the option " Prompt for location," as illustrated in the dialog box segment below. This option presents a dialog box for choosing the current location when you start Notes.

- To delay dialing for certain access codes that have electronic voice responses or unusual timing, us a comma for each two-second delay. Experiment to get the right timing.
- See your system administrator for international calling to get the right country codes.
- Test as many of the numbers as you can before you leave. This may only be possible for the server number and not the credit card or hotel outside access.
 Monitor your connection with the modem icon on the left side of the taskbar. When Notes and a server are communicating, the red and green lights flash. If the connection is idle, the lights are yellow. Monitor your connection with the modem icon on the left side of the taskbar. When Notes and a server are communicating, the red and green lights flash. If the connection is idle, the lights are yellow.
 Don't forget to hang up. In the foreground, disconnect with a click on the SmartIcon. Generally, a modem or data transfer timeout is in effect, but a click on the SmartIcon is more economical because the timeout occurs sooner. If the connection was made in the background for scheduled replication, Notes will hang up if the Hang up entry is checked and you did not use the same connection to work on databases on the server. Don't forget to hang up. In the foreground, disconnect with a click on the SmartIcon. Generally, a modem or data transfer timeout is in effect, but a click on the SmartIcon is more economical because the timeout occurs sooner. If the connection was made in the background for scheduled replication, Notes will hang up if the Hang up entry is checked and you did not use the same connection to work on databases on the server.
Take advantage of Notes flexibility of connection options to set up your ideal environment. Look at your situations and personal preferences to set up autodialing customized for you.
ABOUT THE CONTRIBUTORS
Louis Bradbard suggested the idea for this article. Lou is an Iris Associates QE engineer and is familiar with dial-in procedures from his pre-release testing assignments in this area. He enjoys mountain biking and skiing.
Doug Conmy has been with Iris since September of 1991. For Notes Release 4, he helped refine Notes for remote use, the focus of this article. Recently, he has focused his energies on Calendaring and Scheduling in the latest release of Notes. Before joining Iris, Doug worked at Wang Labs which he joined straight out of college. In his off-hours, Doug enjoys skiing, traveling and spending time with his 3 year old daughter, Kaitlyn.
Copyright 1997 Iris Associates, Inc. All rights reserved.
|