 |

by
Damien
Katz


Level: Intermediate
Works with: Designer 5.0
Updated: 10/01/1999

Inside this article:
Creating the Welcome page database
Modifying the Bookmark template
Adding the Welcome page to new Notes installations
Maintaining the design for future upgrades
Ideas for your new Welcome page

Related links:
Domino Designer R5: Framesets
Notes R5 Technical Overview
Robby Shaver: UI Guy
Knowledge management in R5
R5 Application Development Best Practices Guide

Get the PDF:
 (222 KB) (222 KB)


|  |
Notes R5 rolls out the welcome mat for users with its new default startup page -- called, appropriately enough, the Welcome page.
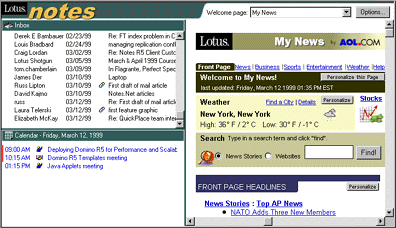
Any user can easily personalize the Welcome page with different layouts, content, and features. You can select from different Welcome page styles and personalize them, or you can create your own. For example, the following page style includes the personalized "My News" service by Lotus and America Online, as well as your Inbox and calendar:

However, what you may not realize is that as an administrator, you can customize the Welcome page to make it specific to your organization. You can provide a new page for users that integrates the existing Welcome page design, but offers specialized, company-specific content and features.
This article takes you step-by-step through the process of creating a custom Welcome page designed for a fictional company named Katzkorp. The first thing you'll do is create a new database where the design of the new Welcome page will live, then you'll modify the Bookmark database to display that Welcome page design. The last step is to polish up the new Welcome page with cool R5 features.
At a minimum, you should be familiar with Domino Designer and have some basic experience creating databases. Once you have the initial work done, you can make your custom Welcome page as simple or as complex as you want, you're only limited by your imagination and skill.
Creating the corporate Welcome page database
The design for the standard Welcome page lives in the Bookmark database (bookmark.nsf). Based on users' choices, it loads different framesets, and the frames in those framesets load other things like Web pages, Inbox, calendar, or subscriptions. What we want is to add a custom Welcome page choice that loads special corporate specific content and information.
One way you could go about customizing the Welcome page would be to store the new design in each user's Bookmark database. However, because every user has their own separate Bookmark replica and therefore can't use replication, updating the design for every user quickly becomes a nightmare.
A better way to customize the Welcome page is to create a separate, corporate Welcome page database for your organization, and have the new design live in this one remote database. Then you modify the standard Bookmark database to display the remote Welcome page database. Whenever users start up Notes, their Welcome page will automatically load your custom Welcome database.
The most important part of the corporate Welcome page database is the frameset we create, called "MainWelcomeFrameset". This design element is what is displayed to the user. We display a frameset to the user because at any time it can be modified to display anything from a single page to any combination of forms, pages, views, folders, Web pages and even other framesets. Read more about framesets here.
To start out, you're going for simplicity. Therefore, your corporate Welcome page database is going to have a one-frame frameset that displays a very simple page. Later, you can worry about making your Welcome page more sophisticated.
To create your corporate Welcome page database:
- In Domino Designer, choose File - Database - New. Complete the fields and click OK. You can choose -Blank- for the template, just to get started.
- In the design pane for the Welcome database, click Pages.
- Click New Page.
- In a centered, big bold red font, type "Welcome to Katzkorp, Plankton is Job One!"
- Choose Design - Page Properties.
- In the Page properties, enter "MainWelcomePage" in the Name field.
- Save and close the page.
- In the design pane, click Framesets.
- Click New Frameset. Keep the default two-frame arrangement and click OK.
- Select the right frame and click Delete Frame so you have a one-frame frameset.
- Choose Frame - Frame properties.
- In the Frame properties, choose "Named Element" for the type, and then click the folder icon.
- In the Locate Object dialog box, select "Page" for the kind of object, "Current Database" for the database, and "MainWelcomePage" for the page. Then, click OK.

- Choose Frame - Frameset properties.
- In the Frameset properties, enter "MainWelcomeFrameset" in the Name field.
- Save and close the frameset.
You now have the basic framework for your new corporate Welcome page. The next step is to modify the standard Bookmark template (bookmark.ntf), so that it knows how to load the Welcome page you just created.
Modifying the Bookmark template
Now that you have a new corporate Welcome page in place, you need to modify the Bookmark template. The modifications to the Bookmark template allow your users to access the new corporate Welcome page database. The first step is to create a frameset that always loads the MainWelcomeFrameset in your Welcome database. Then, you'll add the selection for your users' dropdown Welcome page list so users can choose it like they would any other Welcome page layout.
Note: You might want to create a backup copy of your standard Bookmark template before proceeding.
Creating the frameset
- In Domino Designer, open bookmark.ntf and navigate to the framesets.
- Click New Frameset. Keep the default two-frame arrangement and click OK.
- Select the right frame and click Delete Frame so you have a one-frame frameset.
- Choose Frame - Frame Properties.
- In the Frame properties, select "Named Element" for the type, and then click the folder icon.
- In the Locate Object dialog box, select "Frameset" for the kind of object, your new Welcome database, and "MainWelcomeFrameset" for the frameset. Then click OK.

- Choose Frame - Frameset properties.
- In the Frameset properties, enter "KatzkorpWelcomeFrameset" in the name field.
- Save and close the frameset.
- In the Framesets work pane, select the frameset you just created.
- Choose Design - Design Properties.
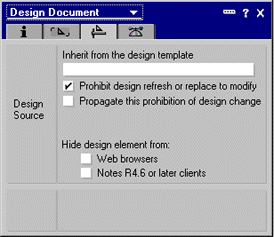
- On the third Design tab, select the "Prohibit design refresh or replace to modify" box. (This will prevent future upgrades from accidentally deleting this design element.)

Adding your page to the Welcome page dropdown list
Now, you need to add the custom Welcome page to the dropdown choices for the user. This requires that you use the Advanced Configuration Editor, which you turn on by running an agent. While end-users can edit most of the default Welcome pages by clicking the Options button, they are not allowed to change the "Basics" Welcome page. The Advanced Configuration Editor allows you both to change the "Basics" Welcome page, and to change the order of the pages in the dropdown list.
To turn on the Advanced Configuration Editor in your Bookmark database:
- In Domino Designer, open your customized bookmark.ntf and navigate to the agents list.
- Select the (Toggle Advanced Configuration Editor) agent, and choose Actions - Run. Designer prompts you that the Advanced Configuration mode has been turned on. If you do not see this prompt, try running the agent again.
- Return to the Notes client and open your customized Bookmark template.
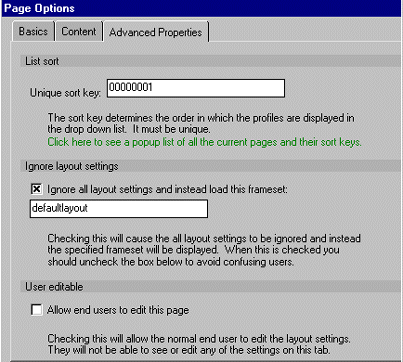
You can now edit the advanced options for all Welcome pages, including the "Basics" page, by clicking the Options button. (You may have switch to another Welcome page before you'll see the Options button on the "Basics" page.) When you click the Options button, you'll notice a new Advanced Properties tab:

The Advanced Properties that you can specify include:
- List Sort - This controls the sorting of the Welcome pages in the dropdown list. When new pages are created, Notes generates the new sort key by first retrieving the key of the last page and then adding 100 to it.
- Ignore Layout Settings - This allows you to override the frameset layout and contents, and to specify a completely different frameset to load instead.
- User Editable - This is a checkbox that determines if end-users (those with the Advanced Configuration mode turned off) can edit the settings of the current Welcome page. When de-selected, it makes the Options button unavailable to the end-user.
To add your new Welcome page to the dropdown list:
- Go to the Notes Welcome page.
- Choose "Create new page style..." from the Welcome page dropdown list.
- Enter a name for your new Welcome page.
- Click the Advanced Properties tab.
- In the "Unique sort key" field, enter 00000000.
- Select the "Ignore all layout settings and instead load this frameset" checkbox. Then, enter "KatzkorpWelcomeFrameset" in the field.
- De-select the "Allow end users to edit this page" option.
- Click OK.
Drum roll please... Tah dah! Your new custom Welcome page should load in the Welcome frameset.

However, this is just the template. You should now try it out in your own Bookmark file. This is pretty simple. Just shut down all clients (Notes, Designer, and Administrator), delete your bookmark.nsf (be careful not to delete the bookmark.ntf template you just created), and then restart the Notes client. Notes will automatically create a new bookmark.nsf from the template, and it will display it on startup. If all went well, you should now have the Katzkorp Welcome page as your default Welcome page, and the Options button should not be available -- this is what your end-users will see.
Adding the template to new installs
There is a standard mechanism for adding custom files to new installs, but this is broken and not scheduled to be fixed until R5.0.2.
In the meantime, you can add the new file by following these steps:
- Install Notes or upgrade the client to a new release, but do not launch the client.
- Delete the standard Bookmark template (bookmark.ntf) from the Notes data directory.
- Now, add your custom Bookmark template to the Notes data directory.
- Launch the client to complete the install.
For 5.02 and later, follow these steps:
- Create a text file in the installation directory, and name it COPYFILE.TXT.
- Add the following line to the file:
BOOKMARK.NTF DataDir COPY
Maintaining the design for future upgrades
When your Notes clients get upgraded in the future, you should have no problems with your custom Bookmark template -- assuming that you selected the "Prohibit design refresh or replace to modify" field in the design properties. (Step 12 in "Creating the frameset") Therefore, you can use the standard Notes Install program or Incremental Installer without worry. The client will be upgraded properly without losing your custom features.
Fresh Notes installs or upgrades from R4.x will require the latest bookmark.ntf design. Therefore, if you are installing a fresh R5.0.2 client, you can't replace the bookmark.ntf with the same custom file you used for R5. Instead, you must incorporate your custom features into the new template.
To incorporate your modifications into future bookmark.ntf designs:
- Before upgrading your client to the latest release, rename your bookmark.ntf to bookmarkcust.nsf.
- Upgrade your client to the latest release.
- In Domino Designer, open bookmarkcust.nsf.
- Choose File - Database - Replace Design.
- Select the Bookmark entry from the list.
- De-select the "Inherit future design changes" field.
- Click OK.
- Rename the bookmark.ntf to bookmark.bak.
- Rename the bookmarkcust.nsf to bookmark.ntf.
Now, you can replace the bookmark.ntf in the new installs and upgrades the same way as described previously.
Ideas for your new Welcome page
There are all sorts of things you can put on your new Welcome page, and because it lives on the server, updates and changes are easy. With the power of R5, the options to place helpful things on your custom Welcome page are unlimited.
Some ideas include:
- Links to important company databases or Web pages
- A link to help-desk applications, or text displaying the help desk phone number
- A view in a discussion database
- A "news ticker" -- using timed tables, display rotating company news headlines that link to full news stories
- Buttons to compose expense reports, time sheets, vacation requests and other frequently used company forms
- Display a "Did you know..." or tip of the day
ABOUT THE AUTHOR
Damien Katz joined Iris in 1997. He is has been primarily a template developer responsible for the Welcome Page, Statistics & Events and several other templates. Prior to joining Iris, Damien did Notes and Domino consulting in the Charlotte, NC area. When not working, he spends time with his wife Laura, plays basketball, lifts weights and runs his off-color humor Web site. |