 |
by
Ken
Yee


Level: Advanced
Works with: Designer 5.0
Updated: 06/02/2000

Inside this article:
Understanding projects and packages
Creating a servlet
Debugging with ServletRunner
Understanding data file locations
Exporting to a JAR file
Deploying the JAR file on Domino
Creating a servlet that accesses Domino classes

Related links:
IBM VisualAge product page
VisualAge Developer Domain
Java servlets: Extending your Domino applications
IBM Redbook: Using VisualAge for Java to Develop Domino Applications
Sun's Java Servlet API page

Get the PDF:
 (364 KB) (364 KB)


|  |
With Domino R5, you can add Java servlets that call Domino backend classes, extending the range of possibilities for your applications and Web sites. To develop these servlets, you can use a number of different tools. However, IBM VisualAge for Java provides an extremely productive environment for developing and debugging Java servlets that can be easily deployed in Domino R5.
VisualAge for Java is a powerful development environment. Here are some of its key features:
- You can debug a servlet directly. For example, you can set breakpoints in your source code, view variables, step through your code, and so on.
- There is automatic versioning of the servlet's methods with VisualAge's built-in source control system.
- Your Java code is automatically compiled every time you save a method.
- You can improve code organization by grouping your Java code into projects.
- You can debug servlets that directly access the Domino Java API.
- You can easily export your servlet and related classes into a JAR file.
Because VisualAge's Integrated Development Environment (IDE) is radically different than traditional file-based IDEs, this article starts by leading you through the setup of the Standard Edition of the IDE so that you can develop servlets with VisualAge. It then describes how to create a servlet project, debug it, and deploy it in Domino R5. Finally, it shows you a servlet that uses the Domino Java classes to access information in a Notes database.
This article assumes you have some knowledge of Java. Familiarity with Domino R5's Java classes and the Sun Java Servlet Development Kit would also be helpful. This article was developed using VisualAge for Java 3.0 and the Sun Java Servlet Development Kit (JSDK) 2.0.
Understanding projects and packages
Before getting started, you need to understand what VisualAge means by projects and packages.
Projects help you organize your Java code. You organize interrelated Java packages and code into projects. Additionally, you can add projects to classpaths of classes that you can run from the IDE, which will be critical when debugging your servlets.
Packages are analogous to Java packages. They are used to organize Java classes and can be thought of as subdirectories in which to place class files. You can create packages within a project. For example, in the Workbench screen below, javax.servlet is a Sun servlet package in the Lotus libraries project.
Each project can have a Default package; classes you place in the Default package are at the "root directory" when they are referenced. You will see why this concept is important later when you try running servlets under the debugger and on Domino.
The following screen shows how the first project I'll create in this article appears in the VisualAge 3.0 workspace, or Workbench. I put all my tools under the KEY Solutions project. There is a Default package and a com.keysolutions.tools package under that project.
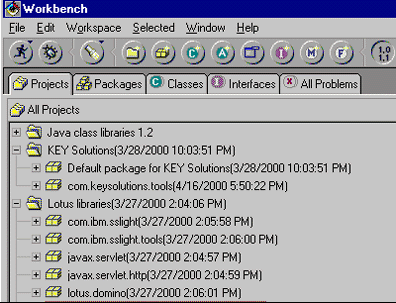
Notice that Sun's Java Servlet Development Kit (JSDK) along with Domino's Java classes have been imported into a project named Lotus libraries. The following section explains how to do this.
Importing the JSDK into VisualAge
VisualAge for Java Standard Edition does not have servlet or Domino support bundled in, but they are easy to add.
- Create a new project by clicking the New Project icon in the toolbar.

- Name the project Lotus libraries.
- Choose File - Import.
- Specify the jsdk.jar file as the source. Domino R5 currently uses version 2.0 of the JSDK and includes this jsdk.jar in your Domino (or Notes) directory.
Note: You can download any 2.x version from Sun's Java Servlet API page. The latest JSDK version is 2.2, however, if you use a different JSDK version than that provided with Domino, procedures and results may be different than those described in this article.
Use the same method to import the Domino Java classes, which are in the Notes.jar file in your Domino (or Notes) directory. This JAR file contains the classes needed to access files on a local server. You will need these to access Notes databases directly from a servlet.
Additionally, if you want to access remote servers, you will need to import the NCSO.jar file, which is in your \data\domino\html\java directory.
A word about the Default package and servlets
The Default package conceptually puts the servlet in the "root" directory when referencing it. This means that if you have a servlet named MyServlet in the Default package, you can reference it directly with a URL such as http://localhost:8080/servlet/MyServlet. If you put it in a package named com.keysolutions.tools, the URL that you use to invoke it would be http://localhost:8080/servlet/com.keysolutions.tools.MyServlet.
Why use something besides the Default package? The Default package is perfect for doing a quick test and trying out your first servlet. However, you will soon find that your servlet names start conflicting because they are all in the root directory. If you decide to sell your servlet commercially, you'll also find that people prefer that you put your servlets in a separate package so that your class names do not conflict with another company's.
The disadvantage of not using the Default package is that during debug in VisualAge for Java, you will have to reference the servlet along with the package name for testing, for example: http://localhost:8080/servlet/com.keysolutions.tools.MyServlet.
Creating a servlet
To understand how the IDE works, you can create a simple servlet. You can place a servlet in an existing project and package or specify a new project and package. In this case, you can specify the new project KEY Solutions and the new package com.keysolutions.tools when you create the class for the new servlet.
- Click on the New Class icon in the toolbar.

- Type KEY Solutions as the Project, com.keysolutions.tools as the Package, and Hello as the Class name.
- Specify javax.servlet.http.HttpServlet as the Superclass because the new servlet class derives from that class.
- Select the "Browse the class when finished" checkbox so that you can specify the packages to import next.
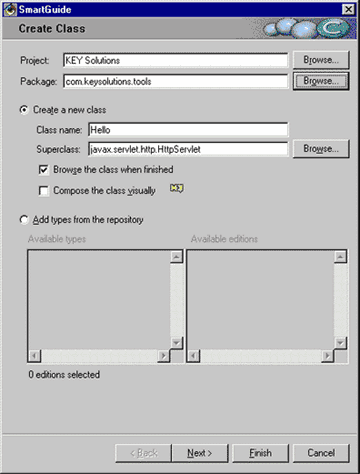
- Click Next to move to the Attributes page where you specify the packages to use in the servlet.
- Use the Add Package button to specify the java.io, javax.servlet, and javax.servlet.http packages.
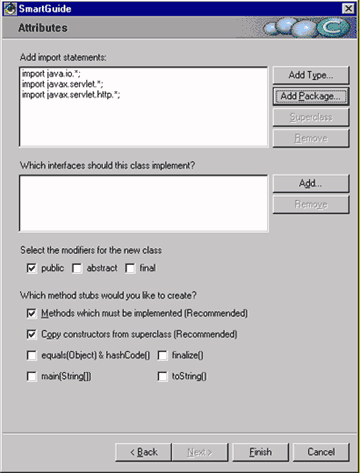
- Click Finish to create the project, package, and class.
Because the "Methods which must be implemented" checkbox was selected, the Hello() method and service() method are generated automatically. However, in this case, you should remove the service() method so that it does not conflict with the service() method defined in the servlet's superclass.
- Select service(SerletRequest, ServletResponse) in the list of methods.
- Press Delete and confirm the deletion.
Now, add the doGet() method to the class.
- Select the Hello class and click the New Method icon in the toolbar.

- Specify void doGet(HttpServletRequest req, HttpServletResponse res) in the text box.
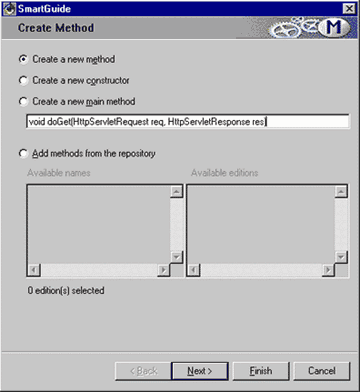
- Click Next to move to the attributes page where you specify the attributes for the method you are adding.
- Select public under Access Modifiers.
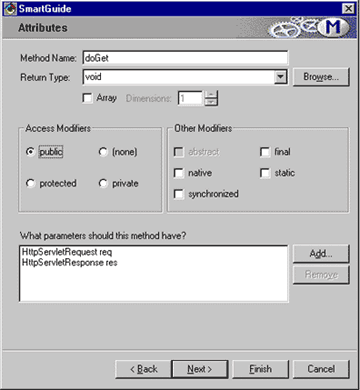
- Click Next to see the next Attributes page, where you can specify the exceptions the method should throw.
- Click the Add button to add ServletException and IOException as the exceptions.
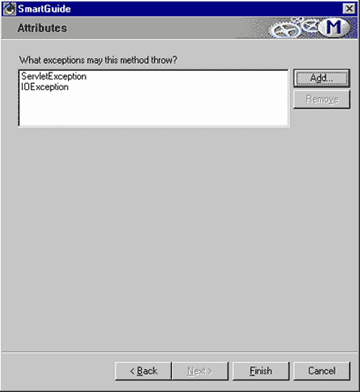
- Click Finish to complete the method.
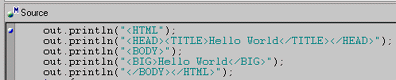
Now you can enter the code for the Hello servlet in the doGet() method, as shown below. You can either use the Source pane in the Workbench window or double-click the method to open its window and use its Source page.
public void doGet (HttpServletRequest req, httpServletResponse res) throws
javax.servlet.ServletException, java.io.IOException
{
res.setContentType("text/html");
PrintWriter out = res.getWriter();
out.println("<HTML>");
out.println("<HEAD><TITLE>Hello World</TITLE></HEAD>");
out.println("<BODY>");
out.println("<BIG>Hello World</BIG>");
out.println("</BODY></HTML>");
out.close();
}
When you save your changes by pressing CTRL+S, VisualAge will automatically compile your Hello class and inform you of any syntax errors. This is a convenient feature because it gives you instant feedback about any errors in your code.
Debugging with ServletRunner
The JSDK includes ServletRunner, which acts as a standalone Web server that only understands how to serve up servlets (that is, it cannot serve up HTML). ServletRunner lets you test the servlet without actually moving it to a Web server.
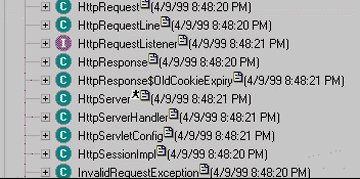
ServletRunner is a Java application with a classname of HttpServer. You will find it under the sun.servlet.http package. Notice that the HttpServer class has an icon of a running person. VisualAge for Java uses this icon to indicate that you can run this class from the IDE.
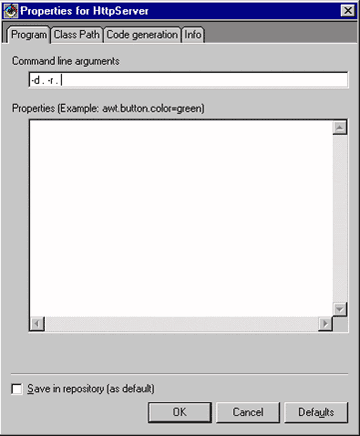
Setting the class path for ServletRunner
Before you try running and debugging the servlet, you have to set the class path for the class. I suggest setting the document root and servlet root to "." to make it easier to locate program files later. (This overrides the default document root, which is .\example.)
- Locate the HttpServer class under the sun.servlet.http package in the Lotus libraries project.
- Right-click HttpServer and choose Properties to see the class properties.
- On the Program pate, set the document and servlet roots to "." by typing -d . -r . in the Command line arguments text box. (Be sure to leave a space before the periods.)
By default, the ServletRunner's project path is included in the class path. Because the servlet you have created is in another project, you have to add that project to the class path. Then ServletRunner will be able to find your servlet and any classes it may require.
- Click the Class Path tab and click the Edit button under Project path to see a list of projects.
- Select the KEY Solutions project and add it to the Class Path.
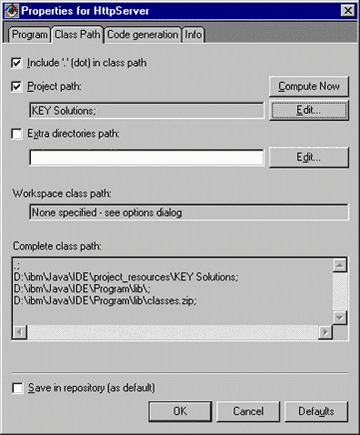
- Click OK.
Running ServletRunner
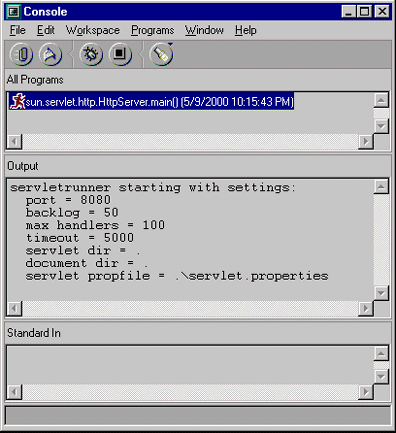
Now run ServletRunner by selecting HttpServer in the list and clicking the Run icon on the toolbar.

You will see ServletRunner start up and print out status messages in the VisualAge Java Console similar to those in the screen below.
Finally, using your browser, invoke your servlet using its URL. Since you created the servlet in the com.keysolutions.tools package, use http://localhost:8080/servlet/com.keysolutions.tools.Hello. (If you created it in the Default package, you would use http://localhost:8080/servlet/Hello.)
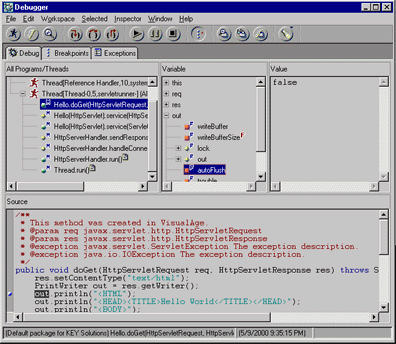
Setting breakpoints and debugging
You can set breakpoints in your servlet code by double-clicking in the gray gutter that's located to the left of your source code. The breakpoint appears as a shaded ball in the gutter, as shown below.
During debugging, when VisualAge for Java hits this breakpoint, you can examine variables by returning to the Workbench and right-clicking the selected variable in the source code panel or by opening the Debugger and looking at the Visible Variables, as shown below.
And the best part is that you can edit the code in your servlet and continue without restarting anything. All you have to do is change the code, save the code in the Debugger window, and then return to the browser and click the refresh/reload button; the compiled code runs again.
Understanding data file locations
It is not always obvious where a servlet's home or root directory is. When you run a servlet under the ServletRunner, the data files are in the ServletRunner's VisualAge for Java project directory (for example, \visjava\ide\project_resources\Lotus class libraries), and the file I/O in your servlet will default to this directory.
A quick way to test this is to create and write a file from within the servlet with a unique name; you can then search for this file to find out where the servlet's root directory is.
Alternatively, you can use the getRealPath() method to download any resources to the servlet. The getRealPath() method will return the ServletRunner's project directory because this directory is where the ServletRunner runs from.
Data file location in Domino is similar to what you find when running your servlet under the ServletRunner, that is, the servlet's root directory is the same as the executable for the Web server. With Domino, this is where the executables and program files for Notes/Domino are, that is, the Notes or Domino directory. If you use the getRealPath() method to download resources to the servlet, the servlet's root directory is where the HTML files for Domino are, that is, the Domino\html directory where the static Web pages start from.
Exporting to a JAR file
Now that you've successfully debugged a servlet under the VisualAge for Java IDE, you are ready to deploy it. You can either deploy it as a class file or a JAR file. If you deploy it as a class file, you specify a directory and VisualAge for Java exports all the class files for the servlet to that directory.
It's typically easier to distribute a servlet using a JAR file, however. Using a JAR file also allows you to sign the JAR file for security purposes and compress it to save space.
- Right-click the servlet's classname in your project and select Export.
- Select Jar file and click Next.
- Ensure that only .class is selected. Normally only the .class files are needed. The .java files are source code, which you normally don't want to include. The .resource files and .beans are also normally not needed in Java servlets running under Domino.
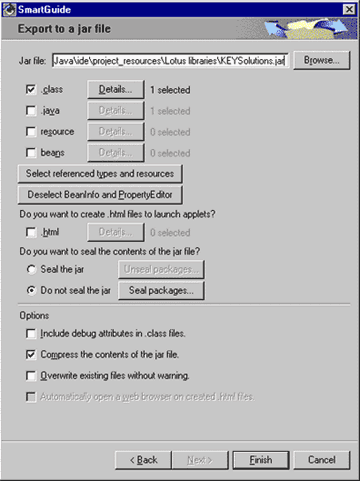
- If you use any other class files that are not on the server already, it is useful to click the "Select referenced types and resources" button. VisualAge for Java will then include all classes that are used by your servlet.
Note: This button usually also includes the JSDK and Domino classes, which are normally on the server already. To prevent this duplication, click on the Details button and deselect the Lotus Classes project before clicking the "Select referenced types and resources" button.
- Click Finish to export the servlet files to the JAR file.
Deploying the JAR file on Domino
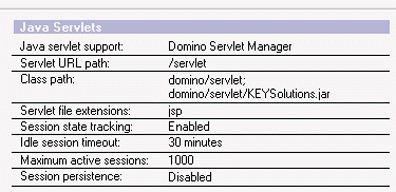
Servlet JAR files should be deployed into the standard \data\domino\servlet directory. Domino will not search JAR files automatically, but it will look in .class files automatically. Therefore, after you have placed the JAR file in the directory, you must add the JAR file to Domino's class path. You can do this in the Domino server's Web Server Configuration document.
- In Domino Administrator, open the Web Server Configuration document for the Web server.
- Go to the Domino Web Engine page of the Internet Protocols page of the document.
- In the Java Servlets section, check that Java servlet support contains Domino Servlet Manager.
- Add the Class path for the JAR file, for example, domino/servlet/KEYSolutions.jar.
Understanding Domino's servlets.properties file
If you want to pass arguments into a servlet or want to rename the servlet in the URL, you must use the servlets.properties file. The servlets.properties file is a standard file used to configure servlets with initial arguments and to set up aliases for servlets.
Here is an example that sets up two initial arguments and renames the servlet so that Web users see its name as http://<website>/servlet/myhello.
servlet.myhello.code=keysolutions.tools.Hello
servlet.myhello.initArgs=arg1=1,arg2=3
Creating a servlet that accesses Domino classes
Now that you've deployed a simple Hello servlet, you can take advantage of the Domino Java class support to create a servlet that accesses a database. The Java classes are similar to the Notes classes in LotusScript or the C++ API.
Here is a servlet that you can create in VisualAge for Java that shows the entire contact list from your local address book. Notice how simple it is to access the Domino Java classes.
import java.io.*;
import javax.servlet.*;
import javax.servlet.http.*;
import lotus.domino.*;
/**
* Simple servlet to demonstrate showing all the contact names in your address book
* Creation date: (5/9/2000 10:42:17 PM)
* @author: Ken Yee
*/
public class ShowNames extends HttpServlet {
/**
* ShowNames constructor
*/
public ShowNames() {
super();
}
/**
* Process request...this is where we do our real work
* Creation date: (5/9/2000 11:13:40 PM)
* @param req javax.servlet.http.HttpServletRequest
* @param res javax.servlet.http.HttpServletResponse
*/
public void doGet(HttpServletRequest req, HttpServletResponse res)
{
try {
// initialize Notes access and get the Contacts view in your local address book
NotesThread.sinitThread();
Session s = NotesFactory.createSession();
Database db = s.getDatabase(null, "names.nsf");
View vw = db.getView("Contacts");
// set up HTML output format
res.setContentType("text/html");
PrintWriter out = res.getWriter();
out.println("<HTML");
out.println("<HEAD><TITLE>Contact List</TITLE></HEAD>");
out.println("<BODY>");
// loop through each person document
Document doc = vw.getFirstDocument();
while (doc != null) {
out.println(doc.getItemValueString("FirstName") + " " + doc.getItemValueString("LastName") + "<BR>");
doc = vw.getNextDocument(doc);
}
// finish off HTML document
out.println("</BODY></HTML>");
}
catch(Exception e) {
// print out errors to console and servlet Log (servlet Log output goes to Notes log)
e.printStackTrace();
getServletContext().log("Error: " + e.getMessage());
}
finally {
// clean up Notes
NotesThread.stermThread();
}
}
}
A word about DIIOP and accessing remote server access
One thing to be aware of is that if you access another server besides the one the servlet is running on, the remote server will have to have the DIIOP task loaded. This server add-in task is needed for the servlet to access any Domino classes that run on a remote server. You can load this manually on the Domino console using load DIIOP, but the best way to do this is to add it to your ServerTasks line in your NOTES.INI file on the server.
Additionally, to access the same database on a remote server requires a simple change to the line:
Database db = s.getDatabase(null, "names.nsf");
The line needs to include the remote server's name as the first parameter, for example:
Database db = s.getDatabase("Server1/MyCompany", "names.nsf");
Finally, remember that to access a remote server, you should have imported the NCSO.jar file into VisualAge, as described earlier.
Conclusion
Java servlets in Domino R5 open up a whole new world of possibilities for your applications and Web sites. VisualAge for Java is a great environment for creating and debugging them, and deploying them in Domino is a simple task.
ABOUT KEN
Ken Yee has been a Lotus Business Partner since the inception of the program. His company, KEY Enterprise Solutions, has done Notes, Domino, IIS/ASP, Java, ActiveX/COM, and C++ development and administration projects for Lotus, Inso, Logica, Global Telemedix, and eVelocity. KEY Enterprise Solutions maintains the Notes/Domino FAQ (the first Notes FAQ on the net) as a service to the Notes community and the Java Servlet FAQ for the Java community.
|