 | 
by
Russ
Lipton


Level: Beginner
Works with: Notes 5.0
Updated: 07/01/1999

Inside this article:
Creating a memo
Using separate addressing
Preparing the memo
Sending the memo
Setting mail filter rules
Other Notes mail goodies

Related links:
Notes R5: Into the future with Internet standards
Notes 5 Help
Notes R5 Technical Overview

Get the PDF:
 474Kb 474Kb


|  | E-mail is probably the killer app of all time. And in Notes R5, mail has the features and flair of a champ.
Notes R5 mail takes the best features of cc:Mail and combines them with Internet mail functionality. Those of you familiar with cc:Mail will welcome the separate address headers, faster type-ahead addressing, and mail rules for filtering messages as they arrive. Also, those of you who blended use of Notes and an external Internet mail program will now live entirely within Notes itself, gaining even more leverage from the entire environment. For example, the new Universal Inbox feature enables you to collect mail together from varied sources (IMAP or POP3, for instance) using the new Account document. You can also send and receive HTML-viewable messages within Notes. For more details on using Internet mail in Notes R5, see the article "Notes R5: Into the future with Internet standards."
In this article, we'll tour the Notes R5 mail interface and some of its basic features. We'll work through the process of composing and sending a memo, including such tasks as copying an existing memo into a new one, and using separate addressing, highlighting, spell checking, and print preview. We'll also show you how to create a mail filtering rule. For in-depth information on using the Notes R5 mail features, see the Notes 5 Help.
A quick peek at the interface
Accessing your mail in Notes R5 is as easy as clicking on the Mail bookmark in the Bookmark bar, or clicking the Mail link on your opening Welcome page. As you'll then see, the Notes mail interface is now frames-based with a new look-and-feel:
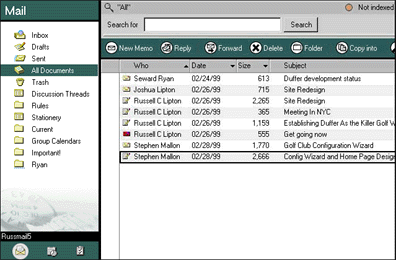
As in R4.x, your folders and views are in the left frame, while the documents in the selected view display to the right. However, in contrast with R4.x, a search bar and action bar float useful functionality to the top. You can display and hide the search bar by clicking on the Search button (Magnifying glass) in the top-right corner of the Notes interface. You can also close the search bar by clicking on the X button (above the More tab on the search bar).
Notice that the search bar now shows you whether the database is full-text indexed. You can create an index by clicking the More tab, and clicking Create Index. Then, you can access advanced search features and increase performance for searches within your mail file.
You can access the actions in both the action bar in the right frame, as well as in the Notes menus. One new aspect is that the action bar now includes pop-up action buttons for working with your mail. For example, when you click Reply, you can then select from the pop-up menu to Reply, Reply with History, Reply to All, or Reply to All with History.
Finally, notice that you can also switch quickly between your mail, calendar, and to do list by using the switchbar in the lower left frame. (For more information on the mail interface and the design decisions behind it, see "R5 template graphics: The high resolution revolution.")
Creating a memo
Let's assume that you need to send an e-mail to the members of your team discussing the design of your Web site. Instead of starting from scratch (by clicking New Memo), you can base the memo on some previous messages that you've already exchanged on the subject. But which ones? To flush them out and create the memo, do this:
- Select the appropriate folder or view for conducting the search (in this case, the Sent view).
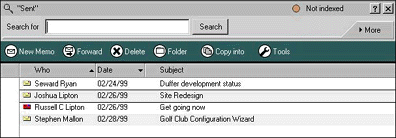
- Enter the word “design” into the “Search for” field and click Search.
This surfaces two documents:

- To use one of these documents (such as the "Golf Club Configuration Wizard" message) as the basis for your memo, first deselect the document that is irrelevant.
- Then, click “Copy into - New memo.”
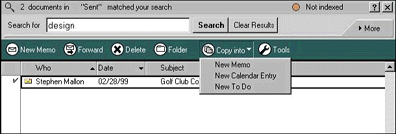
Notes creates a new memo, copying the text into the body of the mail message and preserving the addressing of the original message (that is, you get the same To, cc, bcc, and Subject information). Notice that you can copy documents into your mail, your calendar or to do list, retaining both addressing and content for each new entry.
Using separate addressing
Right away, you'll notice that mail addressing is now separated from the text of the document in a new non-scrollable region:

Other enhancements include support for rapid type-ahead addressing, with quicker identification and display of the first name instance match across directories. You can also use the up and down arrows for fast cycling through a set of similar names (once you get “Lipton,” you'll find the rest of us quickly).
In addition, you can use the address book directly. To do this:
- Click the Address button, which is available on the action bar when you are creating a new memo.
- Select the address book to look in.
- Add address book entries to the recipients list by selecting them in the left pane, and clicking the To, cc, and bcc buttons to transfer them to the appropriate address line (To, cc, bcc).

- Click OK.
From within your memo, you can also conveniently add any or all of the recipients as a new group in your address book by choosing Actions - Add Recipients - to New Group in Address Book. This way, addressing the message the next time will be easier -- you can just use the group name. (Note: You must save the message first by choosing File - Save.) The following "Add recipients to new group" dialog box displays, where you can enter the group name and type, and select the members for the group itself:
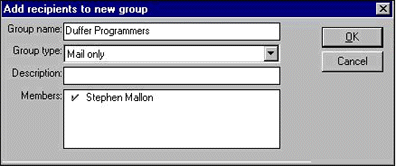
You can also add recipients to a new group by selecting multiple mail messages in any view, and choosing Actions - Add Recipients - to New Group in Address Book. Notice that you can also choose Actions - Add Recipients - to new Group Calendar entry.
Preparing the memo
There are many text creation and editing enhancements in Notes R5, and one of the exciting new features for your mail is the highlighter. In addition to using the permanent pen feature, you can now use the yellow, pink, or blue highlighter to add emphasis to your memos.
To use highlighting:
- Choose Text - Highlighter - Use <color> Highlighter.
- Drag your mouse from left to right over the text to highlight it.

To add the final touch to your memo, you can include a signature at the end of it. To do this:
- Click Tools - Insert Signature.
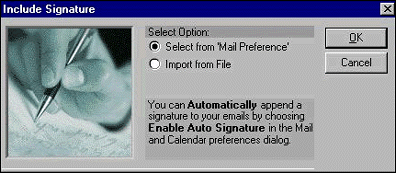
Notice, as the "Include Signature" dialog box suggests, you can also automatically append a signature to your memos by choosing Enable Auto Signature in your Mail preferences. (We'll look at this more later in the article.)
- Select "Import from File," and select your signature file. For example, my HTML file includes a company logo and some text:

Now, for a truly amazing Notes development: print previewing has come to Notes Mail (and other documents too, of course). To review the way your memo will look if someone should print it, choose File - Print and click Preview from the Print dialog box.
Sending the memo
Both the "Send" and "Send and File" actions are available from the action bar. So, to send the memo, you can just click Send. But wait, what's this?
 Notes R5 now includes an automated spell checker, which you can enable in your mail preferences to execute whenever you send a memo. (Click Tools - Preferences, and select "Automatically check mail messages for misspellings before sending.")
Delivery options are also easier to use. The new Delivery Options dialog box collects together the Delivery Options and Special Options of R4.x, and puts them in one place. On the Basics tab, you can make the “signed” or “encrypted” option for this particular memo the default for future messages (you can later deselect this in a future memo). It also gives you another location from which to enable or disable the automatic spellcheck capability.
 The Advanced tab offers workflow administration options (stamping a message with a 'Please reply by' date, adding an expiration date for the message, and specifying whom replies to this memo should be addressed to) and Internet message format settings. You can select dates by using the calendar picker, and select a wide range of MIME character sets for Internet messages. For example, the following screen requests a reply to this e-mail by 3/12/1999 and authorizes archiving of the message after 6/12/1999:
 Setting mail filter rules
cc:Mail users have long been familiar with the power and flexibility that comes with the ability to define filtering rules for their incoming mail. You can now do this directly within Notes Mail.
Let's say that you want to add a rule that changes the importance of messages that you receive from your boss (Seward Ryan) so that they are always "Important." To define a new rule or edit an existing rule:
1. Select the Rules folder. This displays a view of any existing rules:

2. Click “New Rule.”
3. In the "Create condition" fields, select "sender" and "contains." Then, enter the name, "Seward Ryan."
4. Click Add to add the logic to the rule window. (You could add additional conditions one at a time from the rule options, but this is enough for this rule.)
5. Under Specify Actions, select “change importance to” and “high.”
6. Again, click Add.
7. Then, under Specify Actions, select “move to folder” and click Choose Folder to select a folder. In this case, select "Ryan."
8. Again, click Add. Notice that the logic is now "ANDed." This rule will change the importance AND move any mail from Seward into a folder named “Ryan.”

Other Notes mail goodies
There are a number of ways you can take added control over your mail environment to tweak it “just so” for your working requirements, or otherwise take advantage of the new Notes R5 interface.
In general, set your preferences by clicking Tools - Preferences. As already mentioned, you can enable or disable automatic spell checking on the Mail/Basics tab. This is also where you can specify the owner of the mail database. The Mail/Letterhead tab gathers together your new-and-improved letterhead options. Finally, on the Mail/Signature tab, you can automatically append your signature to outgoing e-mail messages. Again, it can be text or a file:
 The Delegation/Mail Delegation tab nicely integrates with other preferences. Here, you can select a person from the address book who can manage your mail and calendar.
 Finally, you may want to turn on the new Notes Minder utility, which is a small, separate application. This will alert you in your Windows 95/98/NT system tray of new mail as it arrives. Cool.
Conclusion
The bottom line with Notes Mail in R5 is the same one we began with in the top line: you no longer have any reason to use another mail program, ever. You get cc:Mail and Internet mail features together, all within the powerful, new Notes R5 mail interface.
Even better, you don't need to think in terms of Notes mail and Internet mail. It's just mail. It doesn't matter where your mail comes from or where it goes, or what protocols or formats are required. Notes can handle it all. Combined with the vast improvements in browsing, searching and displaying HTML documents and the implementation of numerous Internet protocols natively, Notes users now have the best of both worlds. |